Evaporator - you can put it in a bucket of water, blow compressed air into it and see if you see any bubbles come out. Might want to plug one of the tubes and get a good seal around your air nozzle to do a true test. I don’t know how much PSI they are supposed to handle, but I wouldn’t overdo it. You can also take it to a radiator shop, if you have such a thing in your area, to have it tested and/or repaired.
Vacuum pods - either a handheld vacuum pump like the Mityvac, or in a pinch you can put it up to your mouth and suck on the nipple (for lack of a more accurate term) to see if the arm moves inward. Then hold the vacuum pressure for a few seconds and see if the arm stays in place (good) or slowly moves back out (bad).
I just did mine. Mine is 67 with AC so should be same as yours. What I found is that you need to at least loosen the blower motor to get the heater box to drop easily. It will have one speed nut on fire wall engine side. And it will have one 3/8 sheet metal screw going straight up into the dash. Be careful that stuff is fragile fiberglass and will break easily.
While you have it out, you mentioned some rust around the air intake… I believe that will be your cowl. You with your car at normal stance, you should pour some water into your cowl vent and see if it is leaking. You will see it dripping inside the car around that opening if it’s bad. Most will as the sealer gets dry and they didn’t treat that cowl metal for rust at factory. If it’s leaking get the cowlvent repairkit WCCC sells and use it. It works pretty well.
As far as the evaporator, I am having trouble taking off one of the lines, I do not to twist the copper end, but I feel I feel like I need to get this line off before I put the the heater box back together. I have tried penatrating oil and heat.
Don, great job. Even though I did mine three weeks ago I watched your video so I could remember how much fun it all is. And as usual learned something…I’m glad you included some tips on console as well.
The new evaporators are “high performance” which means they figured out how to get more coils packed into a small area. This sounds great but to achieve this they used thinner material and they often fail within 3 years.
Thanks for the video Don,
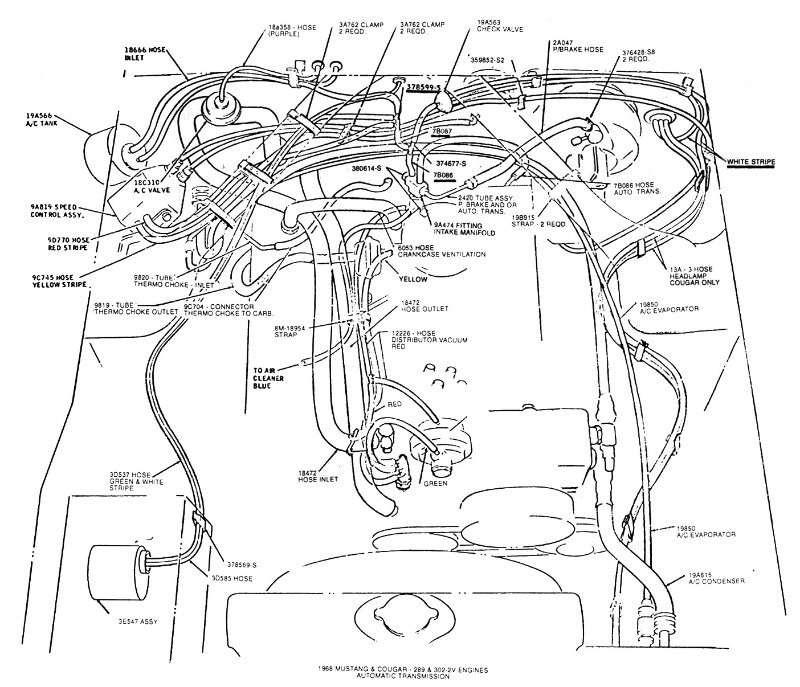
My car came from California, and the heater core was bypassed. Is there a diagram that shows how the to run the heater hoses to the valve, heater core and engine
Basically, this diagram shows that the hose from the water neck on the intake manifold goes to the left (or passenger side) port of the A/C valve, and the hose from the water pump goes to the right (or driver’s side) port on the heater core, presumably running through the bracket on the carb to warm up the choke if you have the original Autolite 2100. Then you have that short separate hose that connects the right port on the A/C valve to the left port on the heater core.
So I needed up taking out the blower motor. I emended upbreplacing the foam on the vent door the vent door was sticking)and replaced the bad vacuum actuator. It does not make sense not to check the blower motor since you are right there.
Awesome video, Don. Thank you.
There are many vacuum hoses running around under the dash, associated with the heater and the A/C. Is there a “schematic” someplace that shows the source and end points of each lose. Half of mine are missing/rotted away.
Something else to watch. The blower motor runs backwards if the polarity is not right. It blows some air but not nearly as much as when it rotates the correct direction. My Cougars prior owner replaced the blower and reversed the polarity. If all is original the plugs will keep in correct but if anyone has messed with it be careful. You don’t need it disassembled to check it if you suspect it reverse the polarity on the blower you will get a change in air flow.
I’m following your video on removing the heater box for my factory air
67 Cougar. You had mentioned briefly in your video that your
particular car was missing a floor center air diffuser which is
attached to the blower box. I have that diffuser, and I got the two
push pins out of the front facing the shifter. But its still attached
on the left side and I can’t feel or find that attachment point. You
also mentioned about removing the blower box bolts so it can move to
the left a couple inches to make room for getting the heater/A/C box
out.
I have removed the nut on the bolt that goes thru the firewall, but
the motor box is still attached. Any ideas on where the attachment
points or bolts are for that heater diffuser and the blower box?
Perhaps this is a topic to splice into your excellent video about
removing the heater box.
MaY I suggest a video showing a slow rotation of the heater box, and also the blower box, so that we can see some of the more hidden attachment points when it is in place.
On the floor vent piece, it’s shown more clearly later in the video during the reassembly phase. There is one more of those push fasteners on the back side on a short metal bracket, which clips the vent to the blower housing itself. Since you have the front two fasteners out, you should be able to wiggle the vent down off the blower housing, then give it a light tug towards you. That should pop that third clip out.
Here’s a pic of the back side, to give you an idea for where that third clip is:
For the blower housing, there are just two fasteners that hold it to the car. You got the firewall nut, so now you just need to get the bolt that holds it to the underside of the dash. Look for the metal “L” bracket towards the top, driver’s side. As seen here, right next to the red resistor at the top:
You may also want to pull the rubber accordion-like piece off of the center vent in the dash, depending on how much you’re trying to shift the blower housing over. Hope that helps!
Thank you I did use it and had two bad actuators. I have the system together and need to check my vacuum connections. Only one of the actuators are working or getting vacuum.
I so have heat.