Nice work! The rechromed window frames look great.
I’d be worried about the white dash pad. I think it will be very distracting when you’re driving around in the sun - seems to me that it would reflect in your windshield pretty noticeably.
Nice work! The rechromed window frames look great.
I’d be worried about the white dash pad. I think it will be very distracting when you’re driving around in the sun - seems to me that it would reflect in your windshield pretty noticeably.
The plan is to get a dash cover for driving if the parchment proves too reflective in the windshield. The original plan had been to have the dash pad aqua, but I think I forgot to tell the trim shop that. My wife likes the look so we’ll try it this way first.
Work is moving along on B3Cat. Here are the latest progress pictures:
The first one is with the engine out of the car and having a clear view of the back of the head showing the matching VIN.


The engine was originally detailed while still in the car, shortly after it first arrived. This shot shows it before being cleaned up and detailed to go back in now that the engine compartment has been cleaned and repainted.


The new trunk lid arrived from California and was absolutely perfect. It needed nothing but sanding and a coat of primer. This week has been a flurry of UPS deliveries from Mustangs Unlimited and CJ Pony Parts. The new heater core and heater box seal kit, A/C thermostat and other small items arrived this week. The next day saw the arrival of the new leaf springs, shackle and U-bolt kits, and mounting bolts along with the front upper ball joints, lower control arms, and shock absorbers all around. I was able to get the shocks, lower control arms, and ball joints from my wholesale supplier so that saves some money.
Due in this week are the new lowering front coil springs (CJ Pony Parts) and the refurbished A/C evaporator (Original Auto Air).
The 15" Cougar styled steel wheels (WCCC) and BFG tires (my wholesale supplier) came a while ago but I finally dropped them off at an old-school tire store that has the right fittings to do lug-centric balancing.
Dave created a template for installing the vinyl top trim pieces, since this car didn’t have one from the factory. If any of you need something like this, let me know. Dave told me he’ll probably put the template up on eBay once he’s done with my car.
B3Cat will be getting painted this weekend, so we’re getting close to the finish line. It’s now time to decide what exhaust to put on it. I’d like to use the pipe-within-a-pipe exhaust tip that comes through the cutout in the rear valence, similar to the XR-7G, but the only ones I’ve seen like that are 2" inlets and I’m thinking about going to a 2 1/4" exhaust.
Any opinions on this? What have other folks done?
No secret I like turndowns tucked behind the valence, but if you are up for cutting/rolling the valance, the XR7-G/'68 Shelby style of which you speak is cool too. There is always the '67,& 8 GT style too.
I always loved the look of the exposed factory tailpipes on my '87 LX 5.0, and they are 2.5". I wonder if you’d have room to adapt those…
http://www.latemodelrestoration.com/products/Mustang-Exhaust-Tail-Pipes
My pal Tommy modified a set of those to exit from the side of his '66 Nova. Looks bitchin…
Chris, the valence is already cut and ready to go back on the car. The late model ones look good, but I’m not sure about the 2.5" inlet.
We do have a pipe bender at the store with a spreader cone attachment. I could try spreading the inlet on the XR-7G/Shelby style to 2.25", but I don’t know if I’d damage the finish and they are too expensive to experiment with unless I can’t find a suitable alternate. I may also have the option of having out installer use some of the pipe scraps we have lying around to fabricate a 2.25" version of that tip. I’ll have to talk to him about it on Saturday and see what he thinks.
Just use a set of reducers in front of the tips or insert them inside the 2 1/4" pipe. The exhaust gas has cooled dramatically by the time it gets to the end of the pipe so the volume requirement has dropped and the smaller inner pipe won’t make any kind of measurable difference.
Yeah, I’d use a reducer if going with a period correct tip, or flip it to use the fox body stainless tailpipes.
For a stock (or stock appearing) system, these guys look like they do cool work, and offer enlaged tubing sizes. Pretty sure they do tips too:
http://www.precisionexhaust.com/#!manufacturing/chyz
These guys offer a full stainless system ($$$):
http://waldronexhaust.com/cart/index.php?main_page=product_info&cPath=61_47_348&products_id=3091
This car wins the big pipe contest:
http://bringatrailer.com/2010/07/21/bat-exclusive-1968-mercury-cougar-xr-7/
Last Thursday I picked up B3Cat from Dave’s shop and took it to Seamless Custom in Leicester, MA for the interior finish work. Here are some photos of the car upon arrival at Seamless Custom:


In these pictures, the windshield and rear window are out since the parchment vinyl top is yet to be installed and there is no interior in the car. The GT-E style exhaust tips are still in place but the valence has been modified for the XR-7G style tips. The Madras Blue paint looks great and, in this lighting, really seems to show it’s true color.
The front of the car has the Scott Drake 1" drop springs and the rear has new leaf springs. The rear should still settle some but I like the stance even now. We also put in new KYB shocks all around.
Gorgeous looking so far! But I’m kind of partial to the whole blue and parchment theme!
Bill it looks great. I can’t wait to see it finished and gleaming in the sun. great color combo.
Steven
Looks very nice Bill…
Bill the cat is looking great. Are the exhaust tips that came on the car Borlas? Your color combo is very close to my second Cougar as well the interior. Mine was two tone emerald green white top and white interior. I am still trying to find that car.
Bill the cat is looking great. Are the exhaust tips that came on the car Borlas? Your color combo is very close to my second Cougar as well the interior. Mine was two tone emerald green white top and white interior. I am still trying to find that car.
Wow, great looking cat, Bill. The missus must be pleased.
The exhaust tips that came on the car are the repro GT-E style. I’m not sure who makes them.
My wife has not been allowed to see the car since it left to go down to Dave’s. She hasn’t seen any of the in-progress photos. When the car is finished, I will trailer it back to the store where we will put it in the garage under cover. I’ll have our installer remove the exhaust tips and put on the G-style tips while I install the new windshield washer kit, hood blanket (I know, I know) and halogen headlights.
Then we’ll do an Overhaulin’ style reveal to present her with the finished car. I plan to schedule that to make sure that our kids can be there to see her get the car and, hopefully, have Dave and Justin (owner of Seamless Custom) there as well. That should happen either one week or two weeks from Saturday. The official “show” debut of the car will be at our club season opener, which is always hosted at our store. The first real show will be Carlisle in June.
Now we are all expecting a utube video of the unvailing ![]()
The plan for the 69 standard white interior and top was to paint it Maradas blue. Going to sell it so, hopefully I can convince the next owner to paint it that color.
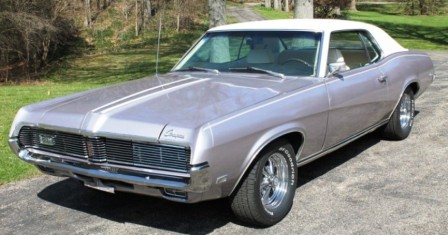
2 1/5 years after the first B3Cat project post, here are “finished” shots. Of course, there is always more to do. B3Cat still needs a front-end alignment, the windshield moldings have to go back on, and there’s a gremlin in the sequential system to figure out, but the interior, exterior, and mechanical restoration is effectively done. Here is what I presented my wife with today at the reveal. The first shot is kind of fuzzy but the others are better.


Love the color combination and the upholstery.