Bench testing a tilt away motor

Good Day All


I am new to this forum. I was told to speak to you guys about my tilt column I have a 1969 XR-7 and I am based in South Africa. My tilt column had been disconnected at some stage and now I am trying to resolves previous issues because someone had been fiddling with the wiring. I have attached an image from Cougar Parts Catalog and I have circled in red where I am having issues. I cannot find where this plug should connect into the harness. It seems that it has been removed and that I am probably going to need to run new wires. I’m not sure. What I first need to figure out, where do these wires go? On my wiring diagram (69 cougar wiring diagram), they are wires 54A (Green-Yellow Stripe) and 53 (Black-Blue Stripe). I cannot find where they connect into ASSY. 14401. If I just knew what they are meant to connect to, I could figure it out from there.
I would really appreciate any help I can get.

Regards,
Bradley

Bradley,

That connector plugs into your existing door jamb courtesy lamp connector. Nice complete harness & control assy!

Easy cheesy!

Advise if you need more help!
Steve

Hi Steve

Thanks for the incredibly fast response.

I am still a little unsure. Firstly, does this need to be connected for the tilt column to work?
Looking at the wiring diagrams it looks like wire 53 (Black-Blue Stripe) goes directly to the courtesy lamp but I can’t seem to see where the wire 54 goes?
My courtesy lamp has two single plugs on the end of a single wire. So like two plugs in series, neither of which are connected to anything. Both LH Side door jam switches are connected the same as seen in the figure I posted.

Someone really has messed with my poor cougars wiring. I am having multiple problems all round. One step at a time though.

Thanks again for your help.

Bradley

+1. Your existing underdash harness has a door jamb switch on the driver’s side. Disconnect the battery first, then remove the door jamb switch and plug the connector into that female receptacle. You see a door jamb switch in your photo? That then goes into the door jamb.

Thanks guys for your assistance but I am still a bit unsure. Please see this picture I took of the wires I have lose. The left one is part of the Tilt column harness coming from the door jam switch with the plug I am unsure of. The wire on the right with the two single plugs in series is for the courtesy lamp.

What do I do from here? There is no female plug for the black male plug.
Tilt Column, Door Jam.JPG

Steve,
Six years later your guidance is still helping out. My tilt away stopped working last week. I was able to bring it back to life following your advice, of note

  1. The 12:00 pin had partially dislodged - I didn’t know the wheel also tilted!
  2. Found old clumps of what I assume is dust and grease.
  3. Cleaned it out and used white lithium
  4. Replaced the main vacuum line from under the battery. The old one had rested on the engine and the heat got to it.

I’m getting 6 tilt away activations on a “charge” now. Smooth as can be.

One question, the teeth of the cast iron tilt function top and bottom do not engage at the same time. Either top or bottom engage. Is this correct?

Thanks again for the help!

Mike,

Sorry, I did not see your reply for some reason…and only just ran across this old thread!

Your question about the two cast iron position “pawls”… They do NOT engage both at the same time. You only get one holding at a time…alternating as you change position. The pins that hold these two pawls in place are NOTORIOUS for walking out of position as well, so if yours have only moved a little bit, you can push them back into proper place. If they have moved out completely on one side, and the pin is at an obtuse angle now…well, then your tilt needs to come out and have it looked at more closely for broken/worn parts…plus the center joint is likely loose as well.

Again, sorry I missed this question!
Steve

No worries!

That was about 5,000 miles ago and its working perfectly. It just seemed odd that the pawls did not both engage… i wont say how long I played with it until I gave up though…LOL

Thanks for the reply it is appreciated.

Hi guys - some very useful info here!!
I have purchased a ‘complete’ '69 Tilt steering setup for my '69 Fastback. I’ve had it serviced and it’s “good to go” - but the car is nearing the end of a complete 15 year restoration (don’t ask…) so I’m not sure where all the parts go that are supposed to be on the car, let alone those that are new additions…
So - a couple of really newbie questions to start with:
1] Where/how/to what does the little metal bracket bolt up to, so that the bracket/relay/actuator shown in this photo is in position to pull on the cable? The piece I’m thinking is the mounting point is where the “t” is in catalog:

Anyone have a clear photo of where this goes and to what it bolts to?
2] Assuming I get all this right, where do the wires in the harness connect to? The door switch side I think I have all that figured out, but there appear to be other wires that connect into the harness.
3] I have a lovely new canister that mounts under the battery tray in the passenger wheel-well, but what holds the canister in position - is there a clamp/bracket/screw that holds it there, and does anyone have a photo of the clamp??
4] The wiring harness coming out of the column has two wires that are not connected into the white plug - a red and a brown wire, when the column was serviced the guy wrapped them in yellow tape to draw my attention to them, but I cannot remember what to do with them now…
I have read that they may be unused, but wanted to be sure.
5] Does the same metal cover conceal the wiring harness under the column like it does on a non-tilt wheel?

I think that’s about it for now = thanks in advance for the help.

Cheers

Jeff

Melbourne Australia

ok - an update as I have made a little rogress There was too much play in the rag joint at the bottom of the tilt steering column, and I couldn’t get the damn bolt in, so it all had to come out. I chased the threads with a tap and installed the rag on the bottom of the shaft and it all went in and the bolts are all tight, so happy with that!!

So, next cab off the rank was the tilt steering actuator. This is a complete original '69 setup that I acquired a couple of years ago. I had a recommendation from WCCC about a guy who rebuilt it all, so everything is good and ready to install. It was never optioned for my car, so I have no idea how it all works or goes together. where the holes should be etc so it’s all trial and error - so my apologies for the bone questions that appear from time to time.

I figured out that the canister mounts under the battery tray (I haven’t painted or installed that yet) - so I search on the 'net and found a couple of pics that show where it should go. On the apron below the tray but above the lower mounting holes, there are three dimples in the apron - the centre one becomes a hole for the valve to poke through, the outer ones are drilled for the canister studs to appear, so I used a hole-saw to mark the circle, drilled the ring and used the hole saw to break through - easy to do after a while, just a PITA whilst you’re doing it…

So, the canister is now in the right place

I put the hoses on, they run up from under the battery tray (not in there yet) around the shock tower and under the export brace to the rear of the PCV and (soon, when I figure out where it’s supposed to go) through the firewall to the actuator/relay and vacuum motor.

Next thing was figuring out the actuator and vacuum motor.

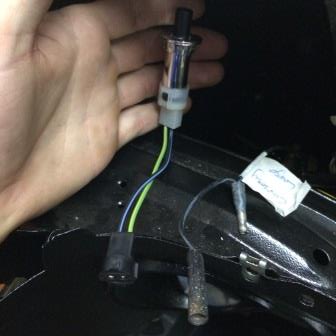
I had a few questions about this thing - what were all the parts for, and how did it mount, and what are these wires for?

So, it turns out that these are for a second “safety switch” - these get wired in series with the NSS (Neutral Safety Switch) on an Auto car - so you cannot start the car whilst the column is tilted. Apparently not used for a 4-speed car as the idea is to use the little jumper wire (I know - the switch is not connected right??).

I spent a couple of days trying to figure out how this thing would mount onto the steering column, and it didn’t matter how I twisted and turned it, there was no way it would mount anywhere sensible.

Then - I had a light-bulb moment - the lower dash wasn’t it, and I saw a pic on the interweb that hinted at it not being mounted on the column, so I figured out that it actually mounts on the underside of the dash itself!! So, nearly ready to put the lower dash in and once that’s in, then the final piece of the puzzle will be complete, I’ll just need to cut a hole for the additional door switch and it’s done!!

Steve,
I have a 69-cougar original 51k miles with tilt away column that worked fine until I took apart to clean and paint. There was no wear or sloppiness on pins always giving problems due wear. Now with column out of car reassembled I noticed stays in tilt away position and locking cable frozen. What did I do wrong. No assembly parts break down and repair manual for internal items?
Thanks for any help.
Bob B

The factory shop manual has an entire section devoted to the tilt away steering.