When i got the car it had many traces of issues with the brakes : rear drum stuck, no parking brake, master cylinder shot and leaking its guts on the firewall, and even the pain on the apron by the union on the passenger side is all flaky…
I thought i’d address that first, and being ambitious thought i’d be doing a power disc conversion, how hard can it be ???
Well it seems there are greater forces at play … the car doesnt want its brakes to be fixed clearly.
after many hours of clueless fiddling, i’m still nowhere near a working brake systems. The thing leaks like it’s the niagara falls.
I cant seem to stop the union on the passenger side to leak, i’m wondering if the new stainless brake lines are flared correctly, or maybe i damaged the flare buy going gorilla on it. Changed the union, still leaking.
The outside of the distribution block hasnt been dry since I put brake fluid back in the master. Brake fluid has been coming OFF THE SWITCH itself - clearly my rebuild using the $15 micro o-ring from WCCC was a botch job - and it also seems to be coming from the top front wheel fitting (rear of the block).
The bottom of the master is also slightly wet, it seems it comes also from the front brake connector (rear of the master), but i feel like i’ve gone gorilla enough on the fitting already.
The thought of brake fluid now makes me sick, i can’t stand that thing anymore i just want to throw up, it goes everywhere and sticks to everything
Oh and to top it off, i still have no clue how to make the brake light work, that st00pid design just doesnt want to work.
Al I got to add… it’s harder to get stainless lines to seal. Stainless is harder and tends to smear (bad surface finish) when making a flare and does conform as well to the mating surface. Steel lines are more forgiving.
Which brake light are you talking about? The actual tail light brake lights? Or the “BRAKES” warning light on the dash?
The brakes warning light on the dash is going to keep giving you grief until you get all your leaks sorted out. That is its basic function: to tell you there is a mismatch in the system between the front and rear brakes (usually caused by a leak or air in the system).
Yes, rebuilding the proportioning valve is a crap shoot. When in doubt, spend the money on a new valve. Also, be sure to use the “special tool” that holds the proportion valve piston in place while you are working to resolve your leaks.
And hang in there! Tackle one leaky bit at a time ~ I recommend starting at the master cylinder and working your way “out” from there (MC → proportioning valve → front brakes → rear brakes). As they say, it’s the journey not the destination? …yeah, forget that crap. We all know it’s the journey that kills you and you really want to be at the destination (driving your classic on a completely different journey to a much better destination).
Where was I? Oh yeah! Hang in there, you’ll get it licked. Take a break from brakes and come back to it when you are in a more positive frame of mind
However the lines between master and distribution block are mild steel (they came “pre-bent to NOT fit” with the kit) and I mangled them to fit.
By the looks of it i’m having most trouble with the line for the front (at both ends master and block ends), so i’m debating buying a new one that i’d bend to fit. I hope the gorilla didnt damage the distribution block or the master by going berserk on the fitting
But all of that involves a lot more playing with brake fluid (oh yes i forgot, i also ran my master dry while bleeding after replacing the union)
Thanks for the encouragement ! Yes … i think i’m ready to tackle this again … maybe this weekend.
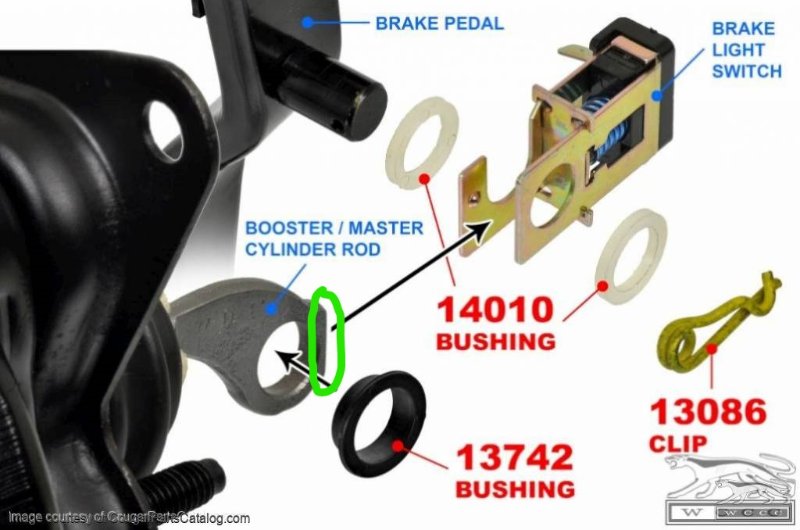
Regarding the brake light, I actually meant the brake light switch, on the pedal. That dumb thing just doesnt work and will never work, maybe it’s a problem with the rod from the new booster, i dont know. I have a thread on it, people have tried to help me but i think the greater forces at play are stronger lol
If I recall correctly, there is a different switch for manual vs power brakes. Not sure if there is also a different switch for '69 vs '70 (I don’t recall).
I DO know that you need to be sure to have the right bushing pieces in and around the switch, to hold it in place so it doesn’t wiggle or shift. That will give you consistent “switching action”.
Now, you also need to be aware that the brake switch power passes through the turn signal switch. I had fun with that… pulled my brake switch apart and installed a new one, only to find it still didn’t work properly. Tested the new switch with an ohm-meter = good… tested the old switch = also good. D’oh! Problem was in the turn signal switch >.<
Yup i bought all these things from either WCCC or NPD, including the correct switch for power disc, supposedly (i think the first i bought was actually a power drum, thanks NPD, good website !) and installed it all, correctly i think, like that diagram shows.
As a result, everything is TIGHT and the switch is never activated, it just sits there, dumb and useless haha. Kind people on the forum and elsewhere explained me that the booster rod is supposed to have some play by the pin and push the switch but that doesnt happen, maybe it happens by a micron.
The circuit is fine, lights turn on if i short circuit the switch.
I really think it’s the fitment of the switch. I’ve seen online people add a shim, i’ll try that … or maybe i’ll hold a flashlight backwards by the window when i brake.
I don’t know about a curse but I guarantee you that an inanimate object,in this case a car,can attain a personality and play with your emotions.And don’t think it won’t.Oh, some people may scoff at this notion but just let them put together THAT ONE CAR and have that car fight them every step of the way to the point of even the simple things become an all day fight. Even the king,Richard Petty,will tell you he and his team had one car that had to have been owned by the devil him,or herself.
Sounds like your car is fighting you.
I would like to add this, if you bought a new booster (not a re-build) then you will have to remove some material off of the booster rod where the switch fits against, I took off about 3/32.
Thanks for bringing this up actually, that’s what the instructions that came with the booster said, but i didnt do it because i dont understand how this is going to fix anything. Just to make sure i understand, are you talking about the area i highlighted in green ? Will that not make the rod shorter, making it even further apart from the switch ?
right now i feel like the problem is that the rod doesnt reach to the switch, my next step was to add some thin sheet metal to the switch (i’ve seen that online) to make it closer to the rod.
I had an original Bendix booster to compare to the new one, and the new one jammed the switch up too tight on the rod, so in my case I had to remove the material you circled. Your situation may be different but the switch needs some clearance between rod because it is like a rocking motion that makes it work.