I know your top is already on but in effect you are trying to fit the frame to the top, at least in my view. Yes, you should always store the car with the top up but I understand why you wouldn’t with leaking cylinders!
To that point, if I leave Isabel’s top down for a couple of days during nice weather, it is harder to pull the front bow down and latch the hooks after doing so.
Lastly, sorry, I did not get to looking at the top mechanism tonight, I am under the weather with a head cold and had all I could do to remove the accessories and such to redo the water pump a second time on my 408C, this time because the timing cover was a bit deformed at the two bolt holes in the lower middle of the pump. The darn thing was leaking at the gasket rather than the “usual” weep hole (so the pump is good, one small bright spot).
The next time I get back at it (to reassemble), I will look at the top mechanism for sure, sorry about that.
When I purchased my 70, the top did not come close to latching. It was new but left down for a very long time and must have shrunken a great deal. After much time and effort I finally got it to stretch.
I soaked it with armor all. Laid a blanket across the top with 4x4 and weighted down for many days outside in the sun. I even tied rope from the latches to the rear bumper of my jeep and put tention for hrs. It finally stretched so it latches normally now. If I leave it down for a few days, week, it ibecomes more difficult to latchn
I see what you are saying about trying to fit the frame to the top, instead of vice versa. Yeah right after I got her I pulled the one trim panel, had my girlfriend hit the power top button and it was barfing fluid out of the top of the lift cylinder like crazy, the previous owner said he would have to “assist” the top up and down I can see why, the fluid was so low there was no way it was lifting the top up on it’s own. About a month after I replaced that cylinder I saw the other side was leaking, not as bad, but definitely leaking so I replaced it also. I will make sure to store car with top up from now, especially if it won’t be driven for a few days.
No worry on not looking at the top mech last night. I wanted to work on the car and pull the tack strips, but just didn’t have the motivation after getting home from work and grocery, hopefully I can work on it some this weekend, but I know it it supposed to rain some this weekend so we’ll see I guess.
It is the time of year for head colds unfortunately, I get those then it turns to bronchitis and really zaps my energy for a couple weeks. Do you have to change your timing cover or maybe just add a little extra RTV at the bad spot? At least your water pump is good. Don’t you love doing things twice, or sometimes even more, seems that always happens to me, i guess that is just part of working on cars, especially older cars.
The timing cover (351C) is flat steel but the two bolt holes in the middle, lower area (that go into the timing chain area) were slightly raised. I beat them down a bit with a large dead blow hammer so now there is a slight concave to that area (which will pull straight when bolted). I wll use a little extra Ultra Black or Grey in this area! I have never seen this happen on a Cleveland before. Weird.
Will report back on the top frame as soon as I feel up to going back out to continue the work.
I got sick of being sick and went and climbed into Isabel just now (on the lift using a ladder, LOL). Happily, I didn’t fall and break anything (I have a history!). The sail area cast bracket angle is set by (what I think is the same as Alex showed) an eccentric, it is at the top of the cast bracket in the steel frame that attaches to the bracket.
Let me post a pic here and then I will edit this post.
This adjustment controls the forward lean of the sail area cast bracket as nearly as I can tell. So, if you have a non-parallel gap with the quarter window, this could help with getting the frame to meet the A-pillar latch receivers.
Thanks guys! I would have never known that was an adjustment without your help!! When it quits raining, and I have some motivation, I will back the car out and experiment around with this, but I am very hopeful and excited to see what happens.
I had her(Sunshine Daydream) out Saturday, backed her out in the sun got the top pretty hot and tried putting the top up and down a couple times. It was a little easier, I didn’t have to fight it as much to get it latched, but I did have to coax it into place a little bit. I put the top back up that night when I put her to bed and it was tighter since the sun wasn’t on it, but I don’t feel when the sun was on it that it was right so I’m looking forward to trying the adjustment you guys mentioned.
Thanks again! I’ll report back what the results are when I get to it.
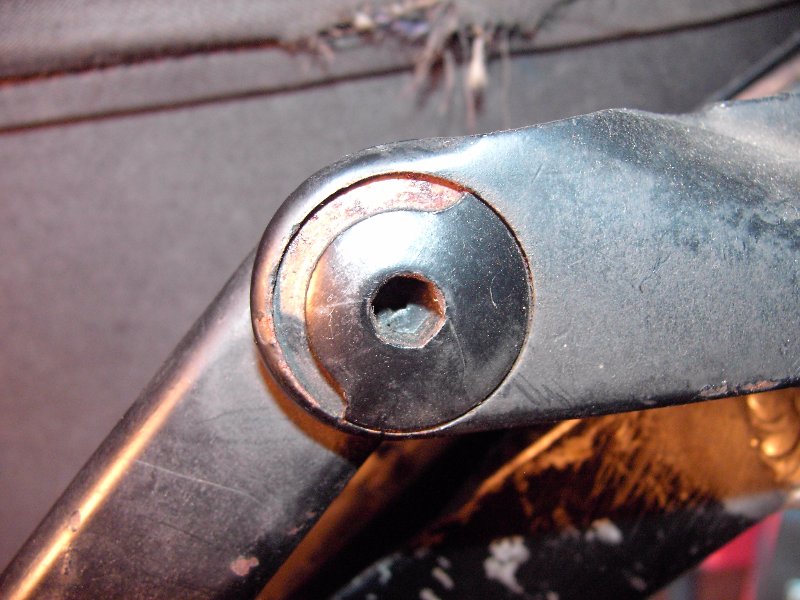
I finally felt like working on my top issue some more this weekend. The first thing I did was located the torx head cam screw that was pointed out to me earlier in this thread, while it didn’t do much on the driver’s side it did take the “droop” out I had on the RH side above the window. Next I installed my new A-pillar seal I got from WCCC on the RH side. The new seal closed up the gap a slight bit between the A-pillar and top, but it was still there. I then followed 1969XR7vert’s advice and unbolted the tack strips, I thought for sure this would let the top frame come up to the windshield frame and close up my gap, it didn’t and I was left scratching my head. My neighbor came over, we were both looking at it, couldn’t figure anything out and he kind of got me thinking asking about the top lift cylinders. I replaced one as soon as I got the car a couple months ago and the other one about three weeks ago; both bought from Mustangs Unlimited. I unbolted the cylinder on the LH side since I already had that trim panel off and magically my gap and tightness problems were gone!
So I guess I need to find cylinders that aren’t pieces of garbage. I guess these were made wrong, or even designed wrong and caused hours of frustration and headache for me. I took a picture of the cylinder with the top attached and the bottom hanging loose. It might be kind of hard to tell, but the peg the cylinder is supposed to mount to is about 1/4" lower than the female receiving hole on the cylinder which was not allowing the top frame to travel all the way forward.
I don’t recall seeing a screw when I installed it, but I wasn’t looking for one. I can disconnect the lines and spin the housing to see if that might lengthen it.
If the lines are not new, don’t mess with them! Better yet, if they are old, replace them. They do not fare well when disturbed - as member Rob, MrEos can tell you first hand!
I’m not sure if the lines have been replaced or not. They don’t look new, but I have had both sides off with no problems. I guess I am going to have to try and get my money back from Mustangs Unlimited. Any suggestions on a good brand or where to get good cylinders?
Yes, you have had no problem, just like Rob. Then, one day, transmission fluid all over the place! Not trying to scare you but this is what can happen. The plastic lines get brittle (but look okay).
Interesting on the cylinder(s). Wonder if the new ones are not as long as the old? Did you keep the old ones? If yes, you could do a length comparison.
Since I will need to replace both cylinders it would be a good time to go ahead and replace the nylon lines as cheap insurance I guess. Transmission fluid all over the place doesn’t sound like much fun!
I did save the most recent cylinder I replaced, and it looks just like the ones I installed, even has the same warning sticker on it. I have looked around and most all of the replacements look the same. I wonder if there is only one source and perhaps a bad batch was made? Which brings me to: how do I know if replacements will have the same problem?
I should also mention I unfortunately found a 10" crack in the silicone folding seam on my folding rear window. Does anyone know if this can be repaired anyhow? It looks like a replacement rear window is $250
I checked the lift cylinders on National Parts Depot and it looks like they might be a different manufacturer. The reason I say this is because it says they don’t use nylon bushing while the ones I have do. So these might be the next ones I try.