Congratulations Rob!

I am a bit under the weather right now but I don’t think I could do better than Rob did on his site: http://www.minnesotacats.com/qvert01.htm
The following is the abridged version of one of the best restoration stories ever.
As I got deeper into the Cougar hobby, I wanted to try restoring a car. Aqua Vert is a nice driver, which could use some more work, but isn’t ready for a restoration. I decided to search for a car needing a restoration, but still nice or rare enough that I wouldn’t end up completely upside down. The 69 XR-7 convertible has been my preference. The “R” code cars - equipped with the 428 Cobra Jet engine with Ram Air induction - are rare and valuable, making them excellent restoration candidates. The hood scoop, though, is not my thing… so I set my sights on the Q-code, 428 Cobra Jet XR-7 convertible without Ram Air.
I contacted the Cougar CJ Registrar, posted “wanted” ads on the CCOA site and MC.net and kept an eye open. Since only 46 Q-code XR-7 convertibles were built–39 with automatic, 7 with manual transmission–I figured it would take some time.
A couple of years went by. One day, I was talking to Lin at WCCC to buy something for Aqua Vert. We somehow strayed into talking about dream cars. He talked about the R-code convertble he was restoring and I mentioned my search for a Q-code convertible. Lin said, “Don’s going to look at one of those next week, you should talk to him.” I did.
Next thing I knew, I was flying to Phoenix, meeting Don and looking over the car. The trip coincided with the annual Barrett-Jackson auction, so I spent a day there too. Bill, a.k.a. xr7g428 on MC.net hosted his first annual B-J Cougar Garagapalooza which added to the fun. It was a great trip, but I left Phoenix thinking the car needed too much for the price.

Although the car looks perty good as it sat in Phoenix, it needed a ground-up restoration. It was missing parts, the interior was trashed, the glass was ruined, grill busted up, chrome work dented or dull, etc. etc. The body was solid, though, and there was very little rust - some on the fender aprons, a little in the trunk, and on the passenger side floorpan. At least that’s what I could find without taking the car apart in the seller’s garage.
As the car sat, it had a 351 Windsor in the engine compartment. The seller had a C.J. engine and the rest of the drive line. The 428CJ already had been rebuilt, and was waiting for the rest of the car to be restored.

After returning home, I kept thinking about the car, and started second-guessing myself whether I should buy it. Ultimately, I struck a deal and the car was shipped to Duluth.
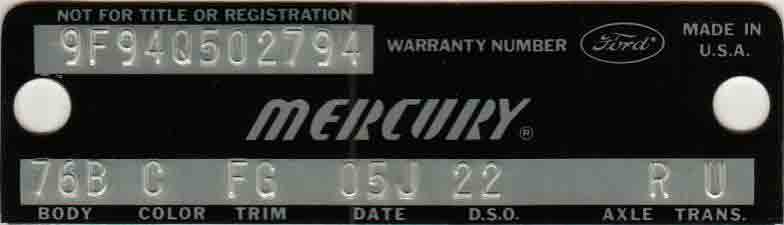
The V.I.N. and data plate disclose the following information:
9 1969 Model Year
F Dearborn Assembly Plant
94 Cougar XR-7 Convertible
Q 428 4v Cobra Jet Engine
502794 Sequential number (2,794th Cougar)
Engine: 428 c.i.d. 4v Cobra Jet V-8 (Q-code)
Transmission: C-6 Cruise-O-Matic 3 Speed Automatic (U)
Rear gear: 3.25 Trac-Lok (R)
Body Style: XR-7 Convertible (76B)
Color: Dark Ivy Green Metallic (C)
Trim: White Leather with Ivy Gold Appointments (FG)
Assembly Plant: Dearborn, Michigan (F)
Scheduled Build: September 5, 1968 (05J)
Actual Build: September 13, 1968 (Friday)
Sales District: Dallas, Texas (22)
Date Sold: September 23, 1969 (Tuesday)
Dealer: Midland Auto Co., Midland, Texas

I stripped everything off Q-vert down to a rolling chassis, and sent it out for rust repair, body work and paint. I figured this was not the car to teach myself those skills. I also figured that the professionals would do the job quicker and better than I could on my own. Well, as the one year mark passes, “quicker” hasn’t proved to be true. Hopefully - when the job is done - it will have been worth the wait.
I also found a use for my engine lift, while it patiently waits to replace the engine. My neighbors seemed concerned that I was creating some kind of yard art. I’m sure they were relieved to see it go back into the garage…

“Body shop jail” is a bi*ch. The first year of incarceration was not really a problem. I wasn’t ready for the shell, since I had all sorts of parts to refurbish or find replacements. The first year was like free storage of the chassis. Still, it would have been better if the first shop had actually worked on the car, so that it would have been ready when I was. As I whittled down on the list of things to do, the car was no closer to being ready for paint. After over a year at the first shop with precious little attention from the warden, a jail break was made. Shop number two promised an early parole. Promised the car wouldn’t be used to collect dust from the rest of the shop. In and out… won’t let it sit … Still, another year passed before eventual release. By this time, my shelfs and rafters were full of parts eagerly waiting to be reunited with the shell. I also needed to start putting it back together in order to figure out what parts were still missing or needing attention.
Since this is a hobby, and supposed to be fun, I won’t dwell further on this Jobian test of patience. Here are some pictures of the time spent with the pros as the car progressed from “before” to “after.”
I stripped everything off the car down to a rolling chassis in preparation for the body work and paint. The car was then loaded onto rollback for delivery to the body shop.


Rust repairs were needed to the floorboards, battery tray area and some around the rear wheel wells. Those who know what is necessary to restore an old car will recognize that these pictures greatly oversimplify all of the work required. Lots of welding, grinding, reshaping, sanding, smoothing, blood, sweat and tears go into getting the car ready for paint. As they say, 95% of a good paint job is in the preparation. Eventually, though, the car is ready for the primer coats.


Free at Last!
Independence came just a little early. Freshly painted Q-vert was brought home on July 2, 2009. The entire “body shop jail” ordeal soon faded into a mere unpleasant memory.

The first task was to get the car off the rotissery and onto jack stands and then onto its new suspension. The rear axle was all ready to install by the time Q-vert came home. The axle housing is powdercoated a semigloss black. The differential (or “pumpkin”) was rebuilt with 3.25 Traction-lok gears, as original. Everything was ready to go, including the brakes, rear brake lines, leaf springs and tires. Just needed to roll the assembly under the car and bolt it on.


Next up was the front suspension. This is a little more work since the coil springs must be compressed to install. The upper and lower control arms bolt on easily, followed by attaching the strut rod to the lower arm and frame. The spindles and disc brake assemblies were prepared ahead of time and then torqued to the ball joints.
Reassembly can take many different paths. I decided to install the gas tank and fuel lines next, followed by brake lines. I figured that as long as I was working in the area under the front fender with the brake lines, I might as well go ahead and install the vacuum reservoirs for the air conditioning (rear fender apron) and the tilt-away steering column (front apron).
Next on the list was all of the stuff under the dash. My thinking was to get everything installed that needed to pass through the firewall before installing the engine. Once the engine goes in, there isn’t much room to maneuver. Started off with the firewall insulation. I used spray adhesive to secure it to the firewall in addition to the rubber plugs. Installed the fresh air vents next. My original gaskets were toast, and it seems they are not reproduced. I used a closed-cell, foam tape from the hardware store to make a new seal. Actually looks OEM - although no one will ever see it until the next restoration. Next up was the parking brake mechanism. Since I was there, and installing these later would be difficult, I screwed on the circuit breaker, low fuel warning and seat belt warning relays. The blower motor housing and plenum goes in next. Followed by the a/c - heater box which contains the air conditioner condensor and heater core. The box is made of fiberglas and it somewhat fragile. It helps to have a second set of eyes on the engine side of the firewall to guide it into position.


Brake pedal support gets bolted in next . Followed by steering column support brackets and the pedals. Now’s as good of time as any to install the wiper motor and transmission. Continuing with the idea of installing parts that will be harder to get at after the engine is installed, I did the brake booster and steering gear box/pitman arm next. The steering linkage - tie rods, centerlink, power steering components - followed closely.


The steering box attaches to the frame with the bolt heads in the driver’s front wheel well. That’s the new fuel line running between the bolts, and the brake line off to the left. The steering box connects to the Pitman arm which connects to the power steering control valve. The centerlink is screwed into the control valve. The other end of the centerlink attaches to the idler arm. The idler arm is bolted through the passenger side frame. The centerlink connects to the tie rod which connects to the spindle. Passenger side shown here. The stationery end of the power steering slave cylinder also attaches to the centerlink on the passenger’s side. The other end of the slave cylinder is attached to a bracket on the bottom of the driver’s side frame. The driver’s side tie rod connects the centerlink to the spindle.


More parts that pass through the firewall include various vacuum hoses for the heater & a/c controls and tilt-away steering column, as well as the wiring harnesses. Also shown here is the brake master cylinder. Just about ready for the engine. A lot of the reassembly does not need to follow any particular order. The window regulators, door glass and door handles can go on whenever the boxes holding those parts come off the shelf. Same goes for the convertible top pump and hoses. The VIN plate, though, needs to be in place before the windshield is set.


Time to put the “Q” in Q-vert
The “Q” in Q-vert derives from the vehicle identification number - 9F94Q502794. That “Q” in the VIN designates the 428 cubic inch CobraJet engine with a Holley four barrel carburetor breathing 735 cubic feet per minute. Officially rated at 335 brake horsepower, rumor has it that Ford understated the power in a futile attempt to deceive insurance underwriters.
The engine is massive. Getting it squeezed into a pony car engine bay takes some talent. If, like me, you lack talent, try persistence.
The 428CJ & C6 Transmission combo is a pig to install. Before tackling the job, I read postings at the CJ forum, the article on TCCN, studied the shop manual, etc. A lot of folks say the whole assembly will slide right in with the passenger side exhaust manifold in place. We ended up removing it half way through the job.

Truth be told, we actually failed on the first attempt at installation. The first go-around, we tried installing the engine and transmission separately. Both went in without much trouble. Getting them aligned and connected to each other, however, proved to be more than we could muster. So, we pulled them back out and attached the transmission to the engine and set ourselves to installing them as a unit. Here is Kevin when we realized that the engine leveler’s handle should face away from the crane. You learn stuff like this when you install an engine for the first time.

Onto the second attempt. Towels in place to protect the engine compartment paint. Everything was looking good at this point. Looked like it would slide right in, just like people said on the internet. Got to this point and tried everything to squeeze her in without success.

Clearance problem was the ‘bump’ on the manifold at the number 4 cylinder. When it was at the back side of the shock tower, the driver’s side manifold would wedge on its side. We tried turning the engine to the sides, tried increasing the angle of entry, tried lowering the rear of the car, tried raising the rear, even tried lifting the passenger side of the engine with a come-a-long strapped to the rafters trying to get a little more clearance. It was always just a matter of millimeters. We ended up taking the right manifold off - just couldn’t get by the shock towers with it on. After removing it, we positioned the manifold under the engine, kind of where it would end up after the engine was in place. Got the engine down onto the mounts, and the transmission mount in place, then lifted the engine a few inches to get at all the manifold bolts. Had to use three different styles of wrenches to get them all tightened back up…

With the engine in place, next came the carburetor, alternator and power steering pump. This seemed like a good time to install the one-piece shock tower brace, along with the shock absorbers. The original brace was two pieces. The one-piece “export” brace is an aftermarket item originally used on Shelby Mustangs back in the 60’s. It stiffens up the front end and is supposed to make a noticeable improvement in handling.

All it needed then was the radiator, fan, belt and hoses.
And the rest… its just like it says in the factory shop manual. Reassembly is the reverse of the dis-assembly procedure. LOL!
For the rest of the pictures of reassembly be sure to check out Rob’s incredible website here:
