Hello all,
I had my 1969 XR7 Convertible’s front brakes upgrade to Power Front Disk several years ago and they seem to work very well.
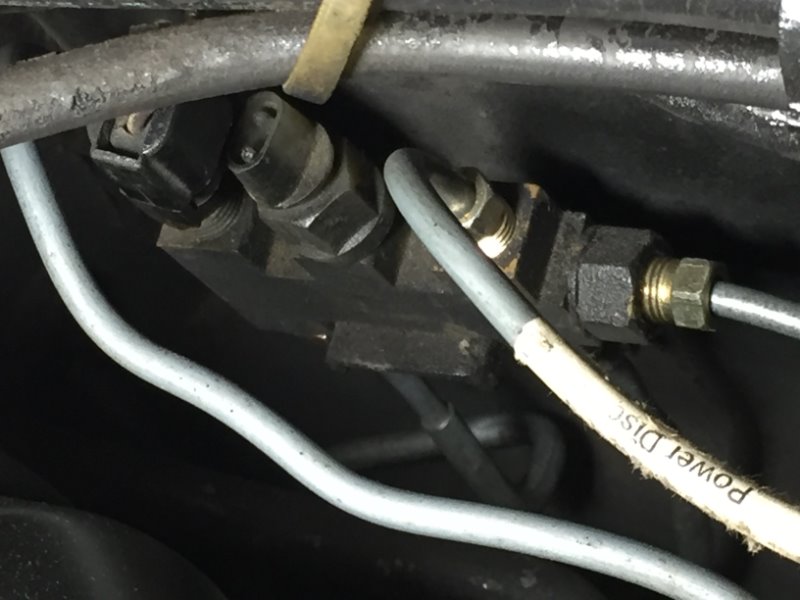
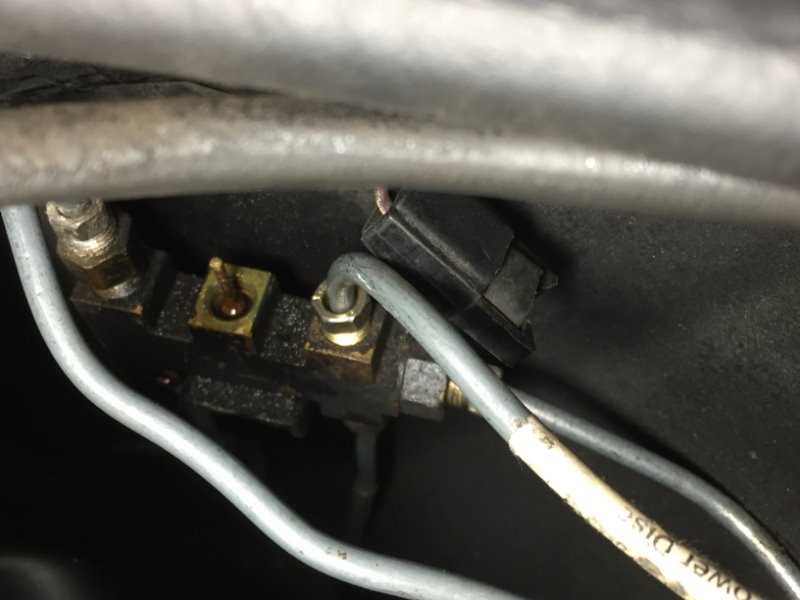
The other day I was poking around in the engine compartment and I noticed the connection for the brake warning light was disconnected from the distribution block. When I reconnected it the Brake Warning light illuminated on the dash.
I suspect the mechanic who installed the upgrade didn’t use the locking tool on this switch while he bleed the brakes and the switch indicator rod (or whatever you call it) drifted to one side during the bleeding process.
My question is which end to bleed to realign the switch?
My understanding is you typically bleed the brakes from the farthest away from the Master Cylinder to the closest, so the passenger rear would be first followed by the drivers side rear then the front passenger and finally the front drivers. If this is the case then (and if my theory is correct about the misalignment of the switch due to bleeding) I would expect by bleeding the rear brakes I could bring the switch back to center and the light would turn off since the front brakes were probably bleed last causing the misalignment.
Is my logic sound? Does anybody have any other thoughts on fixing this issue?
Like I said before, the brakes work very well so I suspect it’s just a bleeding issue to realign the warning switch.
The brake upgrade kit was purchased from Classic Service Restoration Parts (CSRP) back in 2015, so I imagine the distribution block is not a standard ford\cougar part.
Thx,
Jay
You could try the back first, if that does not work do the front. The way I did it was to turn the key on so the dummy lights will work,than bleed the brakes watching the brake light it will flash when the piston moves. Might be a better way but that worked for me. You can also feel the switch move while bleading the brakes.
So I went to bleed the rear brakes and I opened the master cylinder and to my surprise there was no fluid in the small front compartment (rear brake reservoir). So I filled that up with fluid and proceeded to bleed the rear brakes. Didn’t see any leaks and the fluid did not drain away after several minutes of just waiting.
Bled both sides of the rear and the light did not go out, went to the front passenger side and bled that hoping that would make the light go out, it did not. Tomorrow I will take the switch out and see if there is something wrong in the switch.
Jay
The other thing is to make the switch move you have to push it all the way to the floor. After you feel the click from the moving of the rod and you will feel it. Then bleed the brakes normally.
Yes open a front bleeder push the pedal to the floor if you feel the switch move it. If that does not do it open a rear bleeder and do the same. Turn the key to on. Watch the light at this time, I believe the light will flash than go out. If it comes back on you have pushed it to far. You may have to do this a few times. You may do this several times untill you get the switch centered, it is a little touchy. Sorry I did not mention this before.
That’s what I pretty much did already. Had the wife in the drivers seat handling the pedal push and lamp status while was at the wheel handling the bleeding. I would open the bleeder and the wife would bump the brakes, she complained about how hard she had to push and was pressing as far as she could go. Not sure she ever made it to the floor. She new to watch the idiot light and never mentioned it flashing or going off and back on during any of the rear or front bleeding.
That’s why I leaning toward a switch issue. Appreciate your input!
Be careful with that empty reservoir- make sure you find the leak. If the master has failed you only have your front brakes - and when the front circuit fails you’ll have NO brakes!
PS I learned this lesson the hard way. Masters can leak back into the booster and there is no visible leaks.
Good luck!
Ok…so I removed the switch and it looks like the switch is broken, as the shaft that I assume works the switch is rusted in-place.
I’ve put some WD-40 in there and I’m hoping to get it to come out.
That is supposed to come out right? Does it possibly need to be unscrewed? I wouldn’t think so, but this is all new to me.
Looks like I’m going to need a completely new combination valve!
It’s pretty tight in there, not looking forward to that effort!
Jay
I contacted CSRP and they told me that they do not include the Distribution Block/Proportioning valve with the kit, so I’m looking at the original (all Drum brakes) distribution block. That probably explains the frozen switch and bad light switch. Seems to me the brake upgrade should have included the distribution block with the proportioning valve since an all drum brake system does not have a proportioning valve which I would think is important in a mixed Drum\Disc brake system. Now after the fact I need to take the export brace off and the master cylinder and probably the booster to get at this distribution block! Certainly would have been a lot easier to do it while they were upgrading the brakes from drum to disk, Not sure who I’m more disappointed with, CSRP for not including it in their kit or the installer for not telling me to get them an updated distribution block\Proportioning valve while they performed the upgrade!
Harry,
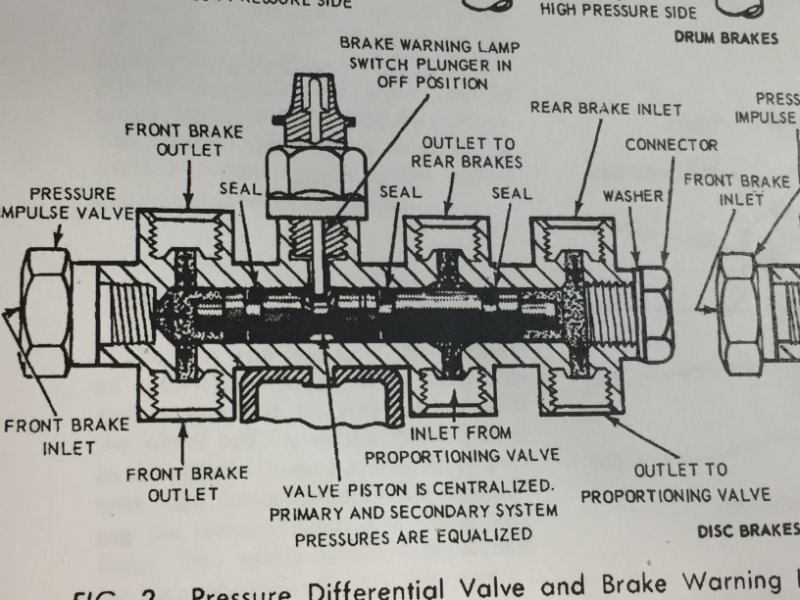
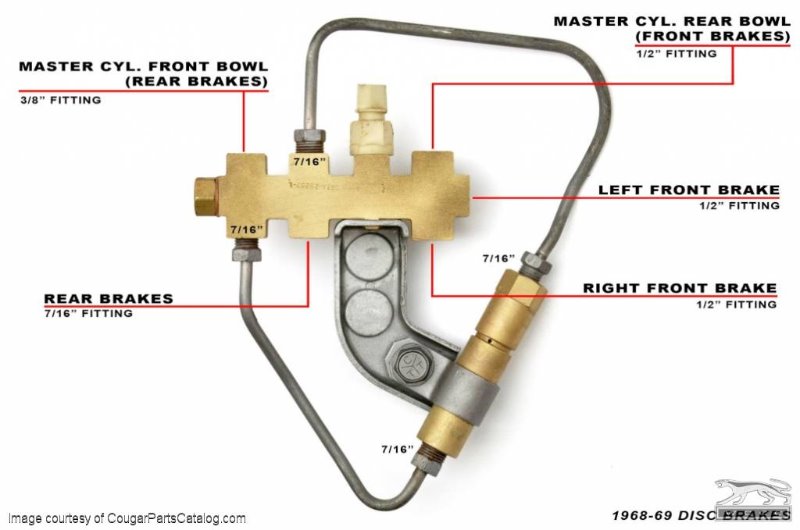
I was looking at that as the item, as it seemed to be the correct part I’ll need. I noticed in the Ford shop manual they show the same block but have a different layout for the connections. Specifically, the proportioning valve in and out ports and the front disc brake in and out ports are different.
The proportioning valve connection differences don’t bother me so much as their just going to a different side on one of the connection points, but the inlet from the Master Cylinder for the front brakes seems like that could make a difference as the input coming from the side would seem to more evenly distribute to the two front outputs.
The manual also talks about a “Pressure Impulse Valve” on the front disc input and I’m not sure if this WCCC part has this or it isn’t needed?
I’ve attached the photo from the manual (a picture of a print out).
Can anyone clarify this discrepancy?
Thx,
Jay
Randy,
It’s more than just that. After spinning the image around in your head there are still connection differences in the 2 diagrams. The WCCC diagram has the inlet (from the MC) for the front brakes coming from the top while the Ford diagram has it coming from the side. I think the side would be more appropriate as the brake fluid would flow evenly to each wheel if sourced from the center.
Thx,
Jay
I’m digging deeper into my brake system and contacted the manufacturer of the system again.
It seems I have a manually adjustable proportioning valve in series with my rear drum brake line and do not need a proportioning valve integrated into (or part of the) distribution block that is standard with the Ford front disc brake system.
So what I need is a distribution block like the one that originally came with my all drum brake car, or possibly I can remove the manually adjustable proportioning valve and go with the Ford part that we were looking at in the earlier posts (includes the proportioning valve).
My main issue is I can’t seem to find the Distribution block that handles all drum brakes. Does anyone know if this part is available? I’d prefer a new item or an already rebuilt used.
Thx,
Jay
So after some research and phone calls I decided to purchase a used “all drum” distribution block and rebuild it, good old WCCC comes thru again.
The rebuild kit looks easier than the WCCC rebuild video, which was for a front disc distribution/proportioning valve. Less parts to replace anyway.
I bought 2 rebuild kits, I’ll try and rebuild mine, but with the level of stuck that my switch is in I figured getting a “better” used one as a backup was a good way to go. Don’t want to be stuck waiting for parts with no brakes!
I’ll post my results once I do the rebuild. With any luck I’ll have 2 working rebuilt “All Drum” distribution blocks.
I found a blog that gives you a primer on how to go about rebuilding the “all drum” DB, they tell you to use a brass bore brush from a .45 caliber gun cleaning kit. Dam, I knew I should have gotten a 1911!