Cool color choice! Had to look at it a couple times to see the green in it! Looked like dark grey until a second look.
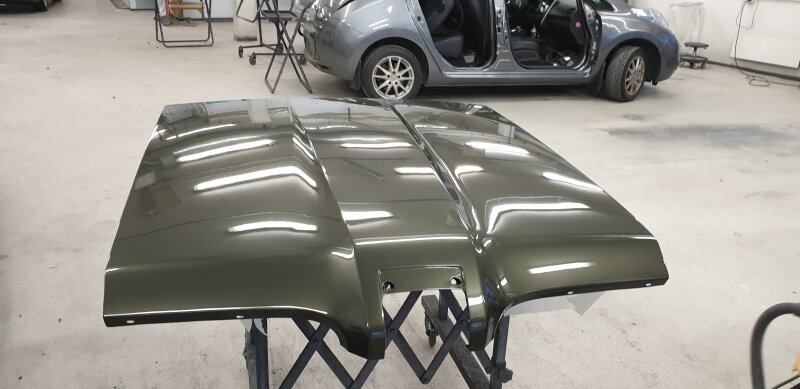
I am glad you guys like the color as much as I do. Classy is the exact word for it. It is very easy to chose a bright and fancy color when going or something else than the original to make it appeal to more people. But I wanted this car to look different, and classy is exactly what I had in mind. The color is really dark and how the color appear is very much depending on the light and the screen it is presented on. It does not look like grey at all when I see it “live” and this picture where the there by coincidence is a grey car in the back ground should make it more obvious that the color is dark green ![]()
Ok now i`m jealous ,
i spent the past 10 years trying to work on my car and you did yours in a quarter of that. Then i had a co worker laugh at me when i showed them the picture of it still in primer… lol You did a fantastic job on it. Color looks amazing. Cant wait to see it back together…
thanks
pat
It’s home again after a terrible troublesome trip to the paint shop in Oslo where winter weather and icy roads made everything a true challenge.
Hopefully there will be some more progress again soon.
If you got ahold of mine it would be painted in a week!!
I’m busy rebuilding my 71 429 car this winter.
Looks great… good to see another one coming together!
Jim
Jim, even if I try to be as effective and work as fast as I can when I’m restoring cars, there is no such thing as a quality paint job done in a week. Those things only happens on fake TV shows. You can put 20 people on a paint job and it will be done in a week. Anyway if you want a good lasting result you need time. Time for all materials to cure right and most important, for the body fillers to cure and sink. The thing is that I can use the highest quality body filler and sand to absolutely perfection, then let it sit for a few weeks and it is not perfect anymore. You really don’t want that to happen after the car is painted. On this car it took 3 months from start of body work to it was ready for paint, which in my world is about as fast as it is possible to do it. Even painting takes time as I had the car painted once in December, then it was sanded again and 2 new layers of clear was put on in the beginning of January. The result speaks for itself when you look at the picture of the hood. And just to make it clear, this paint is not wet sanded and buffed.
Here’s a couple more pictures. I guess there will be some time before I can have guest here as this is my guest room ![]()


Really nice finish! Since you don’t wet sand and buff, is that enamel paint? In any case, that cat is a worthy wintertime occupant of the guest room in my opinion.
Calicat, I am using old fashion base coat (not water based) and high quality acrylic clear.
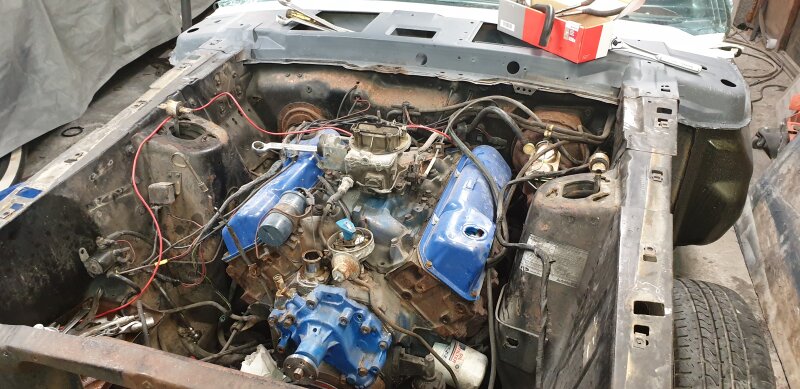
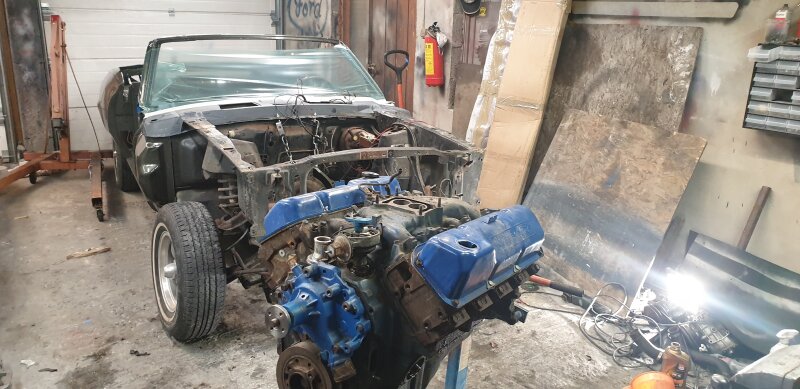
Tonight I finally had some time over to start the cosmetic restoration of the engine bay and engine. Plan is to take engine out, remove surface rust, get everything painted and fix eventual problems I might find on the way. I am also going to replace the radiator with a 24 inch that will be correct for an AC car. I will also take the front steering and suspension apart and replace or rebuild whatever I find that is worn. In other words, lots of fun is waiting for me in my garage ![]()
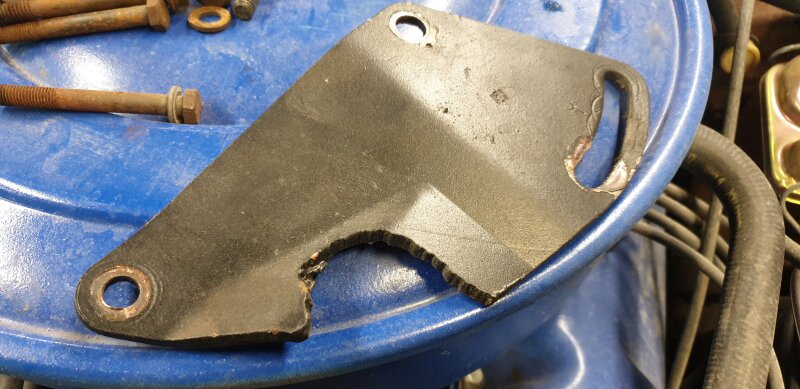
So I didn’t have to work too long before I found the first problems. Cooling fan turned out to be junk with a broken blade and the power steering pump bracket had been ruined by a previous owner to make it possible to replace the water pump without removing the AC compressor and PS pump bracket. Extremely creative, but not smart at all. I also found the reason for an oil leak that was caused by a loose fuel pump. And with the fuel pump removed I got access to the timing chain, which turned out to have a big slack, so I better have it replaced as well. Time will show what more that will need to be addressed.
BTW, is there anyone here with a suggestion on what kind of replacement fan I should get for the engine?


This is all sounding familiar! I also decided to pull my 351c out last winter because it needed freeze plugs. But of course while it was out, it made sense to install hardened valve seats and machine the heads and valves. And yes, the timing chain had too much slack, so new timing set. Center main bearings were a little worn, so new main and rod bearings. Also went with a high volume oil pump since the 351c oil distribution system has limitations. I’ve read that this doesn’t solve the problem unless you also restrict oil flow to lifters, but so far so good and my car has ideal oil pressures. I also had the 20” bolt-on radiator and 5 blade flex fan being a non-AC car. So I upgraded to the 24” three-row radiator, and was able to find a used 7-blade clutch fan from a 70 Cougar with AC. WCCC has a nice repro 7 blade clutch fan for the big blocks that would cool even better. But I now have the same heavy duty cooling package that 70 Cougars with AC have along with a high flow water pump. And for the first time since I’ve owned, it doesn’t overheat on hot summer days! Don’t forget you’ll need the Robert Shaw thermostat that blocks the recirculating port in the block when open. My mechanic put in a 351w thermostat at first, but of course it ran too hot.
Calicat, the engine and the engine bay on your Cougare is so nice and I know a little to well how much work that is involved in getting there. Hopefully mine will be as nice, but there is a long way and many hours dirty work before I get there.
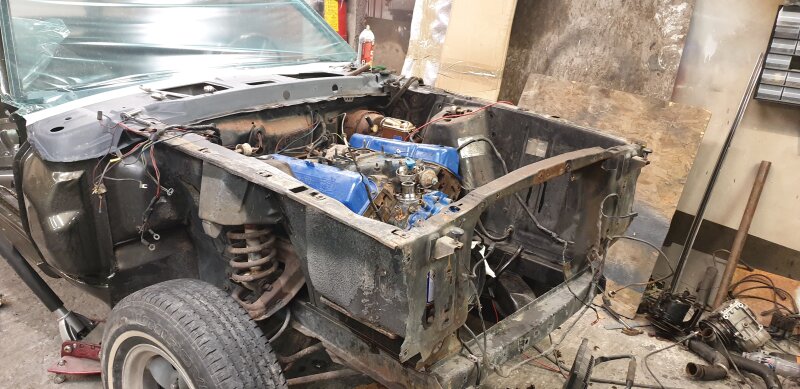
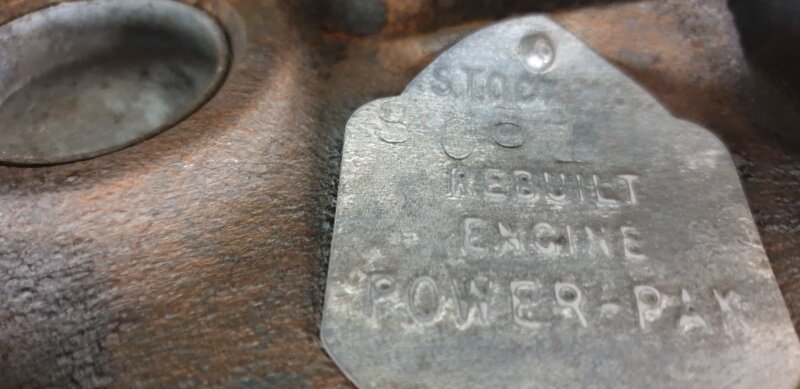
Today I got my engine pulled, just to find a few bad things and some that might be good. My engine has been running really strong, no smoke, starts right up, it is just a good engine. So after I pulled it I found this tag that told me it is a rebuilt engine from Automotive Enginering. (tag doesn’t say that, but that’s what it is). It is not the matching number block for the car as it has a casting number showing it’s a 1972 block. Also heads are rebuilt, hopefully they are converted to unleaded fuel too, but I don’t know for sure. The engine bay is nasty looking and it will be a big job just to clean it up.

Thanks Gry! I didn’t repaint the engine bay - so yours will eventually look even nicer. But yes, lots of dirty work getting there. At least you won’t need to rebuild the engine! Good luck!
Every time I work on a car it ends up the same… full restoration. And now this Cougar seems to be no exception from the rule.
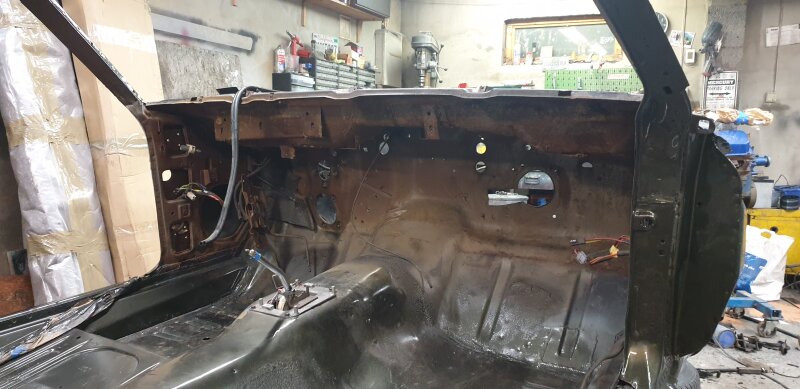
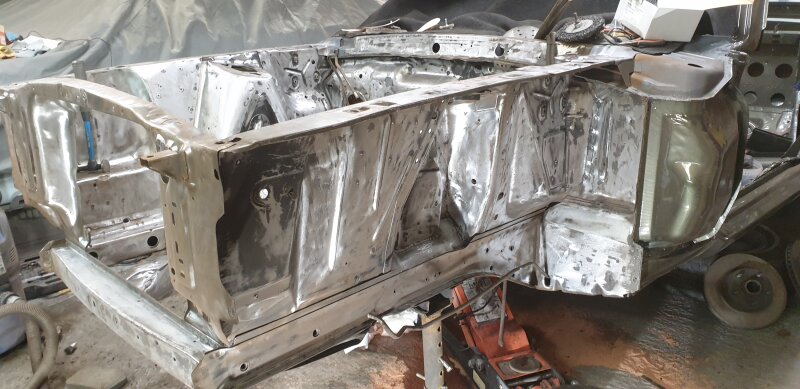
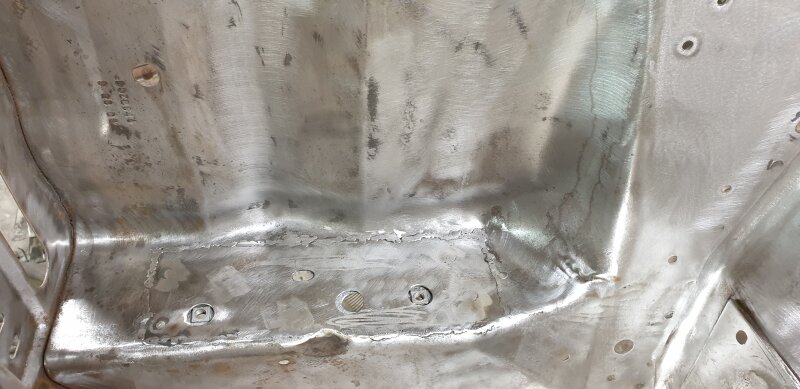
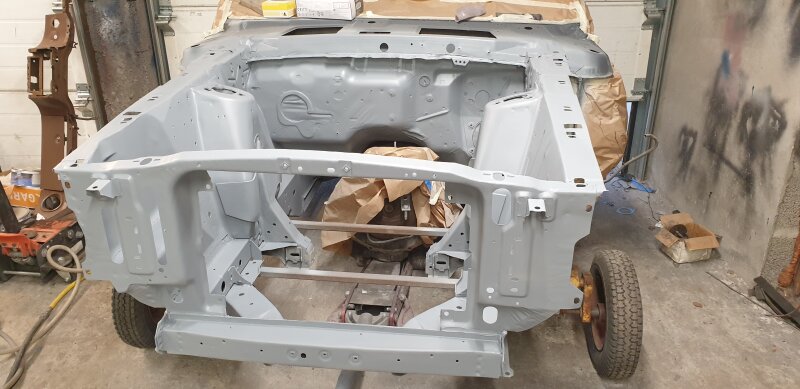
Now instrument panel and everything else under dash is gone, front suspension and steering is off too and I have done some welding on the shock towers and other places where they put holes in the front of the car. I also decided to make the shock tower reinforcements and have them welded in since I already had the mig welder there. I have never done this before so I don’t know what to except of the upgrade, but I figure it doesn’t hurt to put them in. Anything that might help the body from flexing is a plus in my book. I will also install the export brace later so together they should help stiffen the front end a little bit more.
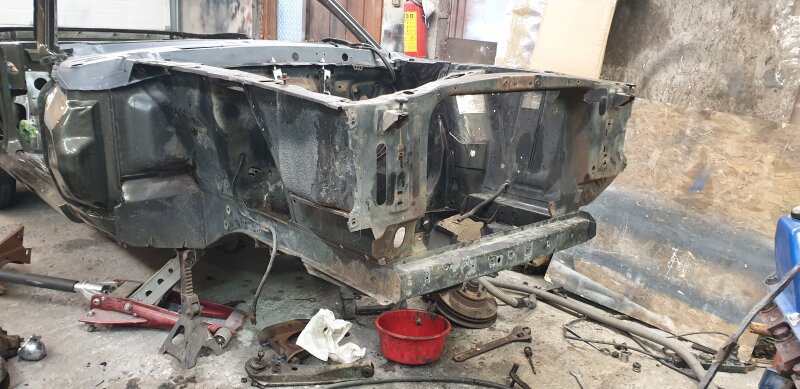
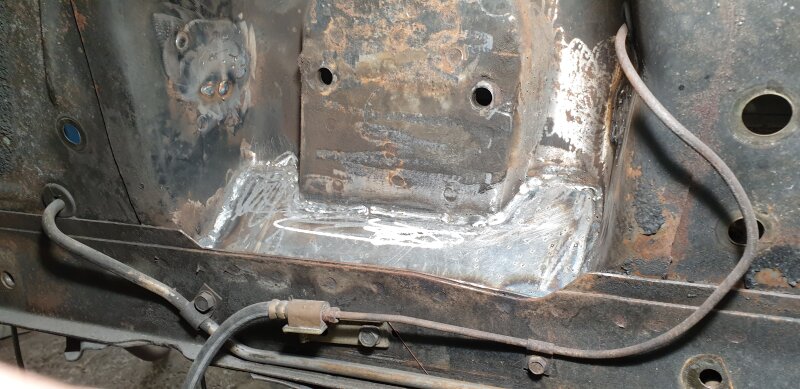

LOts of dirty work done and it was absolutely needed. It might not have looked so bad in the previous pictures, but believe me, dirt and surface rust was everywhere, also under the old paint. I also found more rust in the battery area and I have done some metal repair after an earlier owner butchered the firewall and radiator frame when the AC was installed. The AC is totally disassembled and it was in extremely bad condition with rust and many other problems. More about that later.


What an incredible amount of messy, hard work to get all those nooks and crannies shiny clean. Especially with the lead in those old paints. Looking great though!
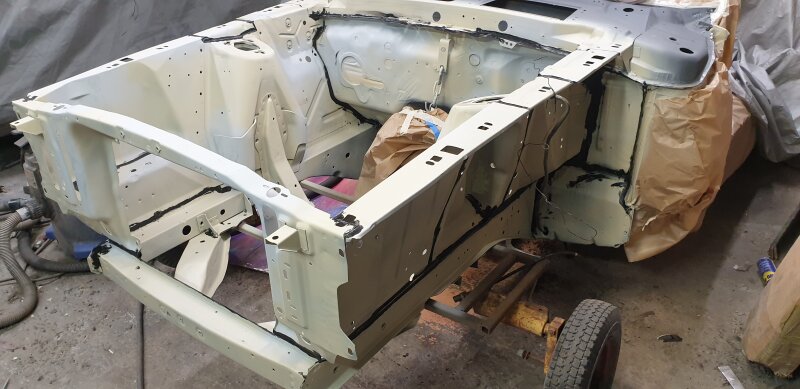
Spring is in the air, and that means that I was finally able to push my Cougar outside and get the engine bay painted.
Things are not going fast these days, but it is for a reason. ![]() My Doberman got 5 puppies March 15th, and it is hard to get much time over with these cuties in the house.
My Doberman got 5 puppies March 15th, and it is hard to get much time over with these cuties in the house.


Awesome work! Looking good.
And that look on mom’s face is universal and transcends species.
Right now I have several small projects going on with the Cougar. All the suspension and other parts for the engine and engine bay needs restoration. I see most people bead blast parts before paint, but I have found that putting parts in citrus acid for a couple of days and then a good pressure washing is my preferred way, at least if I’m not in a hurry. The acid removes all rust and most of the paint while it leaves fresh metal unharmed. So during the last few weeks all my parts have been soaked in the acid including front springs, upper control arms and so on. Then I give the parts a final round with a scotch brite pad or wire brush on my drill and they are ready for paint. It’s a little work but the cost is minimal and result is absolutely the best.
I am reusing as much as possible but replacing all critical parts like inner upper shafts and ball joints. Normally I would have replaced the complete upper control arm, but shipping cost these days are forcing me to make some compromises.

Pre-rusty parts out of the citrus acid.

Some clean up before paint.

Painting parts. Some are grey, some are black. No matter what color they are finished they are all painted black at first to give them the best protection against rust. My experience is that some of the detailing paint is not sealing the metal as good as it should so that’s the reason for the black paint under the grey.

Springs and upper control arms ready to install.
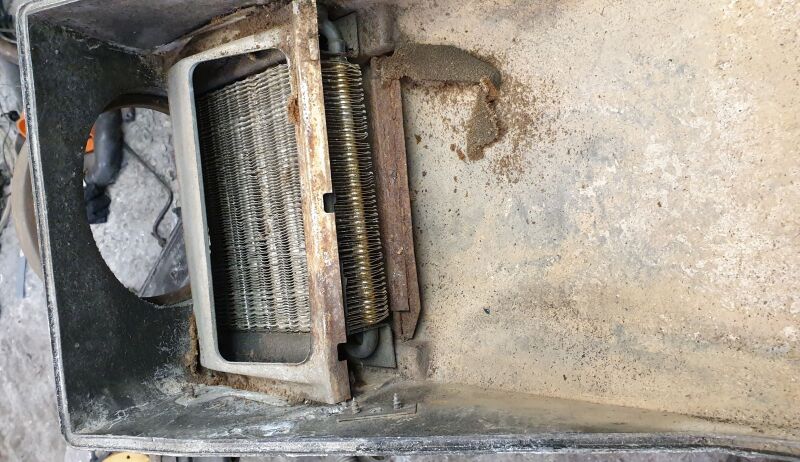
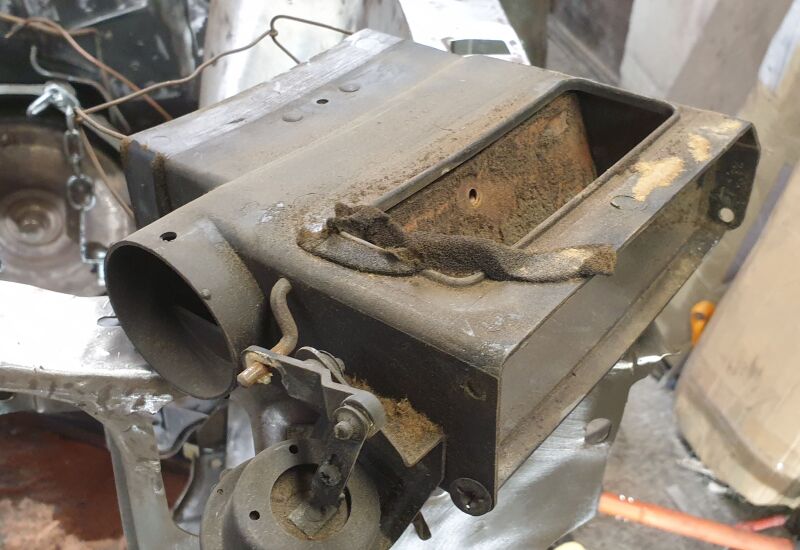
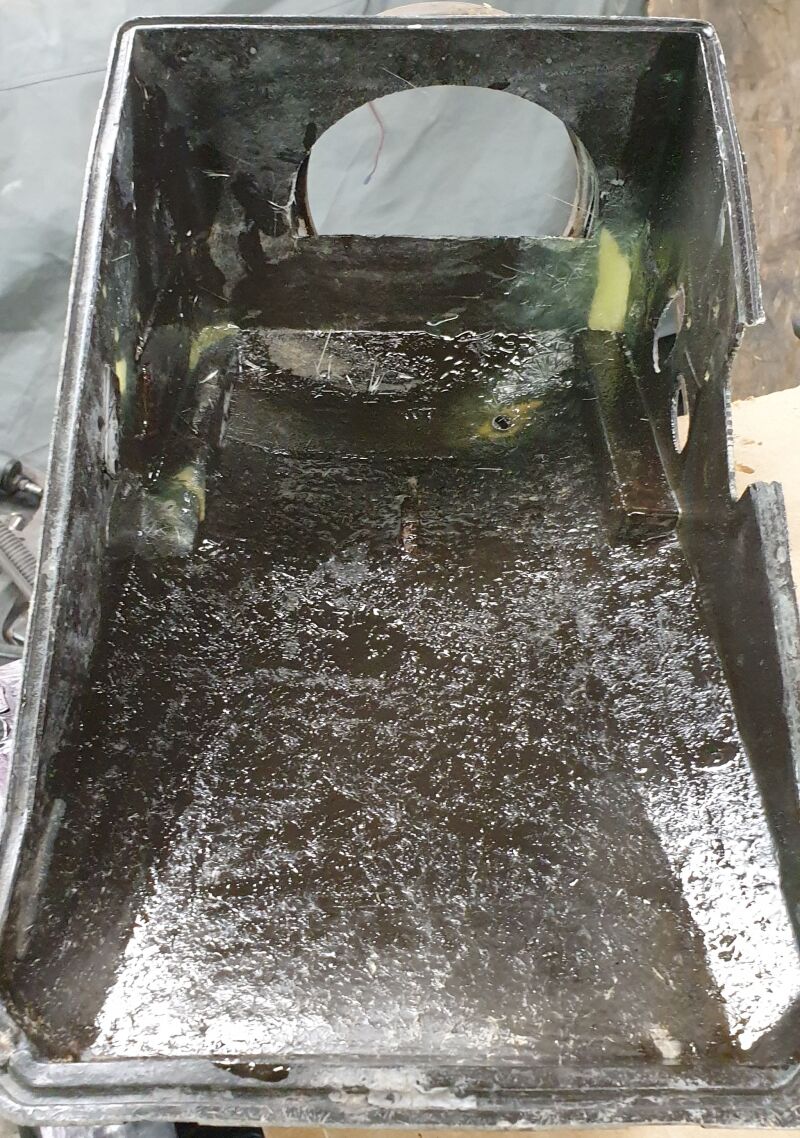
Another ongoing project is to restore the AC and heater on the car. What a total mess this turned out to be. When I bought the car I noticed that the AC were not working, and I soon found that nothing was hooked up like it should either. Wiring, vacuum and so on was a total mess. When someone a long time ago installed the factory AC they used a system from an early 69, which isn’t really a problem, but there are a small minor differences that confused me until I found out. Anyway, optimistic as I was I ordered a reseal kit for the AC and heater box, started to take it apart and damn, that was like opening a box of worms. I don’t know what has been going on here, but it looked like everything inside the fiber glass box had been soaked in salt water for years and everything was rusted and stuck. And they had put in a heater core that did not fit and bent the metal inside to make it fit somehow. I decided to soak the metal parts inside with PB blaster for days to loosed things up, and it helped. After about a week I was finally able to take everything apart. Unfortunately the box itself was also in really bad shape with cracks, widened holes where the rods are going and holes where the brackets once used to be. Also the tube for the drain hose was broken off. I tried to find a better unit here in Norway, but it was impossible so I decided to just do whatever it took to restore what I have. All metal parts had a couple of days in the acid and came out better than expected. The fiber glass box got extensive repair work done with new fiber glass and polyester. A new heater core has been bought and some other parts ordered from WCCC that I am waiting for right now. Luckily all the vacuum motors are working fine, that is a big plus.
A rod that is rusted this bad in the flap doesn’t come out easy.

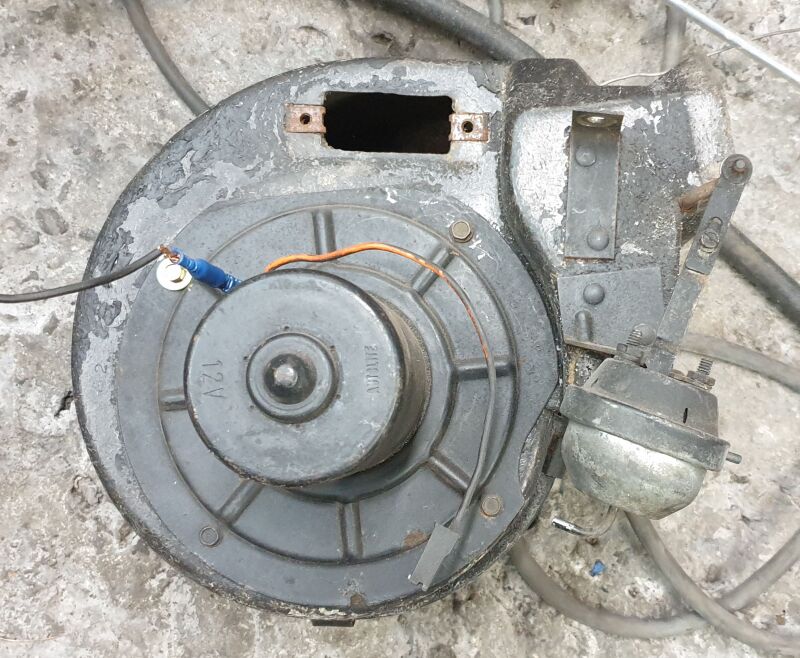
No wonder the blower motor didn’t work as the resistor was missing.
Broken nylon lever caused by a frozen flap.

Repair work on the box in progress.
Fiber glass repair completed.

So far so good. More to follow.
Looks like loads of progress to me, and is looking great. Getting ready to tear into my heater box for a new heater core. Grit blasting alters the surface so much that citric acid dip seems like a reasonable alternative. Is PB Blaster the name of the citric acid based product you use?