The factory had to have some sort of initial/final adjustment on the headlight bulbs as they were assembled. Shop manual doesn’t really have anything. Anybody got any info. or measurements on the adjustment screws. Thanks
Not sure if I fully understand the question, but believing you know “how” to adjust the headlights (the adjustment screws), I am responding as to “correct height and splay”. Generally, I believe, from a distance of 25’, aiming at a blank house wall or your garage door, the beam should be at the center height of your headlamp. In other words, if your headlamp center is 24" off the ground, then at 25’ the “beam” should be at or just below that measure on the wall/garage door. The right beam (for those of us that drive on the right side of the road) is typically slightly higher to illuminate signage. Left to Right adjustment I believe is a little more subjective, but probably something along the lines of the inside edge of the beam being in line with the center of the headlamp. That will at least “ballpark” you.
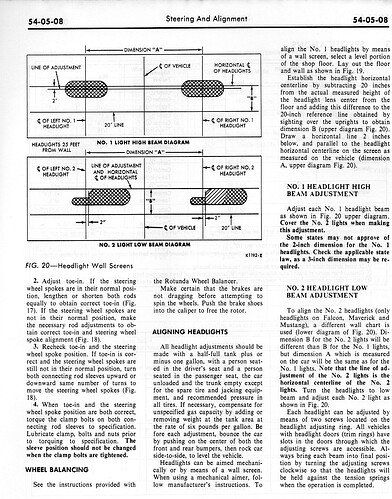
Check the 1970 Ford Shop Manual. Page 54-05-08 Figures 19 & 20. It’s hidden in Volume 5 with Pre-Delivery and Maintenance Procedures.
That same diagram/data is in “Volume Three Electrical” ( 32-02-02) in the 1970 Shop Manual. What I’m asking for / saying is when the headlight bracket was being assembled with the bulbs, springs and such, there had to be a preliminary measurement on the adjusting screws to get it close then maybe a final adjustment at the end of the line. The adjustment screw measurement would be the same for both sides of the low beam and it would be the same for both high beams.
It’s not difficult to follow the shop manual alignment procedure if you have a flat driveway and mark the desired pattern on your garage door with masking tape. It takes some time to get that done and car in proper position, but is easy from there. I doubt the factory took the time to try to pre-aim headlights based on screw position.
My car is on jack stands at an angle in the garage. The shop procedure isn’t a big deal. It’s just not feasible at this time. To me, it makes sense to pre-adjust the headlights as someone was assembling them. Everything was about saving time.
I doubt the dimensional variations and fits in the bulbs and other parts in the assembly will give the kind of reproducibility for screw position to work effectively. I suggest putting it together so they look about right until you can do the proscribed alignment. Proper alignment is pretty sensitive to partial screw turns.
Like anything that was mass produced, the manufacturer of the headlight bucket assemblies would likely have fabricated some simple jigs for their assembly workers to pre-set the buckets. Whatever those dimensions are, have been lost to the sands of time. The simplest solution is to adjust the buckets to be parallel to the bracket surface in the both the vertical and horizontal planes. Once the car is fully assembled and back on the ground, you can perform the final adjustment to the shop manual procedure.
I personally have a hard enough time just getting the bezel over the bulb against the spring tension without concerning myself with adjuster tension. Likely there is a “secret”, but it remains so to me!
Same here - bloody knuckles and bad words every time I install a headlight. Spring hooks do help a lot.
There would be a specification in the original engineering drawings. Getting those, assuming that they still exist, would be the key. They would have been supplied to the vendor or plant that assembled the headlights for use on the assembly line. There they would have been used by the engineers to create the jigs and fixtures used to assemble the lights.
Probably your best shot is to see if someone can provide you a picture of a set showing the screws after having been correctly adjusted. I can confirm that final head light aim was an assembly adjustment so they were never believed to be correct out of the box.
Exactly. I’ve actually contemplated stretching the springs to make it easier, but figure that may be self-defeating. Maybe next time I’ll cable the end to my wife and make her walk across the garage for me.?
Thanks for all the replies/info.
To hook and unhook the springs, this hook is worth its weight in gold though it costs only $6. You can make your own in a pinch out of a wire coat hanger. https://www.amazon.com/gp/aw/d/B095HBBSCF
Sold! Hope you get your commission! I even had plenty of points to pay for it, almost like a “freebie”!
Thanks again, finally got around to replacing my dead low beam and put the bezel on first, then used this tool to afix the spring. What a difference!
