Hey. Is there any company that does dash pad restoration? I have a pad that has some small cracks in it. I have been reading about how to repair it myself. I’m not sure if I’m that talented. I was wondering if there is anybody I could send it to that would redo it at a decent price.
If you have to remove the dash pad to send it out for restoration you might consider replacing it. What year is your Cougar?
Steven
It’s an early 1967 standard. It didn’t have the bezels around the idiot lights. I was trying to add them and I ripped it a little. It has one other small crack. I was thinking if I sent it off the company might be able to put them in.
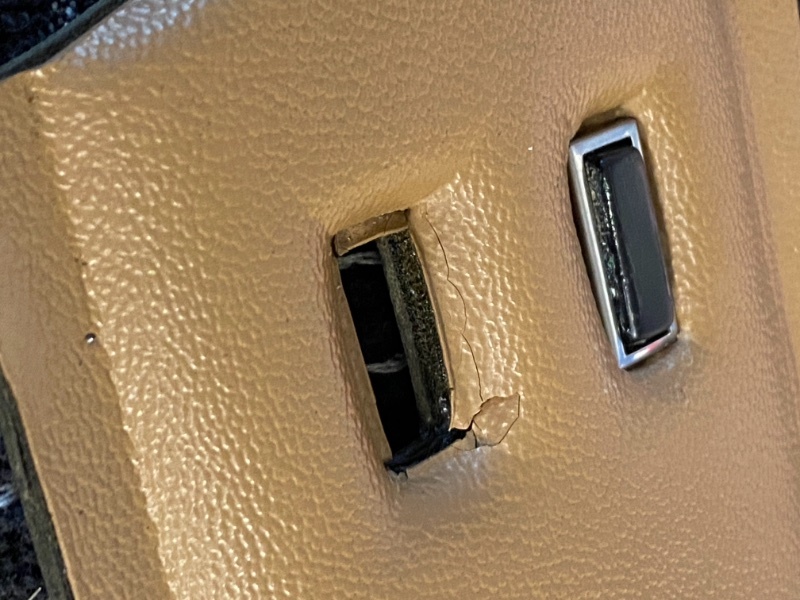
I apologize, I thought you were talking about the dash pad by the windshield. If it were mine and that is the only crack, I would lean towards self repair before sending it off anywhere. A possible solution, adhesive caulk. It can be found in most any hardware store. I would use paintable latex caulk close to the dash pad color. If any painting is needed in such a small area, I would use craft paint. Most craft pairs are water based, come in a variety of colors and can be mixed to match with little effort.
Steven
I never thought about caulk. That might work. I read about Starbond CA thin glue working, but I’m kinda afraid I might make a big mess of it. Then I’ll still have to get the bezel to fit.
Definitely work “small”. Small amounts of glue or paint at a time. That way your “mess” will stay small. And don’t be afraid to quit while you’re behind! If it doesn’t look like it is working the way you want, then stop. Don’t keep fiddling and adding stuff - that’s how small messes become big messes. You can always come back to it and try again another time, with a steadier hand or a different shade of paint, etc.
If it were me, I would use a toothpick or needle to put the caulk exactly in / on the cracks. Then wipe it with a finger or damp cloth to take the excess off of the surface and force more caulk down into the crack. The goal being to fill the cracks so they aren’t obvious and also give you a “level” / matched surface that you can paint. If the caulk color (almond?) is close enough you might not need to paint it. If you do paint it, again, go small - use an ultra-fine brush (check your local craft store). Don’t build up the paint into a blob like you see on car paint touch up jobs. Just a very thin layer to cover the caulk and blend the appearance.
Also, keep in mind that you are working a small area that will mostly be covered by a switch/button/light. Even though YOU will know it’s been repaired there no one else will, and they almost certainly won’t even notice your repairs even if they aren’t completely perfect.
Good luck and post up some pics when you get it finished!
This is one of those pieces that would be nice to have reproduced, if it could be done properly. But there are at least 4 different versions (67/68 with/without AC). They’re all so brittle now. I had a crack on mine, and used thin CA (superglue) to close it up. It’s still there, just looks less obvious. I was going to try to flow some SEM paint into the crack to help cover it up but didn’t get around to it. Your repair job looks much trickier than mine was though.