How do you remove lower part of the dash? I need to fix parking brake releasing cable and get wood and cauge cluster on table for restauration.
The lower part of the dash is part of the main dash assembly and does not come out separately. The cluster and dash face plate can be removed separately by removing a bunch of screws. It may be easier if you loosen and lower the steering column and/or remove the upper dash pad first. Park brake release should be accessible under the dash.
Jim
Sorry, but the lower dash can be removed in a 71. I have done it, but it was so long ago I do not recall what I had to do. The wood grain bezel around the gauges can be removed as well. I recall it has fasteners on the bottom edge and the top. But again I haven’t removed one in years. Take your time staring with the top pad and panel. They come out with removing the fasteners on the lower side of the pad above the instruments and on across to the passengers side.
Note, if you can get your hands on a factory shop manual it will have most oll the needed info.
Good luck and keep us updated…
It’s a one piece injection molded unit. There is no lower dash aside from the trim under the column. And removing it is a big job.
You do not need to remove the main plastic dash frame to do any of what you mention in your post. The park brake assembly is all under the dash other than the release cable that comes through the dash frame.
Now if you want to remove the woodgrain dash face and the instrument cluster again you do not need to remove the whole main dash frame. Start by removing the top dash pad. There will be a row of screws along the front edge, just above the cluster. Once all the screws are out you should be able to slightly lift the front edge of the pad upward. The pad will stay attached to the flat metal upper dash section. With the pad slightly lifted you just pull the whole thing toward you. The metal piece is held in place by 3 blind clips that will just slide backwards as you pull it toward you. Set the pad and metal section aside.
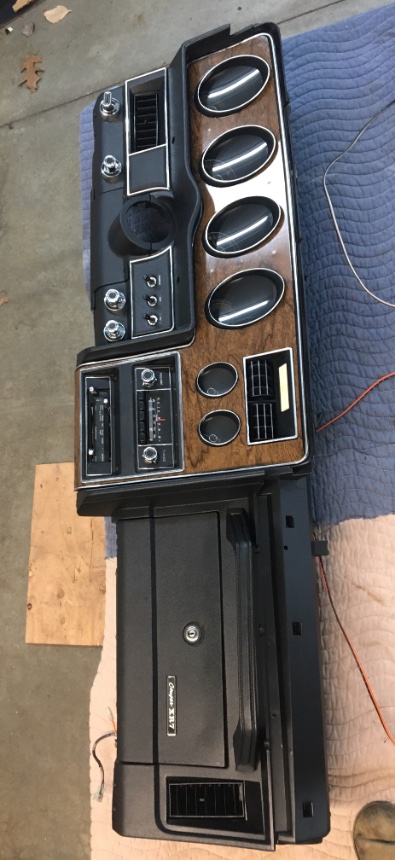
Now remove the bezel around the radio and heater controls. Pull the radio knobs off and remove the screws that hold the bezel in place. Set the bezel aside. Now the woodgrain piece can be removed. It is held in place by screws. You can see 2 of the screw holes in the photo Gyrhead provided, 1 above the toggle switches and 1 above the left A/C vent. You just need to do some looking around to find all the screws. Once all the screws are out the woodgrain piece will be loose. If your car has the center courtesy light that will need to be unplugged. If your car has A/C you will also need to disconnect the center vent ductwork.
Now the fun part, removing the instrument cluster. It too is held in place by screws and some are quite hidden down deep tunnels. It works best to have some sort of good flashlight or work light to find them all. A magnetic screwdriver is also a plus. Once all the screws are out you will be able to pull the cluster out just a little from the dash frame. With it out as far as it will go you will need to reach your hand in behind the cluster to unplug the main wiring harness plug. Squeeze the tabs on the ends of the plug to remove the plug. Then you will need to unplug the speedometer cable. There is a tab on one side of the cable that you need to squeeze toward the cable to release it. If your car is an XR-7 it will have a factory tach and you will also need to unplug that. There is a short lead coming off the back of the tach that goes to a plug. They just pull apart. With all that done you should be able to lay the cluster on your work bench. Good luck.
Randy Goodling
CCOA #95
Or maybe i’l buy that one from you🤔. Did you refurbish those cauge lenses or find new ones somewhere?
Just a careful clean and polish with a 3M plastic compound. Tedious but effective
All good info posted above. On my 73 I couldn’t get to the main wire harness plug nor speedo cable from above, its tedious so X2 take your time. Some people recommend removing the drivers seat for more room working under the dash, if you don’t expect to be sore the next day from twisting your body like a pretzel. The shop manual ( I like the CD version) is a excellent suggestion for future projects. Good luck ![]()
Seat removal is an excellent and easy idea. Popping out the rear seat cushion too also gives room to lay flat and easily shift around.
Great information here, however I am still looking for the wood grain piece screws for the right side…