Can someone help educate me and explain what this chart is trying to tell me? I think I get it, but don’t want to assume too much. For example, the first two columns refer to engine RPM, but the centrifugal advance specs use distributor RPM and camshaft degrees. Ultimately, I’m trying to set my timing advance (without a distributor machine), so looking for timing curve specs based engine rpm. I realize that a ton of factors from gasoline blend to altitude go into a proper curve, but I want to understand OEM specs before I start experimenting.
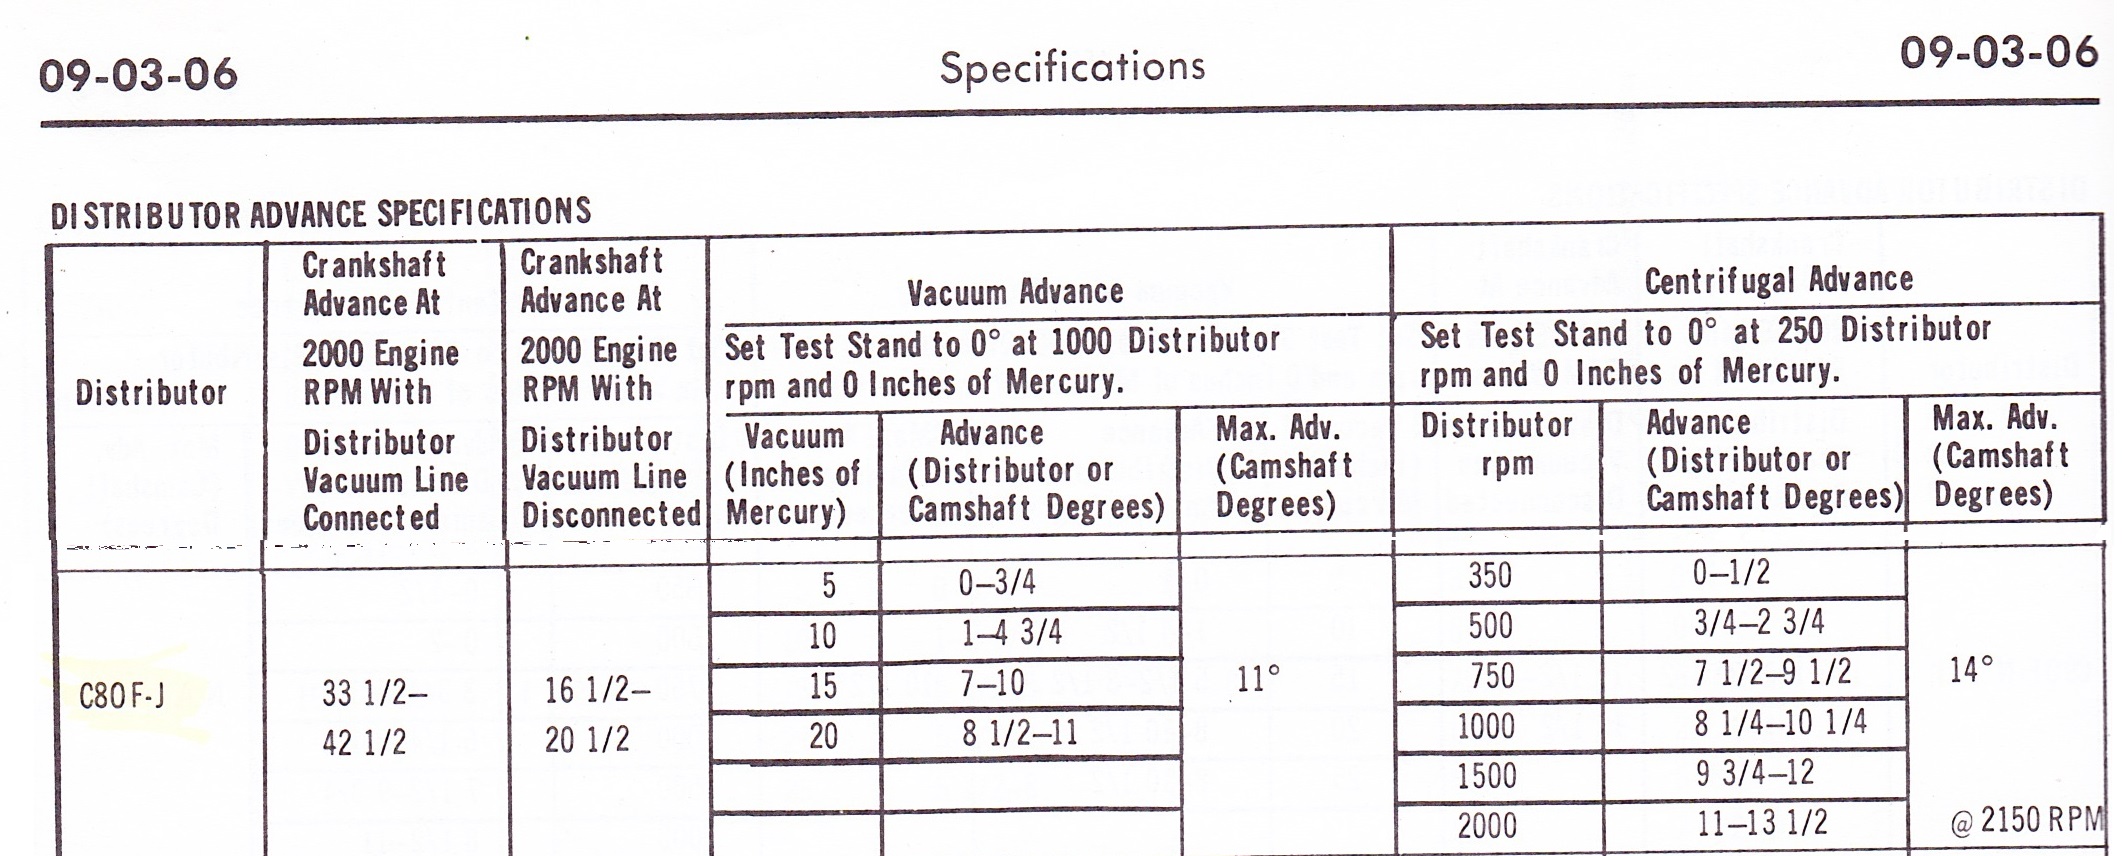
1969 Shop Manual, Section 09-03-06. 428CJ with C6 Automatic.
So here’s the skinny. It is showing your total advance at 2000 rpms with the advance connected and disconnected. If you are looking at recurving, you don’t need a distributor machine to do so. What you DO need is either a dial back timing light, and tune up tach, or a digital timing light that shows rpm as well as distributor advance. some graph paper would help too. At least this is how I do it: I start the car disconnect and plug the vacuum line and cap off the vacuum advance. I use the graph paper and write down o rpms to 2800 rpms as well as advance all the way to 50 depgrees on the left side. I start the car and idle it down to as low as it will idle. With the timing light hooked up, I write down the advance I am getting through the rpm band until I get to my specified max rpm. I recurve from there.
Don’t forget, this is referring to distributor RPM, NOT crankshaft RPM. Camshaft rotates at 1/2 crank speed. I would recommend you try the total advance test FIRST (far left column) this will verify your distributor is in the correct ballpark - and don’t forget to add initial advance to the equation.
Last thing - vacuum advance on the stock distributor is set with shims that adjust spring rate and a fiber sleeve that dictates total vacuum advance. Make sure you have these setup properly.
I just install an adjustable diaphragm on everything, but if you’re looking for originality. And as Gyrhead pointed out, your initial timing is part of your total advance. On my small block I am running 12 degrees initial with 36 degrees total. All of this is done by 2800 rpms. 3,000 isn’t so bad either. Here’s the thing: It’s kind of a trial and error thing, set up your curve and drive it, or have it on a chassis dyno, adjust your curve, drive it or re-dyno, until you are satisfied with how it runs and confident that you won’t have detonation. Each engine, the car’s gearing, altitude, cam, and the list goes on sort of determines what your curve should be. A lot of times the factories had conservative curves and jetting on the rich side as kind of a “safety net” to keep from melting down engines. Kind of the reason that places like Mr. Norm’s, Nickey, etc. existed in the first place. This isn’t always the case, but many times the tune could net you a good bit more performance without busting open the engine. I would use those specs as a base line and try a little more aggressive from there.
I ended up with the same amount of total advance but slowed mine down just a tad (was coming in at 2600) to keep from spark knocking with the crappy gas here in Atlanta. I really didn’t lose much of anything.
I understand the first two columns - easy to check with a timing light. It’s the camshaft rpm data that I’m questioning myself on. If I double the listed distributor rpm, should I see the same advance on the timing marks on crankshaft. In other words, if engine RPM is 2000, should I see 8.25 - 10.25 degrees advance on the crankshaft from centrifugal advance - or do I need to divide/multiply that column as well?
A couple other questions on your post:
“Don’t forget to add in initial advance…” So… are the numbers in the left columns in addition to the initial setting (for purposes of discussion, shop manual says to use 6 degrees btc). If that’s what is set, is the table saying total advance with vac connected would be 39.5-48.5? That seems high to me - even with 1969 leaded fuel. Or are those numbers already including the initial advance?
“shims that adjust spring rate and a fiber sleeve that dictates total vacuum advance…” Now I’m confused. Everything I’ve read (including the shop manual) says that adding shims reduces total vacuum advance (not just delay it), but what you say seems more logical.
guitar… thanks for posting, but my questions really are more geared to the table than what I’ll do in reality. I already know I can’t use as much advance as the manual suggests without pinging. I’ve been mixing in race gas to overcome that, but going to try to tune for pump gas and see if I’m still happy enough with the performance.
Now that I re-read the table, I’m a bit confused too. Does the fine print say anything about initial advance? Because I agree that if you added initial to column 1, that seems like an AWFUL lot of total timing - especially for a fairly high compression engine.
Regarding the vacuum advance, adding shims increases the spring rate, which increases the amount of vacuum needed To initiate advance. The total amount of vacuum advance is dictated by the height of the fiber stop, which will bottom out and not allow additional movement of the diaphragm.
Unless you have a distributor machine, I would just follow Guitar74’s advice and forget the table in favor of a methodical approach to tuning based described above.
Since modern gas is nothing like what we used to get, I don’t try to use the chart. The only thing that seems certain is that you want to limit initial plus centrifugal (mechanical) advance to about 38 degrees.
In side the distributor there are two "windows of different width that control mechanical advance. I think yours will say 13L (13 degrees) on one side and 15L (15 degrees) on the other. This is the number of degrees in cam rotation, so you double it for crankshaft to 26 and 30 degrees respective. I use the 13L position on FE’s. This allows me to run more initial advance, typically 12 degrees (crankshaft). So 12 plus 26 is 38 degrees. I find that running 6 degrees initial and 30 mechanical is a bit dull off the line. Once I have this set, I like to see how fast I can put the timing in, this is determined with a bunch of springs. Usually I can get it to around 2500 RPM. Elevation and fuel differences are going to effect results. The main thing is I don’t want to hear any pinging under hard acceleration. There is almost no vacuum advance under hard acceleration. To tune vacuum advance I try to just tip into the throttle and listen for ping. I will add shims or tighten the screw if needed but I almost never have an issue with vacuum once I have the mechanical dialed in. It makes zero difference in performance but it does help with cooling and mileage.
One last caveat: temperature matters. I try to do this on a warm to hot day. Your results may vary.
Thanks, Bill. It always seems that big blocks will handle a couple more degrees. I see this in my other make of experience as well. Small block mopars like around 34 while the big blocks like around 36. It seems a little general, but a lot of the small block Ford guys I know seem to run around what I am, while the big blocks go about 2 degrees more. Much like you I tried the factory timing spec and my car ran like a turd off the line so 12 initial and 36 total but a little slower due to crappy fuel. Not all octanes of the same number are equal.
No prob, Mr Eos. I just thought you might be going down that road and was trying to let you stand on my shoulders vs having something that feels like a vw off the line.
Mr Eos,
Good sound advice here. Find a good conservative total timing (initial plus mechanical) that suits the fuel you’ll run. You’ll know it’s too much if it pings or surges. The play around with the rate using springs. Generally the more gear & lighter weight of car, the faster you can bring it in. Then dial in as much vacuum as it will tolerate without tip-in ping.
Hate to say it’s an art, but every engine is a bit different, and methodical trial & error is often the way to go.
This was going to be my Saturday project, but a buddy invited me to go look at a barn find he’s been offered. '69 Mustang convt - Acapulco blue with white top & interior, parked 30 years ago - the property sale is closing soon so the car has gotta go. Timing is everything… so mine can wait.
Went and looked at the '69 Mustang Convt. Nice body panels. Mostly complete except for a few trim pieces. No pimples or swollen seams on doors, fenders or quarters. No cracks in shock towers. No ripples or wrinkles or other signs of collision. Interior might clean up - has some seams separating on the front seats that probably can be sewed up. Decor interior with knitted vinyl. Unfortunately the underside will need some major work - both torque boxes and floor pans are toast. The inner rockers are completely gone - but the doors still close with good gaps. Engine turned by hand - although the water pump resists. Really surprising how good the body panels are compared to the undercarriage. Oh… it’s Gulfstream Aqua, not Acapulco blue. One repaint that looks like it will clean up nicely.
Decided against ‘re-curving’ my distributor. I just set initial a bit shy of 10 deg., added a shim to the vac advance and have total advance with vac attached at 38. Runs great - no pinging, quick from a stop and good power thru the rpm range. Still chirps the tires going into second.
A shop just opened in my area with a chassis dyno… only one within 80 miles… so that’s on my list.