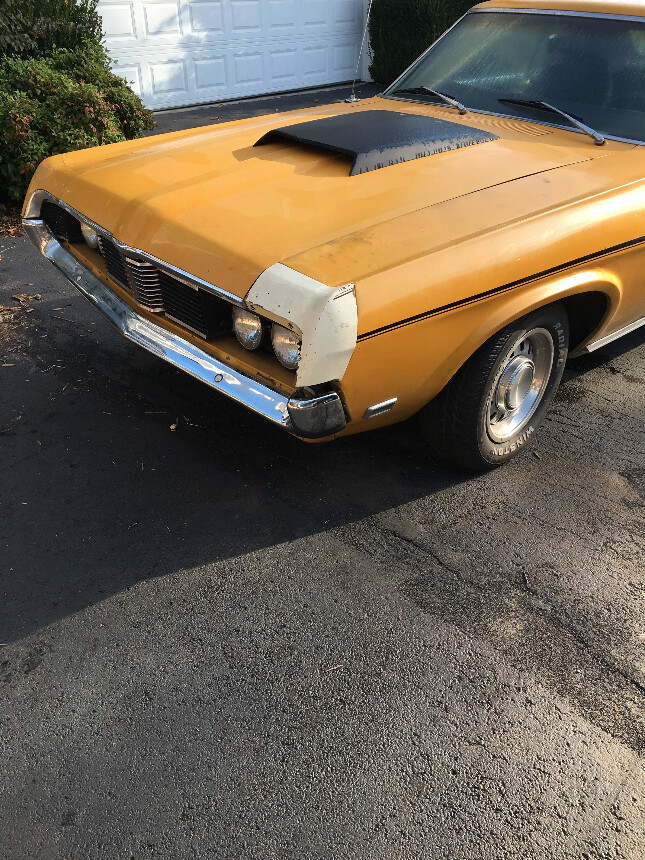
Restoring a 69 eliminator. It is missing the driver’s front fender extension (the one with the cougar emblem on it).
I got one on Ebay, but I am unsure how to bolt it onto the panel. There are 3 bolts and I can’t figure out how to get to the backside to put the nuts on.
Appreciate any help. Thanks.
You should just need to remove the splash shields (get it the wheel well):

It can be a real pain. Once the shield is removed use a 1/4 drive deep well socket and a couple of long extensions. I take a little weather strip adhesive and stick the nut with the washer onto the socket. Then reach up in there and get it start by hand and then tighten it all down once it is aligned. Easier with two people to have someone holding the fender extension while you start the nuts.
Looks like there is a vacuum canister in the way.
So it looks like I need to do this: remove tire, remove canister, remove splash shield? Looks like I don’t have to take off bumper.
Going to repaint car later. Is it best to sand and primer this extension before I install it?
Thanks for your help.
Ahh yes, the canister. I converted my system, and forgot about that, but yea.
My '67 shields are metal with a rubber edge boot. I think yours may be plastic.
Now there’s a rarity. A Cougar owner that doesn’t have three or four sets of extensions lying around…
I took off ond put back on mine trough the enginebay, just opened the hood, and did it from the side, a bit tight, but doable, then you don`t need to take off the splash shields or vacuum tank
There should be a little rubber gasket between the extension and the fender too, iirc.
I recall not having to pull off the tire, or the vacuum canister. Did a lot of it by “feel”, is what I remember.
Don’t feel bad if you need to take the fender off to do it right. I have done it both ways and found removing the fender results in less swearing. The total time to pull the bumper and miscellaneous brackets is not that bad assuming you have a helper. But yes, it can be fiddled together with sockets, extensions, glue, and tiny people to help.
Is there a conversion kit to make the system more reliable?
I got it on, it was a pain though.
Glad you got it. There are electric conversion kits that do away with the vacuum system entirely. Since you’re restoring an Eliminator, I’d advise sticking with the stock set-up, though.
In my experience, the most common cause of problems is a vacuum leak at one or more of the many hose connections. Its not terribly unusual for the hoses to develop small cracks or lose their elasticity where they plug into to another component, causing a loss of system integrity. These can be frustrating to track down, but they can usually be fixed by simply trimming back the hose 1/2 of an inch and re-connecting. The second most common problem (again, in my experience) is failure of the in-line check valve at the back of the manifold. FoMoCo used these on LOTS of cars in the '60’s and '70’s, not just Cougars. I always keep an eye out for them any time I visit a salvage, but they aren’t as common as they used to be. Otherwise, besides stock replacements from the usual vendors, inexpensive one-way vacuum valves can be purchased from ebay or industrial supply companies that function that same, but look different. They’re very difficult to see with the stock air-cleaner in place though, so depending on what level of restoration you’re shooting for, that could be an option, should you need a check valve.
Although less common, the vacuum circuit in the headlight switch can occasionally fail. Fortunately new switches are still availale, and relatively inexpensive, from RockAuto, NAPA, etc. Other potential failure sources are the auxiliary “open” valve at the drivers-side front of the engine compartment. These seem to be pretty robust though, and Its much more common for a hose to develop a leak where it connects to the valve than for the valve itself to leak. The vacuum motors can allegedly go bad, although I’ve never personally experienced it. Fortunately, rebuilt units are available, should you have the misfortune of experiencing a bad headlight door motor.
I’ve also heard that the vacuum reserve canister in the driver’s side inner fender can rust and develop pinhole leaks, if the car has had much salt exposure. Generally not an issue on cars from Oklahoma, Texas, Arkansas, etc., but if you picked up a car from a location where rust is prevalent, its worth checking, should all else fail.
Of course, all this is assuming the system is properly assembled and none of the hoses are misconnected. The hoses are color-coded, so it isn’t all that difficult to verify. If the lines are dirty and the colored stripes are hard to make out, waterless hand cleaner (Goop, GoJo) works great to clean them and reveal the original markings.
Hope that helps. Good luck!
Thanks! Luckily my headlights go up and down like they should, so I am going to keep them stock for now.
Installed. Looks like it needs a gasket between the fender and extension, but will not worry about it until I repaint it (which will be a while down the road).
Here’s the gasket kit you’ll be after one day. Cut to suit.
http://www2.cougarpartscatalog.com/100022829.html
Solid project to be starting from.