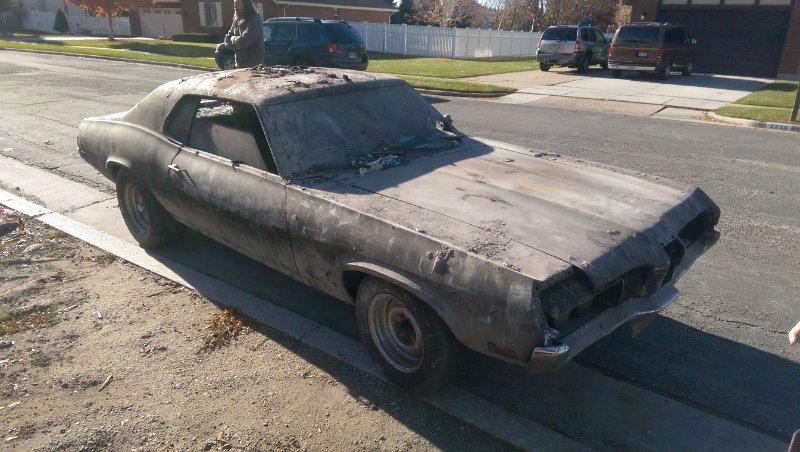
So, I’m a long time Cougar fan and always dreamed of owning one of these elusive cats, and last fall an opportunity fell into my lap. In the local classifieds a poor guy was putting up his 1970 project car to offset the cost of rebuilding his home, which had burnt down. The catch was, the car was in the garage when the place went up! It had melted his new Toyota and 2 motorcycles to slag, however due to fine late 60’s Detroit craftsmanship, the Cougar was mostly spared.
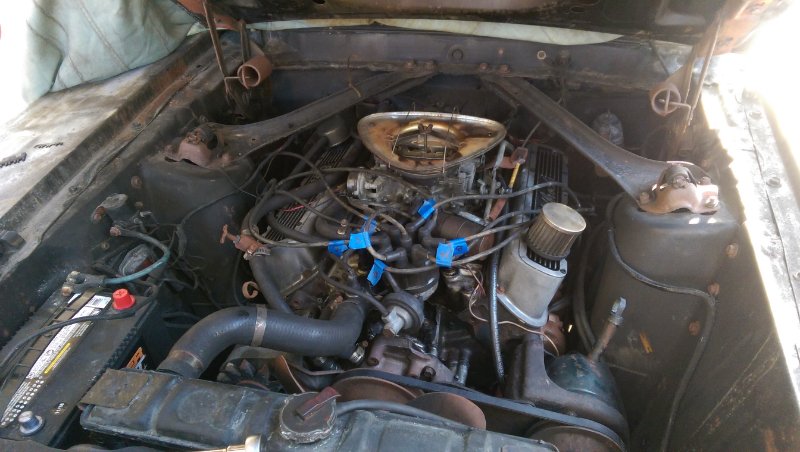
The glass had been busted out during the firefighting efforts, and debris had fallen on the roof, melting the headliner and filling the cabin with soot. Tires had blistered and nearly everything under the hood had oxidized due to the heat. All the documentation on the car had gone up in smoke, (literally). What owner was able to tell me was that it has a 351w bored out 40 over with Edelbrock intake and Edelbrock 4 barrel carb. He was unsure of any cam/crank upgrades as the car had been parked for about 16 years.
Despite its obvious issues, it was too good a deal to pass up. I wasn’t looking for a project but this one fell into my lap. 2k later, I had the old girl towed to my house and got the glass replaced to survive the long Utah winter. Now that the weather has finally cleared up, I’ve started in on trying to get her road worthy. The promising news is that after replacing the fuel tank (due to a large hole) engine flush, oil change, new belts & new battery I was able to get it fired up. It sounded good, but maybe a bit of a miss on one cylinder, so I didn’t want to press my luck. I then changed out the the cap, rotor and plug wires, but now the old girl wont start up. I’ve back tracked the firing order to make sure I’ve got everything wired up correct, but still nothing.
I’ve decided to move forward with the other basic fixes that I’ve bought parts for (cooling system upgrade w/ new water pump, radiator, thermostat and adding a fan clutch) I know I’ve got weeks /months/ years ahead of me but hope to share positive news here and hope to get some advice and tips from the community.
It will probably make the previous owner very happy if in the future you could send him pictures of the car completed. Glad you are saving it, many would have shrugged their shoulders and scrapped it. Welcome to the site!
1st off, welcome! 2nd, you weren’t kidding when you said long Utah winter, it’s nice to finally have some decent weather the last couple weeks. 3rd best of luck on your project looks like you have a big one, also, I’m in Utah county if you need help, I can screw em up just as good as anybody …
I’m with Don, try to keep in touch with the previous owner, they seem to like it.
Welcome to the site. You’ve got some moxie taking on a project like that. I hope the sheet metal hasn’t been ruined from the heat. Good luck and keep us posted on your progress.
I would usually say run far away from anything that was in a fire but that one seems to have survived better then most do. Even the sheet metal doesn’t look too bad, That will be a big project but kudos for taking it on to save it from the scrap yard!
Maybe the wiring harness, ignition switch, points, coil, condensor cashed in. Run 12v from the battery to the positive on the coil, if no spark when cranking then check coil. Is the distributor spinning?
So minor update. This past weekend I pulled out the old water pump to begin the cooling system upgrade and wouldn’t you know it, just like clockwork, everyone favorite thing to happen when dealing with cooling system happened and I broke a bolt off. It was only one bolt, so no big deal, I was till able to get the water pump off. Unfortunately not quite enough of the remaining bolt was showing to easily get it backed out, so instead of going the easy-out route I figured it would be simpler to just pull the timing cover and get that bad boy out with a bunch more of the bolt showing.
Thats when things took a turn. After pulling all the visible bolts out of the timing cover and the front of the oil pan, the sucker still wouldn’t budge. After much grunting, pulling and prying. upon closer inspection, it turns out there are 2 additional broken bolts in the timing cover that had been sheared off sometime in the last 30 years.
So now I’ve found myself with the prospect of cutting off the old timing cover, as these old bolts are snapped off inside the cover and I put a sizable crack in it trying to pry things loose after a few good PB blaster baths.
I’ve already gotten a replacement once I can get things off, also considering replacing the timing chain considering I’ll have everything open already. It never ceases to amaze how one small project can lead down the deepest of rabbit holes…
I’ve already gotten a replacement once I can get things off, also considering replacing the timing chain considering I’ll have everything open already. It never ceases to amaze how one small project can lead down the deepest of rabbit holes…
The joys of working on older cars. It sounds to me like you have a good plan. Get the old chain out and replaced will be some peace of mind whn you do get to start driving it.
Start by drilling a small hole in the center of each broken bolt, and keep going up in bit sizes until you can work the pieces of broken bolt out of the hole. DO NOT be tempted to use an EZ out, which will break off in the bolt and leave you with a much bigger mess than you have now.
I have a whole arsenal of bolt extractors and they do wonders getting broken bolts out. You do need a quality extractor and sharp drill bits, the cheap ones only cause more headaches. My favorite set is from Snap-on with left hand drill bits. These work for most of what I come across. Snap-on Store
Your correct with not breaking them. That makes your day really suck! The extractors are much harder then the bolt itself so forget about drilling out with conventional drill bits!
Well, you were not kidding about the two week project.
So this past weekend I was able to successfully cut off the old timing cover exposing the bolt I broke and the two surprise bolts left by the previous owner. Using a can of PB blaster & a bolt removal tool that clamped on the exposed studs, I was able to get 2 of the bolts out with relative ease.
However one of the old bolts snapped off immediately, flush with the block.
I’ve purchased a set of left handed drill bits & extractors, I’m hoping that it will come loose while drilling out with the bits, as I’m hesitant to use the extractors from reading horror stories and personal experience.
Also, now that I’ve got the cover off, looking at the slack in the timing chain, thats got to go. To make even more work, the oil pan gasket on the front of the pan tore free when pulling off the timing cover, so once I get the front of the engine worked out, i’m going to have to drop the pan and replace that gasket.
I couldn’t find anything from ARP other than the complete engine kit, and with all these other unexpected costs, that is exceeding my current budget. Any suggestions on replacement fasteners?
You are not alone…even though Im a loooong ways away…I would be happy to help…as I lost two classics in a terrible garage fire…1 of them being my sons 70 XR-7 vert…I currently have a 70 vert parts car…351W 4 speed vert…It was too good a deal to pass up as I wanted it for the mint Red Decor Interior…the rest is up for grabs …let me know what you need…I got the car…for next to nothing…help me pay it fwd
On starting the engine after the cap/rotor/plug wires swap you may have found out some info on the cam. It is possible that it has a 289/302 cam in it and hence would have a different firing order the 351-W. It would not hurt to try wiring it up as a 302 and see if it fired.