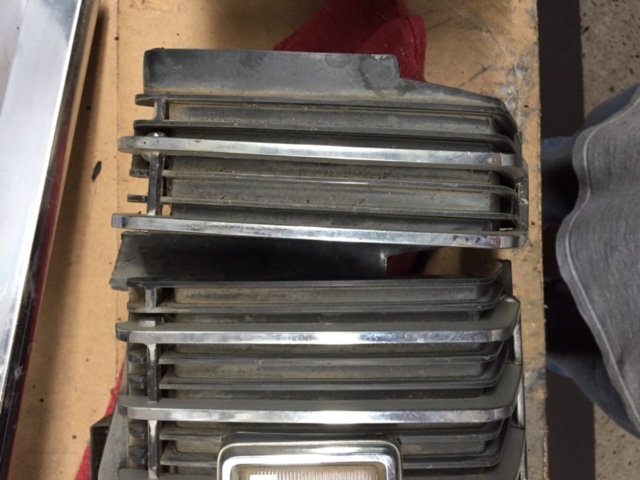
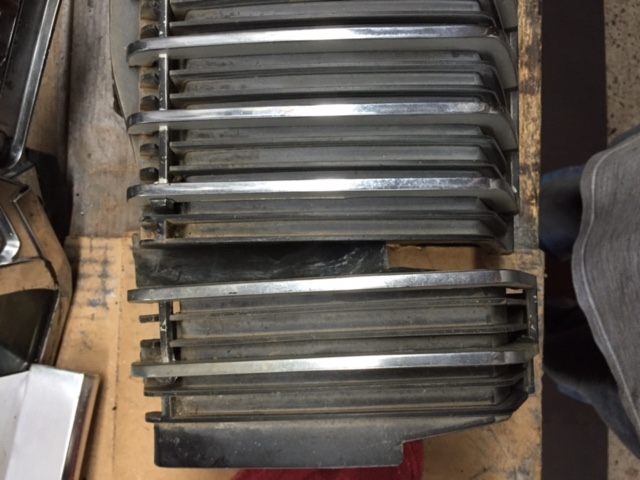
Does anyone know how to straighten the grills while they are on the bench? Any and all suggestions would be greatly appreciated.


This might help.
http://www.mercurycougar.net/forums/search.php?searchid=2552073
Here is what I started with.
After removing the steel back frame I used a industrial heat gun to warm the pot metal. After I had it very hot I began slowly moving the bent portion of the grille back into place. My welding gloves were a must have for this process.
The alignment is slowly coming into place and I’m getting clearance for the headlight door to open with rubbing the frame/grille.
This was the end result. I’m pleased with the way this process work. I was scared to use a torch as the pot metal could be easily destroyed.
Here is a photo of my of my assembly on the bench.
If you go this route just heat the pot metal and slowly move it back into place. Slow and steady is the process moving the pot metal to fast can cause it to break. Good luck.
Steven
Thanks so much S CODE !!! Very much appreciated. I considered the torch idea too until I read how it melts/casts at such a low temp got me real concerned. Heat gun it is. Now, what about where the springs for the headlight bowls attached? These are broken and allow the spring to slip through the broken “V”.
You can use a torch. The issue is the fuel. Propane is too hot.
Butane will work.
There are a few other things to consider. The metal has a memory. It will return to the misaligned state over time. The trick is to deep freeze the grill immediately after heating.
Best time to do this is a very cold winter like below 0 Let it over night outside after bending.
Where you apply heat, how long, and how you bend it back into place is the hardest things to achieve.
I had used bent ones to practice with. It takes a lot of force, heat on the bends of the casting as not to crack them.
Credit Mr Vac. for some of this info !
Butane and propane are almost identical in flame temp, and Butane is just a hair, like 3 degrees hotter so there must be something else that makes the difference. I am pretty sure they are both in the 1900 to 2000 degree range. I would recommend the heat gun even if it takes a while longer. I started making a spring loaded jig to straighten these but never completed it after doing one by hand.
As Bill and I have stated the heat gun takes longer (slow and steady process) but it works. I have had no issue with metal memory on my grille or any other metals I’ve worked with. I guess in the end you will have to use the method that you feel will work best for you.
Steven
I don’t suppose there’s a repo made in steel?
The grill failure is actually pretty complex. The vacuum motor maintains constant pressure on the headlight door, and that pressure is then translated to the grill frame. The old timers will recognize these photos. There was a thread on MC.Net that discussed this that I can’t seem to find any more so I thought I would put them up here for posterity.
The red arrows show the path of force. The vacuum motor connecting rod is pushing up on the headlight door. Rotation of the door is checked by the stop which is pushing down on the casting that holds the headlights.

This downward pressure causes the headlight mount to bend outwards at the top. The red circle shows where the bumper strikes the casting. The red line illustrates the outward (convex) bend in the middle.

But the way the headlight mount bends is complex. On the bottom side the bend is reversed, bending inwards (concave).

When the headlight casting bends it gets shorter, pulling the adjacent grill sections with it.

The casting is actually torn or cracked in some places from the force. The rib in the following image has separated from the casting it was supposed to reinforce.

My thinking was that if you could build a jig with hard points in the correct alignment locations, and then release spring loaded bolts to put pressure in the right spots that you could straighten the grill out by putting it into a large oven, like a powercoating oven.
Of course all of this is going to be temporary if you put the original vacuum motors back in and subject the grill to all of that pressure. To fix that what we need is a better stop system for the doors, or electric openers.
If your thinking about any oven, watch the temp! They melt like chocolate! Thus the mention of Butane over propane. It does work.
There are also 2 different Mfg’s of grills from what Mr Vac told me.
Don has made mention about the poor quality “NOS” vac motors made in Mexico as I recall.
I only know of one grille made of steel for the 67-68 Cougar’s. It’s nice but not anywhere close to a reproduction. It’s made by Wild Wes Paintworks and was featured in Popular Hot Rodding in a Cougar build.
Here is the link to the grille: http://wildwespaintworks.com/product/1967-1968-mercury-cougar-custom-grille-set/
Here is a link to the Popular Hot Rodding article: http://www.hotrod.com/articles/how-to-build-a-custom-grille/
Mr. Vacuumman has completely restored grilles which are beautiful.
Here is a link: Critter Creek Cougar Restorations – Headlight Grille Complete Plug and Play –Original-Restored (Call to Order)
Steven
But it is arrow straight even though it eliminates one of the things that makes these cars special. Probably too costly for proper repo.
On the new “stops” matter, it’s on my design list, maybe next year I can get to it. Right after Vette wiper door motor, Torino headlight door opener kit, Galaxie headlight door opener kit, Cougar custom dash faces, Cougar/Mercury signs and a 62 Biscayne 409 (“Barn Find” tribute)…
Bill,
Thanks for (re)posting this information and photos. Having a better understanding of the problem (both cause and effect) really helps. I even bookmarked the thread for future reference!
Thanks, too, to others for tips on how to fix.
WOOOOOOOOOW !!! Thank you so much folks for the suggestions on how to tweek the old and the tip on the repro/redesigned grill !. I am sure I can do this with the slow heat approach. Although I really dig the reproduction one. But so far my dad hasn’t informed me of any trust fund. I did get a kick out of the “putting it outside in the 0 degree temp after getting it where I want it” Just a bit hard to do that here in Houston. lol.
I cant say thank yall enough for ALL the info provided so I can make a good decision on how to fix it.
UPDATE !!! Used the heat gun last night and straightened them out almost perfectly. Wow this stuff is really malleable when heated. I heated it for 1 minute in multiple spots then brought heat back to the start spot. Placed a long flexible pry bar and got it flexing in the right direction. Hit it with more and heat and then let it air cool for a few minutes before pouring water on it. I measured it afterward and top to bottom measurements are within a 1/16" of each other.
You guys are the stuff !!! Thank you all again !!
Bringing this back up from the dead for two reasons, 1 so I can find it again and I do have a question. First off great thread and thanks for posting all this great info guys!
I am going to be taking on this project pretty quick. My grill is pretty straight but I do have the outer edges touching the headlight door. So my question is when heating and bending in the locations Steven talked about what does that do to the area between the headlights like Bill pointed out? Do you need to address this area as well or leave it be and bend at the outer section? If it matters I plan to dump the vacuum actuators at some point which I hope to be before they go back into the car.
In case anyone is wondering this method works great on the rear tail lights as well. One of mine had a decent bend in one of the vertical bars. Enough of a bend that it cracked the lense. I have a couple of complete tail lights but the chrome on my original was the best so I wanted to use those if possible. I fiqured I would give the heat gun a try and see what happened. I was able to get it to move and straighten out without issue and it looks brand new after a little steel wool and paint. I should have grabbed before and after shot but was too busy working.


