Hello and thanks.
First of all i want to say that if you dont have time or isnt a little bit handy i recomend you to buy a complete plug and play kit.
But if you like me wants to do as much as possible, save money and like the felling when you created something that works.
Then i think you should do it yourself.
One of the reasons of that i did this is that i live in Europe. To buy this kit from The US would cost me much more than $3-400.
Shipping and customs duty is about $200. 
Another reason is that to refurbish the vacuum system is more costly than this conversion. Actually my vacuum system worked quiet well, but i had a minor leak that opened the doors after about 10 minutes. That annoyed me.
This conversion doesnt make any huge damage of the car, and to rebuilt the vacuum system back again is easy.
OK, here is some more info and my opininon about this swap/conversion.
First you have to get a actuator. A Miata or Probe pretty much same, same.
Maybe the colors of the wiring is different but the function is the same.
I bought mine from a scrap yard, it was a 21 y.o. actuator and looked like new inside when i took it apart.
Therefore IMO its not necessary to buy a refurbished one. Try the actuator before you buy it, if it works it will be good for this application.
There is left and righthanded actuators, it doesent matter which one you pic. You can mount the actuator on both sides in the car.
How you decide to mount the actuator is up to you, It can be mounted in several positions. Pointing forward, backward down in an angle or as i did mount it, straight down.
The reason for this is that the actuator is less visible. I bougt a lefthanded and it ended up mounted to the left side.
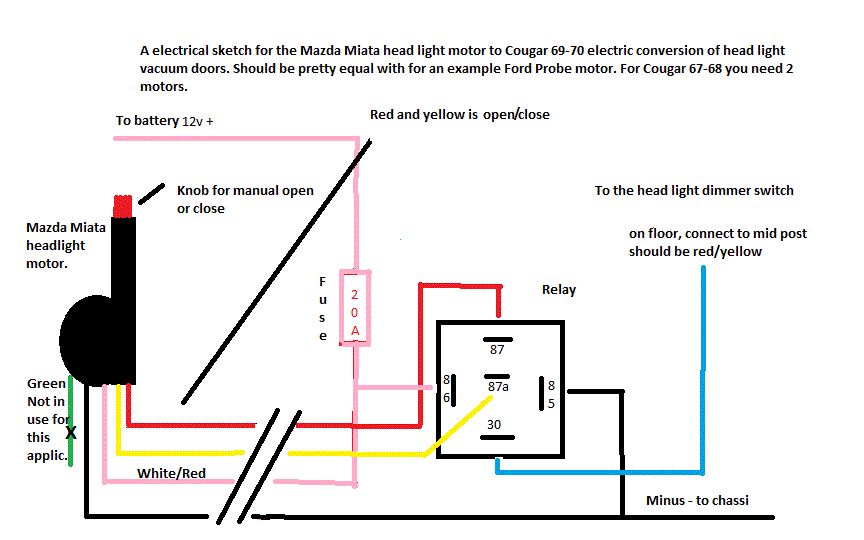
The miata actuator have 5 wires. One (green) isnt in use for this application. You have one 12v+ wire red/white, a black - ground.
Then it is one red and a yellow wire. When you have feed to either the red or yellow wire the actuator will rotate 180 degrees, a half turn.
When you engage the red wire it will turn 180 degrees and the door will open, and vice versa for yellow (close).
To shift between these wires you have to mount a switching relay, and get a signal from the headlight switch that the headlights is turned on. This signal you pick up from the headlight dimmer located on the floor. Maybe it sound complicated, but its quiet easy.
The attached pic shows a electrical sketch over my solution.
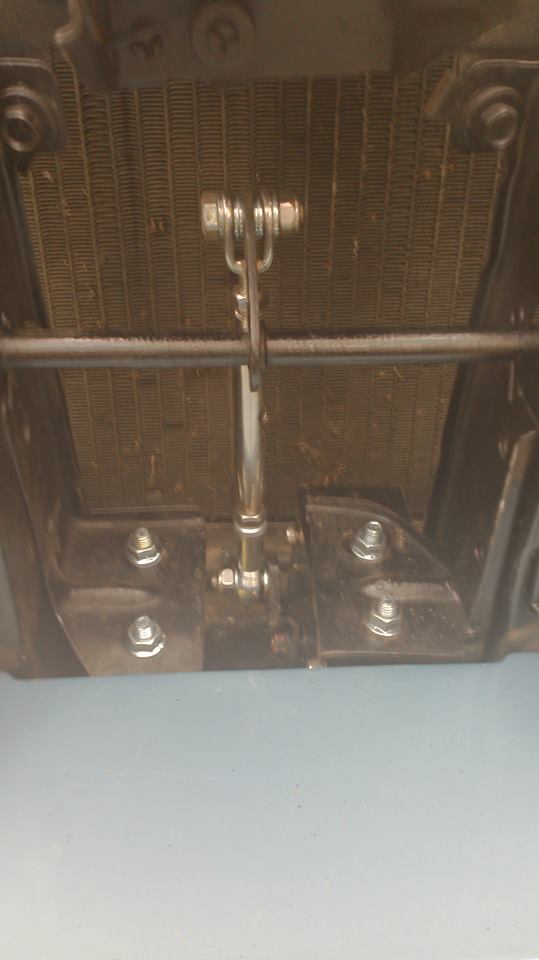
The actuator bracket i made from a piece of 6"x5" sheet, i recomend to use the same thicknes as the hood latch support. I did a 2" bend to get a L shape.
The actuators mounting space is 4"x6". You will maybe use other messures depending which way you prefer to have the actuator.
Fabricate the lever for the actuator is a little bit tricky. You have to meassure the travel of the headlight door lever (open to closed doors).
This meassure you divide in half. Make a arm with this meassure cc from actuator axle. You also have to bend the arm to get it to line up with the rod from headlight lever.
Also the actuator axle is with splines and can be little tricky to secure. I used M8 ½" bolts to the rod/lever joints.
I used 3 M6x50mm bolts for the miata actuator (7/16 head bolt 2" long)
and 2 M8x25 mm bolts for the bracket to hood latch support (½ head bolts 1" long)
The relay i mounted in the left corner behind washer bottle in a existing stock drilled hole (nearly unvisible).
Always have the battery disconnected when working with this parts.
Is this understandable or do you have more questions?
Excuse for my worse English, it isnt my first language.