Thanks! Neither colour is original. It came factory burgundy with a cream-coloured (vinyl roof). What you see outside is how I bought it. Will probably change the rims someday when the budget is a little fatter, but for now I can live with the spokes. I like the 17" look.
Sorry for sending other message twice. I’ve looked better.
Never understood why so many cougars shared colors inside and out. Always been a fan of contrast for the most part. Good luck with your car.
Ray
I agree with the contrast. Best to you Ray!
If you’re talking about mine, yes it is the original color (recently repainted) Madras Blue metallic. Actually the 15" styled steel wheels are next on my list once I get the suspension/brakes finished up. I think they’ll compliment the paint nicely.
Sorry…I didnt mean to hijack Ray’s question/post. I love the Madras Blue BTW…very nice.
No worries at all, nothing wrong with being proud of our cats! ![]()
I noticed that one of the P/S hoses was partially melted from contact with the exhaust manifold, so I wanted to switch to the “big block/1969” hose routing that runs under the motor. First step is to install this insulator/bracket. When I redo all the power assist stuff over the winter I’ll reinstall with the new hose routing.
The holes are pre-punched on the outer steel of the frame stand, but not all the way through. The good news is you know where the holes need to be, the bad news is you have to drill them out the rest of the way. Unfortunately there is only 3" of space between the frame stand and oil pan, so you need to get creative drilling the holes. I ended up using a right-angle drill adapter and a combination of regular drill bits and step bits. The hole towards the front of the car doesn’t have to be perfect, it’s only for the tab on the bracket.
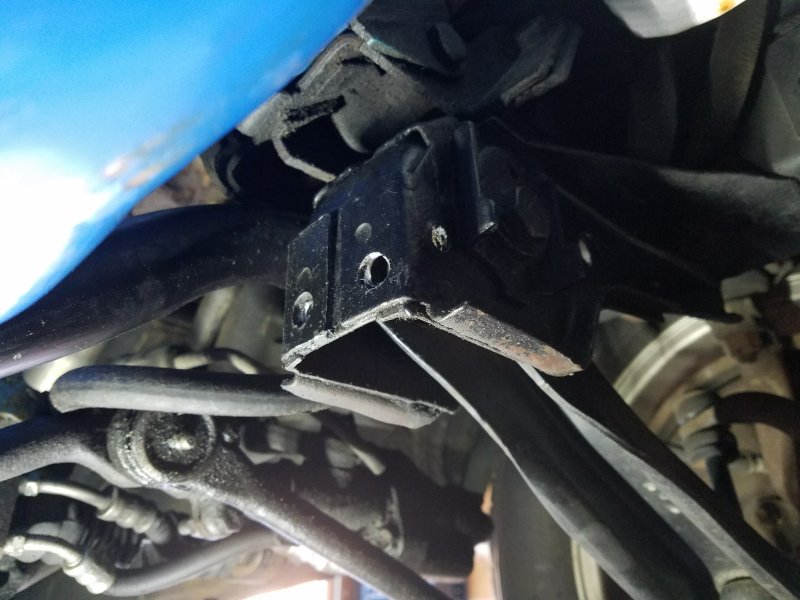
The one towards the rear of the car is where the fastener threads in. The bracket comes with a 5/16" self-tapping machine screw, so this hole must be drilled to 1/4" and as straight as possible for that to work.

I was a bit worried about the length of the fastener provided, I didn’t want to have any issues with it contacting the lower control arm. So after I used it to cut the threads I went with the shorter bolt from NPD.

Needless to say this is a much easier job with the motor out of the car, that’s the way to do it if you can.
Wow 133,
Can’t believe how much our cats share. I have misalignment on the same fender. Rides high, at cowl and hood, but gap spacing is okay. It’s a replacement Fender and a head scratcher. I just replaced my leaf springs with Scott Drake’s. About the only thing he has left made in the USA. Coils, shocks, upper and lower control arms, export brace, and brakes, completes the repair list for this year! There was some confusion with another member. I asked about the original color of your car. Good luck with the Cougar, it looks to be a nice solid example.
Ray.
How did your ride height come out with the new coils and leaf springs? I’m looking to get the car sitting level/have a slight rake to it. Right now its got the typical cougar reverse rake in a bad way.
Hey 133, I got the Moog coil springs from Summit, about $80. And I got the leaf springs, Scott Drake, from Summit also. These are still manufactured in the USA, for now. I was real happy with the way the car sits. The front came up about an inch because the coils were compressed, and the rear came up 2 - 3 in. It now sits just slightly higher in back, which was just what I was looking for. On the leaf springs, I went with the four leaf regular. I hope they’re still made here when you order them. This is just the ticket for you. Good luck.
Ray.
Hi all, it’s been some time since the last update but things are moving along as free time permits. The cougar is officially garaged for the winter, so I finally started tearing into the front suspension. Pulled all the power assist components (and anything that was in the way), and sent all of it to stangerssite for rebuild/blast/repaint.

Since I had one of the manifolds off anyway, I figured I would try my hand at cleaning them up/painting. I used an angle grinder with a couple wire brush attachments to remove most of the rust. Then I used Eastwood’s hi-temp cast gray paint on them, applied with a foam brush and they came out pretty good. I’m thinking about trying their brush-on engine paint next so I can touch up the block/heads without pulling the motor.

The manifolds look great. How are the reviews on the Eastwood paint? Does it hold up well?
Steven
Reviews were pretty good so I figured I’d give it a shot. The final heat cure happens when you run the engine up to operating temp. It’s not a paint-over-rust so it does need good surface prep to stick, but after the final cure it should be very durable.
The paint method is just temporary and won’t last more than a year, maybe more depend how much you drive the car and in what conditions. If you want lasting results you need to have them ceramic coated.
I like the idea of painting but ceramic coating might be the way to go for me.
Steven
I had really good luck with the paint that has ceramic in it on manifolds (I think what I used was VHT branded). That same paint is nearly useless on headers. I suspect the rate/amount of expansion works better with the ceramic on the cast iron than it does the steel tubes, though it was enough years between applications that they may’ve changed the formula too.
Yeah I’m not expecting this stuff to last 10 years, but if it keeps the manifolds looking nice for a while until I get around to putting headers on I’ll be happy. The car never sees weather and only gets driven occasionally.
Quick update since my last post.
Finally got all my power steering components back from Randy at stangerssite. It took a while, but Randy was honest with me about the delay and the finished product looks really good:

While I was waiting for the p/s parts I started some work on the motor. Removing the front brackets/pulleys for powdercoating, removing the water pump, alternator, harmonic balancer. As I remove parts off the motor I’ve been touching it up with the brush-on engine paint. With the exhaust manifolds and front accessories off you can actually get pretty good access to the motor for painting. After I painted the sides of the block I put the new starter in. I also used the paint on the new water pump, t-stat housing and oil sender extension that are to be installed.


Ok lots of progress to catch up on:
- Finished painting the motor, got water pump, thermostat, oil pressure switch installed.
- After a fail from rock auto I sent my original harmonic balancer to damperdudes.net for rebuild and got that installed.
- Pulled the distributor, cleaned it up and put on new cap hold-downs and vacuum advance.
- New trans cooler lines, this was a battle since there is almost no room to tighten down the fittings on the transmission side.
- Put the rebuilt steering box back in, then exhaust manifolds and heat riser.
- Got all the accessory brackets powdercoated semi-gloss black, put the rebuilt p/s pump back on.
- New export brace, luckily did not have shock tower sag so it went on pretty easy.
- New alternator, harness and voltage regulator (another fail from rock auto, alt. is clocked wrong but still fit ok).
- I was able to move the coil to the cylinder head, freeing up room to install a fuel line hookup kit with filter to the carb. The setup I had before was hokey and had the fuel hose laying on the intake manifold, probably not helping with my warm start issues last summer.
- Got the valve covers and air cleaner powdercoated. Everyone’s ford engine blue is a bit different but it’s a close enough match that it looks OK.
- New radiator hoses and water valve. Moving the coil allowed me to route these a bit neater too.
- Lastly I got the center link with rebuilt control valve and power ram installed. I’m glad I did the big block hose routing, but rock auto let me down yet again. Their hoses were not a great fit at all, took a lot of massaging to get them on and not hitting the pitman arm.


Everything is looking good. It’s cool to see everything coming together.
Steven