I fab and sell the kits. Anyone interested can email me at : catheadlights@hotmail.com to order FREE SHIPPING anywhee in the US.
See there you go I got you free advertisement that’s why I asked you through Ebay when I won the auction if you were on the forums as I know there is allot of people looking for a bolt in kit like this.
Thanks again for a great set up and can’t wait to get my wiring done so I can test them out.
Any hints for trying to bleed the hydraulic master on the clutch all by yourself??
Not sure if this will help. I saw this product on one of the Gearz TV episodes. If it works on brakes I would think it could be used for clutches.
Steven
I used to fight this constantly with my 5.0 Ranger…I found that if I cracked the bleeder on the slave and put a little pressure on the vent hole in the master cyl reservoir with an air nozzle, that would force fluid to the slave. My problem was with the Ranger master not the slave it self.
As frankley3555 has said, you have to pressurize the master and then open the bleeder. You can’t use the clutch peddle to do this job, it only makes it worse. Using the brake bleeder that pulls the fluid will also work. On my Saab, I used an inner tube from a bike,(a heavy one from a mountain bike) and cut the tube on each side of the valve stem about 10 inches on one side and shorter on the other. The short side is to be plugged and the other side is to be stretched over the opening with a hose clamp. This method only works on masters that have round openings. Then you pressurize it with a bicycle pump or electric one from the car for a short time. Once the inner tube inflates some, this give enough pressure to bleed the clutch system. If you don’t have a round opening, get a spare lid for the master and insert a threaded valve stem and pressurize that way, Im not a fan of this, because you can’t tell really how much pressure your putting in. This method requires you to check the fluid often, It does not take long for it to go down.
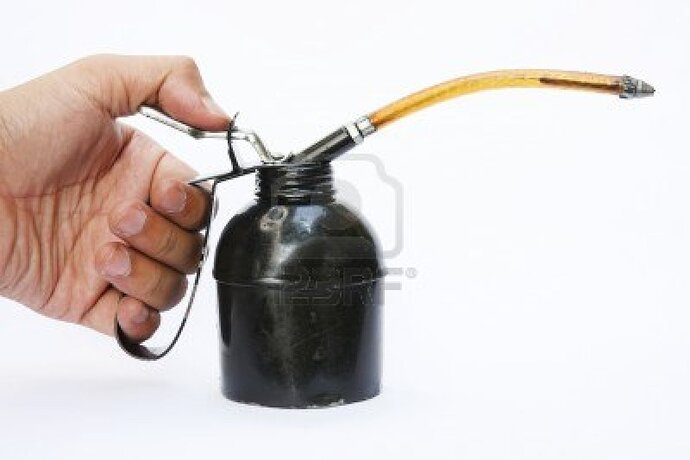
I used an “old fashioned” oil-can(think Tin Man), and filled mine from the slave UP. Worked like a champ, and all the air comes up out of the reservoir.
One of these:
You do have to pay attention to the level in the reservoir so you don’t overflow, however.
That is brilliant!
Wow great ideas. I will give these a shot tomorrow as just got home from a 4hr drive from a weekend at the lake. I will let you know what I tried and how it worked.
I now have sloooow headlight door opener kits. This kit allows you to adjust the speed. Works great!
Forgot my email. Drduitman@hotmail.com. To order kits. Thanks for the advertisement by the way. Enjoy your kit.
Damn I wish I waited the month to get the slow ones instead.
I would think that the system is the same for both, just the one part of the electronics added to alter the voltage. You should, I would think, be able to just order that part.
So being it is summer and we’ve been out on the lake allot relaxing on the boat and awaiting an appointment with a surgeon for my back as per the MRI results, I haven’t done to much to the car. All I can do most days is take my pain pills and sit and stare at her.
But at least I can do a few of the little things on the days when the back is not too bad and here it felt like Christmas in August.

what are these parts for?
Sorry I should of mentioned that.
The box on the right is the billet alternator bracket and the one on the left is the billet power steering delete bracket. I did it this way as I am planning on a manual rack steering setup not to far down the road and also because the 90’s 5.0 came with smog pumps that are not required. So the alternator bracket gets rid of all that extra weight and the big, bulky, smog pump and alt bracketry and the other delete bracket has the stock belt tensioner bolt to it instead. Keeps it nice and clean. The Edelbrock piece is the inline fuel filter with Russel -6AN fittings on either end to go strait onto the Eaton Aeroquip -6 push on fuel hose I have already installed. The billit piece on the bottom right side is a throttle body egr delete plate. On these swaps the egr isn’t really required and gives you more room between upper intake/throttle body and passenger side shock tower.
You’d think that being my third efi swap on a classic Ford I would of remembered all this stuff and pre purchased it but the memory is also going with age I guess. I will post a couple of pictures Sunday night with the result pictures showing why these are used or make an improvement when doing this swap.
