Inside the trunk of a 69 Cougar there are three places that the torsion bars can be placed, from back to front, which of these slots will provide the most lift ? Thanks
Hi Carlton,
Rearmost is the strongest (but still won’t support a spoiler!). Alternatively, it would be the place the rod ends are not!
Robert
WCCC has a recent video that shows how to adjust the torsion bars. Andrew makes it look pretty easy!
It still won’t open very far.
Mine are at the highest adjustment but still won’t hold the lid up. Going to add some gas struts someday to help.
Did you ever have the ones in your car out Scott? Reason I ask is that they are directional. If they get swapped side to side, the very thing you have described happens.
Bob is correct. Remove, reverse and reinstall the torsion bars and your problem should be resolved.
Ah, but is there a way to move the torsion bars to the next notch without scratching all the paint off? Mine are on the weakest setting and for the most part the trunk lid stays open, but if a light breeze comes along and I’m hunched over in the trunk, BANG on my head!
I don’t think I have ever had them out. They worked fine for many years.
Only car I ever had where I messed with the torsion bars was my 78 Zephyr. I took them out and replaced them with gas struts.
The first time I put mine in, I had them reversed, and like you describe, they did not hold the lid up. Switched them around and it was a different story.
Here’s the tool that makes this relatively easy (click picture to view on WCCC website):

Also on that page you’ll see my video on installation. There are a couple pictures in the video that show which bar goes on which side.
I was not able to avoid scratching the crap out of my paint, but it was rattle-can paint, so not the toughest stuff in the world. I will touch it up at some point.
https://www.youtube.com/watch?v=ZcWw41MlPcA
Oh yeah and to answer your question, the “notch” closest to the rear of the car would provide the most torsion.
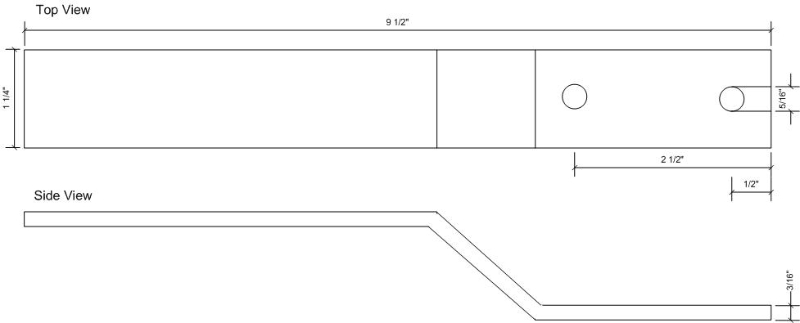
Years ago, I made my own trunk spring tool patterned after an original one from Ford. This is probably the easiest tool you can make. It took me about 10 minutes and since I had a scrap of metal it cost me nothing. None of the measurements is critical. I used 3/16” X 1 ¼” bar stock. Drill two holes as shown. Using a hacksaw, Sawsall, jigsaw or any other metal cutting tool, turn the hole closest to the end into a slot. File the edges of the slot smooth. Put the bar into a vise and using a hammer, bend it twice to make an offset for your hand to clear the trunk hinges. Use some spray paint to prevent rust.
I can use this tool without scratching my paint. I don’t know why the WCCC video makes such a mess of their paint.
https://classiccougarcommunity.com/forum/download/file.php?mode=view&id=3088
I think it was a combo of cheap spray paint and sharp edges on the tool. Had it been factory paint with filed edges on the tool it would have come out differently.
Nice. Couple questions on the tool. What is the approximate dimension of the offset created by the double bends? Also, the offset “shortens” the overall length of the flat stock from X to 9-1/2". What was your original flat length?
Thanks for sharing!
Maybe make the notch a bit bigger and line it with rubber tubing?
Good idea. I may try that!
I used vice grips to install mine recently and it was a bit of a pain. Taped the contact areas off and it didn’t chip. That tool makes it look a hell of a lot easier.
The tool makes adjusting the torsion bars much easier. I made my lien tool and did a drawing with measurements that I post in my convertible conversion topic. Here is a link to some pictures and a drawing I did with measurements: http://www.classiccougarcommunity.com/forum/viewtopic.php?f=41&t=3501&start=70
It’s an easy tool to make but ordering one from WCCC’s would be even easier for some people that don’t have access to some flat bar.
Steven
I don’t think I’d use rubber, it would deflect too much. Try lining the hole and notch with poly eurothane tubing or something similar that is hard but non marring.
That DIY one looks good, I like the shape of it better than the 90 degree version. Seems like you’d get better leverage. But either way, I think a tool like this is almost mandatory.
And yes, I did my rods and hinges with rattle-can paint, I’m sure factory paint or real automotive paint would fare much better.
I kind of wonder if I could make a version of the tool with bigger holes and rubber grommets (grommet cut out with a notch for the notch end of course).
The offset is about 1 1/2". For the overall length, make the tool first then cut to length. 12" of material would be plenty.
There are several things which will help prevent scratching. First make sure there are no sharp edges on the tool (file and sand them off with emery cloth). Cover the hinges in the car with tape (this is one of the only things duct tape is actually good for as it is very thick). You could coat the tool with plastic dip. This would protect your paint without the tool being too spongy. You would probably have to make the notch and hole larger to accommodate the plastic coating.