Thanks for all the tips. If you could share what you used for the chrome surround it would be greatly appreciated. Thank you - Jim R
Here are the colors if that’s helps anyone.

Titanium metallic is used for the Mylar chrome surround, charcoal black is for the basket weave and the satin black is for the panel
1 Like
Panel installed with new hardware. It’s not perfect and my repairs can be seen but I’m happy with it and a great solution to trying to custom make or find good used panels in the right color.

1 Like
Looks fantastic, DieselD. I’m really impressed that it turned out so well, repairs and all. Definitely not something to nitpick!
So you may not win best in show at Pebble Beach, it looks damn good.
Thanks guys. I’m impressed it came out so well too, between not messing up the vinyl installing the backers and actually painting everything I’m impressed with the results. I notice all the flaws but I bet most people won’t look at it twice when they are in the car. The best part is it was affordable compared to my other options.
I’m going for a nice driver quality here so I want it to be nice and done well but I’m not trying for concourse new. It gives a little freedom to try things first like the door panels where you wouldn’t take to attempted on a different build
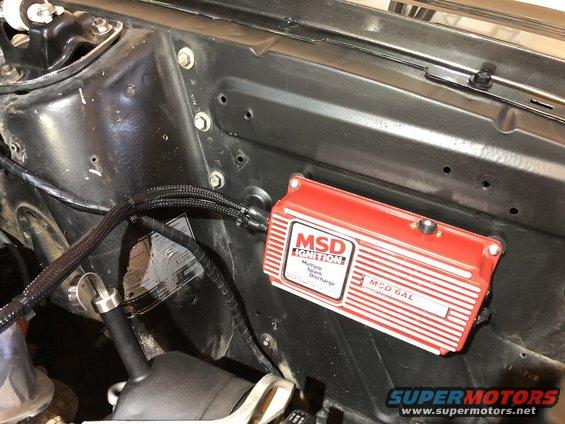
Been working on some more cheap/free stuff to knock off my list so got a little clean up under the hood done. Moved the 6al box to where the washer bottle was and loomed all the harness and replaced all connectors. Also ran the connections straight to the battery as suggested by msd. Previous install was a half hearted install at best. I got a little OCD with wire loom and heat shrink but think the results are worth it. I still need to get the correct clips for the factory harness to route correctly. Eventually I will weld up all the non used holes in the aprons. Not sure what I am going to do with the washer bottle just yet. Honestly I probably dont even need one as I rarely use the squirters on any vehicle anyway but my idea is to hide a small tank with pump and retrofit the pedal for a switch if I really need to. Here in AZ we dont have state level inspections to get tags so it wont prevent me from registration.

Installed a new battery tray and hold down and built all new battery cable using 2ga wiring and new style ford battery terminals that will allow easy replacement and additions down the road. Used a fiberglass cable insulation on the cable to the starter for the eventual header install. Still want to run a ground from battery to frame and still need to order some of the factory replacement clips to hold everything in place but this is much better then the cheap autoparts store generic cables. I did not have a slow crank before but I did notice an increased crank speed and starting over the old cables, highly suggest running larger cable on these old engines/starters.

Next is to build some spark plug wires that actually fit and get rid of the generic length rats nest.
Been working on the rear panels lately. I thought these panel backers might interest more people started a different thread on them so it could be easier to find then buried on a build thread.
See this thread for more detailed info on the process. https://cccforum.discoursehosting.net/t/67-68-rear-interior-panel-repair/12160/1

Those panels look GREAT! Really nicely done.
Just cruised through all 11 pages!! Much needed inspiration.
Great job!!
-Len
Thanks, Its surprising its been 3 years already. I have a long list of things I want to do and upgrade next but really trying to stay focused on my first goal and that was to get it put back together and drive able. Small upgrades along the way but the big stuff would wait until it was driveable so they could be done a little at a time while enjoying driving it. I am really close to that goal with seats being my last big hurdle.
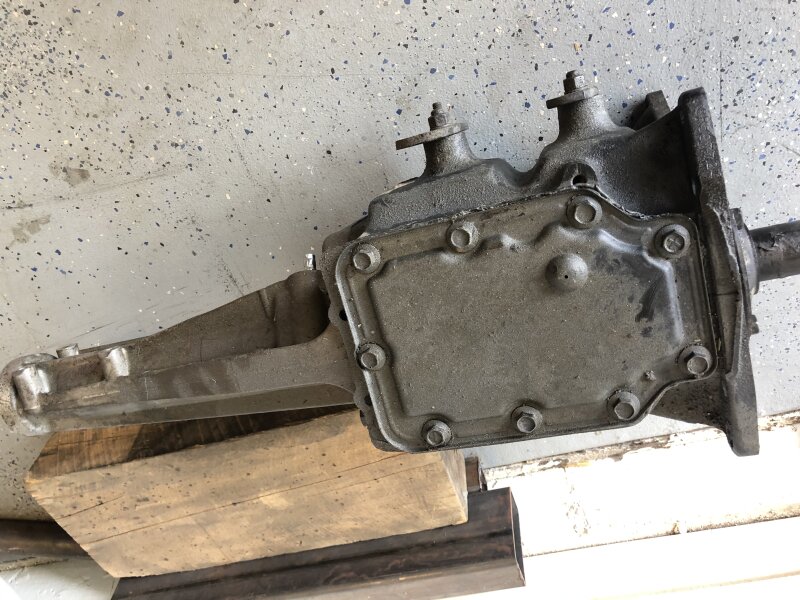
…then I got side tracked last week with a deal I couldnt pass up. Was really on the fence with a 5sp swap rather then the 4sp but the T5 deal is substantially more money and work to get done. This is a direct bolt up and I think with the right gear ratio will not be bad around town. I honestly dont see making long roadtrips in this car anyway. If that changes I can always swap a T5 down the road. Toploaders seem to hold value so would not be a problem offloading it in the future.

Nice! The T5 would give you overdrive, but like you said not really necessary if your gearing isn’t too aggressive. Can’t beat the simplicity of the toploader as well.
Honestly that is the only factor that kept me on the fence. If I did not find a toploader for a good price I would have just probably did the T5 swap down the road. Anything but the stock 3 speed, its ok to drive but not all that fun!
Finally got around to the rear window trim polishing and installation this weekend. Been putting it off as I hate dealing with that mess of sealant. Highly suggest polishing your own stainless trim. Materials and buffer are cheap and doing it yourself is very rewarding!


Thatsa looks nicea
That looks great! Can you give us a quick process overview please? This is on my things to do list.
I have never buffed anything on an actual bench mounted buffer before but it’s really not all that difficult. Just grab your self a harbor freight buffer and a stainless buff kit from Eastwood. That’s really all you need to get started. Take your time and work through the compounds as needed, you will have a wheel and compound for each step. I ended up only needing the stainless compound and the final rouge compound for mine. I started with the stainless compound and buffed until i felt it was good enough to move on the the rouge for the final polish. You can use the emery compound to work deeper scratches and imperfections. Granted I’m not near advanced enough to try and remove dents or deep scratches from the trim so I can’t be much help there. Mine where in decent shape with only a few dings here and there.

I built a quick little stand for the buffer so I didn’t have to try and mount it to a bench. It’s easier to work bigger pieces of trim on a stand by having room to manipulate it around. One thing to note is make sure your wearing eye protection and good gloves. The buffer will tend to grab the trim and eject it across the shop before you can even say WTF. I ended up killing one section of windshield trim this way. Just when you think your getting your technique down it reminds you your just an amature lol. If you have some extra trim laying around it’s not a bad idea to practice before going to town on trim for your car. One thing I learned was to always keep the trim in line with the wheel and work on the bottom side only since it has less tendancy to grab your work. Use very little pressure and let the wheels do the work.
I think total inventment was about 100bucks. I only used if for the front and rear window trim but I enjoyed doing the work and learning something new.
D,
That looks real nice, and I see you still are sporting the t-shirt seat cover ![]()
Thanks! T-shirt covers are holding up great, foam underneath not so much! Oh and still one bolt holding the seat in ![]()
Seats are currently my hold up from getting this thing on the road. I have just about everything else to finish the interior with exception of a few non critical things. It certainly won’t be complete and I already have things I want to change up but getting it back on the road will be a big accomplishment.
I’m sure once I start driving it more then hot laps around the neighborhood other things will come up, such as engine work. I have not done much besides making it run, tune up stuff, oil pan etc. Everything looks decent for I assume higher mileage 302 so not much reason for it or to stay running for a bit but never know.
Fathers day weekend was spent in the garage swapping out the 3spd for the 4spd. My 5yr old son spent quite a bit of time out there with me which slowed the progress down alot as he is very curious and loves to help. I dont mind one bit as I love having the opportunity to stop and teach him what all the parts are and what they do. He is old enough now that he understands and can actually help fetch tools, hold the light etc. I couldn’t ask for a better way to spend fathers day during these crazy times we are in currently. It certainly makes you forget about the day to day stress and headaches we all face day in and day out.

Pretty straight forward swap except for the snag I ran into at the end with the pilot bearing hanging up and causing the input shaft to spin at a faster rate then normal so I couldn’t get it into gear or at least that was my suspicion. I had planned to take it apart to investigate and replace the bushing with a bearing but after a heat soak it started working normally. I have driven it twice around the block and seems to be ok so think I dodged the bullet on that one. I had a separate thread with that question that could be helpful to someone else down the road 3spd to 4spd clutch differences? - Classic Cougar Maintenance Restoration and Repair - Classic Cougar Community Forum
Driveability with the 4spd over the 3spd is alot better! I know everyone says why waste the time to go from the 3 to 4 just put an T5 with and be done with it but I think this swap is worth it. For a fraction of the cost of the T5 I made the 4spd swap and greatly improved the driveability over the 3spd IMO. The additional gear and differences in gear ratios make a difference in overall performance. An OD transmission still could be in the cards for the future but for now I think the 4spd will fit the need quite nicely.
was surprised how light the 3 spd was compared to the 4sp. This appears to be original but has been rebuilt in the past. Vin number is stamped on the top left of the case. I would like to offload this as it will unlikely ever go back in the car and all I will do is get sick of tripping over it but its original to the car soooo? ![]()