Are these pistons what would have been in this engine from the factory?
![20220414_201852[1].jpg](https://forum.classiccougarcommunity.com/uploads/db3333/original/3X/f/4/f4aff209d2704fd46a6c8676d014500c400288c6.jpeg)
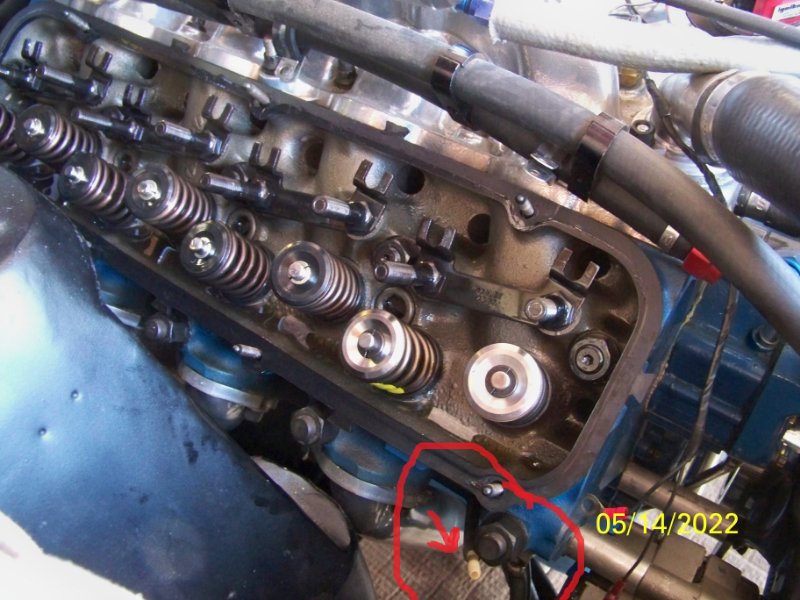
Have you seen a rocker arm cracked like this?
Are these pistons what would have been in this engine from the factory?
Pistons are not OEM. They are aftermarket. Never had a rocker crack but if it was mine I would toss all of them and get Harland Sharp replacements.
Those look like a piston Silv-O-Lite used to offer. So check for a service overbore when you dig in, as well.
Indeed it looks like it is .040 over. Does anyone have an idea how much that dish adds to the volume? Or to ask differently what it likely drops the compression ratio down to?
When I checked the compression cold at WOT, (I know that’s not the standard way. I was looking for a relative indication between cylinders to identify if compression variance was the cause of the rough idle.) I found these values:
C1=180
C2=160
C3=95
C4=175
C5=95
C6=155
C7=155
C8=170
This engine has a published CR of 10.8:1. So doesn’t that mean the compression in a “perfect” case (0 leakage) would be 10.8 x atmospheric pressure = 159 PSI? These measurements were taken at cranking speed with all spark plugs removed, I did not attempt to measure engine RPM, but I would suppose it would be close to idle speed with such a low load on the starter. At a speed like that I would not expect any resonance related cylinder filling effect. With the dish in the pistons, the CR has to be lower than the published CR.
As a comparison, my 66 200CID numbers were;
C1=150
C2=160
C3=160
C4=145
C5=170
C6=160
The published CR for that engine is 9.2:1. So i would expect the “perfect” case for that engine to be 135 PSI.
I have not compared my gauge to a known standard, but I would be surprised to see it reading high by that much.
Have I misunderstood something about static compression ratio?
Is the published CR fiction?
I’m looking forward to learning something new today.
Looks like 2 cylinders have bad rings or your valves aren’t sealing.
Loosen the rockers and connect some air into the spark plug hole…don’t overdo it. It’s either coming up, or blowing down.
The measurements you took are Cold Cranking Pressure. It has no relation to compression ratio which is a calculation of the comparison between volume at TDC versus BDC.
Thanks to you all for chiming in.
So far, I put my leak down tester on #3, and determined I was losing it mostly through the exhaust valve. At that point I knew the heads were coming off and that would be my initial focus.
Because Royce supplied the name for my measurement I was able to find more info on that. It seems I did not consider the effect of the heat of compression on the pressure. PV=nRT, and I forgot T won’t remain constant. I’m not going to beat myself up about that too badly since I’m an Electrical Engineer who took one Thermodynamics class 40+ years ago.
Since the bores don’t show evidence of scoring, my concerns about wear will be based on what I see for ovalation and taper when my telescoping bore gauge arrives.
Does anybody have a recommendation on a pressure gauge that is accurate enough to use as a standard to compare my other gauges against?
After I removed the heads I checked to see which valves were leaking by filling the chambers with ethanol and seeing where it ran out. I found three leaky exhaust valves. The one that had the cracked rocker was the worst. Two were on the cylinders I expected based on the Cold Cranking Pressure and the 3rd was on a cylinder in the middle pressure range.
So this morning I thought I would bring my heads to one of the more reputable machine shops nearby. I found out he doesn’t have the equipment to install hardened valve seats. I expected that would be a very common service, especially around Detroit.
So, do you Cougar lovers have any good experiences to report in SE Michigan with head work and getting hardened valve seats installed?
Barry Robotnick. He has a shop in the Detroit metro area.
Thank you Royce. I sent an email to his Survival Motorsports address.
It looks like his business is in West Bloomfield. My wife and I often take evening top down rides to West Bloomfield so that definitely counts as local.
Any other suggestions are welcome.
Below is what I’m thinking for this head work. If anybody could share experiences that confirm or challenge my thoughts on this I would appreciate them.
I have the original and as far as I can tell, untouched heads from my 69 351W that I would like to get upgraded with hardened exhaust seats. They have the press in rocker studs, original springs, keepers, etc.
I have confirmed 3 leaking exhaust valves by filling the chambers with alcohol and seeing where it leaks out. #3 exhaust had a cracked rocker arm. It leaks the worst. Since the rocker crack would have induced side load on the stem, I expect that one likely has excessive guide and stem wear. I don’t see visible recession on any of the valves.
I’m not looking to do performance upgrades, just to return it to stock condition. These are original heads from an original 4 barrel carb engine with 120K miles. It is a California car which had a California advance curve and at one time had a California “Smog kit” AKA advance killer. I have recurved it to the Federal curve.
I’m thinking this would entail checking guides/stems for wear and replace as necessary, install hardened exhaust valve seats, replace valves as necessary, lap or grind valves, reassemble with new seals.
I’m reluctant to replace parts just because the other ones are >50 years old. My experience with most replacement parts is they are not as good as the OEM part. Particularly on valve train parts I want to minimize my exposure to “infant mortality” failures. However, I also seek your experienced advice.
I have the right head identified with the ground strap bolt in the back side of it. My intent is to put the heads back on the side they were on. I did not have symptoms of head gaskets or exhaust gaskets leaking, and since I’m not planning on removing the block I’m thinking resurfacing the head is not needed or desireable. Any surface warp will be mated with its similarly warped mate. Again advice on this is welcome.
With an engine of this vintage and mileage 120k, I would be thinking that it should be due for a rebuild??
Generally the typical 60’s V8 engine would only last 120-140K miles before needing rebuild.
Add this to the fact you are saying pistons are 0.040 oversize suggests the engine has done a lot more that 120K.
It is also obvious the some one has been into this engine before, hence the Felpro Black aftermarket head gaskets.
So I would be looking for a little more than just a patch up job. Just saying. ![]()
If this was the case (excessive mileage), the lifters would have collapsed, then a previous owner would have over tighten the rockers to take up the slack/noise. And this would then cause the valve springs to bind, hence the cracked rocker arm.
When doing a compression test or leak down test, you can only use it to diagnose problems and make sure compression pressures are within a certain percentage of each other. One should never compare one engines compression pressure to another engine, too many variables.
Even battery condition makes a difference to the readings.
Workshop manuals published compression ratio is just an approximation, each engine is different even on the factory assembly line.
The viscosity of ethanol is too low for checking valve seat sealing, use kerosene. Even a good valve seat can leak with ethanol.
If you go to a head machine shop and they can’t do valve seat install, go to another shop.
Hardened valve seats are recommended, even on the inlet side.
Rocker studs should be okay for standard operation.
The valve springs will be weak, they will need their spring tension and seat height checked, if not up to specifications, they will need to be replaced.
Valve retainer collets will need to be replaced.
When it comes to valve guides, replace all or none. The original guides are cut into the cast iron of the head, cast iron can supply some lubricant to the valve stem, but the cast iron wears very quickly. Good enough for Ford thou.
If you get an el cheapo head work done, they will not replace or measure valve guides. Then the engine will then give out a puff of blue smoke after sitting a few days.
Ideally you need to have bronze valve guides fitted, and have them done before hardened valve inserts.
If bronze guides are used with chrome valve stems, the clearance can be closed up, which in turn improves heat transfer away from the valve head increasing valve seat life. Also cuts down of oil leakage though valve guide, hence no blue smoke on start up.
If you can afford the expense, go stainless steel valves on the exhaust port only. Stainless steel has different heat transfer properties and a lower melting point, this in turn improves the average combustion temperature through out the chamber. Exhaust side is made cooler, inlet side is made hotter. Hence better burn.
Stainless has high concentration of chromium so is good companion to the bronze guides.
Have a minimum of a three angle seat cut for the valve seats. The 351 Windsor can make or lose 10 HP just because of the valve seats.
You need to check the block and the heads, then re-face as necessary. Doing otherwise if false economy. Once you released the head bolt tension when you removed the heads, the head and the block will not be matching.
Ideally, even for a stock standard rebuild on a 351 Windsor, the engine should have some port work done on the exhaust side. It is a very bad design and too restrictive. I would think more for the wish list thou.
Also the piston on the right side in the top picture is showing signs of being on the cusp of detonation, but again, possibly on the wish list if wanting to fix and keep costs down.
Hope this helps.
Regards Peter ![]()
Peter,
Thank you for the suggestions. Lessons learned from all you all’s experience is one of the things I’m hoping to gain.
Could you explain more about the stainless steel exhaust valves? I read your comments as meaning the thermal conductivity is higher for the SS valves, and good point about the closer clearance making it easier for that heat to be conducted into the head. You said the melting point is lower for SS, and that influences the intake valve temperature. What is the connection between the two?
Again, thank you for the insight.
Sorry mate, I should have said the melting point of stainless is higher, my mistake.
Stainless steel absorbs a lot of heat energy before it will get hotter. So tends to say cooler to the air/fuel mass around it.
(it will tend to stay in a narrower average temperature range)
It also conducts (transfers’) heat extremely well.
It also has a higher melting point.
Whereabouts the inlet valve tends to run cooler and is cooled by the intake charge when open. The temperature of the inlet valve will fluctuate temperature over a greater temperature range, hot to cold to hot…
But if you put a stainless valve in the inlet side, it will stay cold in the chamber on that side all the time. Not good idea.
What your are trying to do is increase the temperature on the inlet side of the combustion chamber and lower the temperature on the exhaust side during the burn event.
That is to make a more even temperature across the chamber.
This will increase the amount of fuel mixture burnt on each power stroke.
(In your photos, there are signs of pockets where no fuel is burning (cold), There is evidence of heat transfer at the centre of the piston implying engine is on the cusp of detonation (too hot). There is signs of too rich a mixture, possible to cover detonation??)
With chromium and bronze, the two metals will not grab/seize due to the incompatible structure of the placement of the atoms of each metal. If that make sense?
Peter ![]()
Thank you for the advice. The piston you noted with detonation evidence was in the cylinder with the highest compression. So that is not surprising.
I took the springs off the leaky valves and afew others to compare guide wear. The leakiest one that had the cracked rocker arm was the loosest in the guide. The leaky ones were sloppier than the others Not really surprising.
Does anybody have good or bad experiences with the stainless valves? My big concern is with a failure that drops a valve due to a tip or keeper failure.
Are there any downsides to spiral reamed bronze guides? I’m expecting the spiral will help with lubrication in the guide and provide some torque to aid valve rotation as the valve closes. Is that correct?
The rich condition is something I’ll have to work on when it is back together. The carb is the stock 480 CFM 4300. About the only tools I can work with are jetting and float level, maybe power valve.
351W heads were bad about guide wear. Any replacement guide is good. Just make sure and check the guide/valve clearance.
Stainless steel valves are good. It’s not until you get into high RPM, 6500+ or high spring pressures, 425+ that you have to worry about valve material selection and retainer/keeper materials and type. Standard steel retainer and machined 7 deg keepers will work fine. I use titanium spring retainers with 10 deg machined keepers. Very pricy. But lighter (15.2 grams to 34.8 grams for steel)and strong. I’m also running about 375#s spring pressure.
The cast iron rocker arms are good for everyday average usage. I like the Comp Cams roller tip steel or anything else. That or full roller ones.
I would solve the head/valve issue first before playing with the carb. That and timing. Your black cylinders is more likely from oil burning due to bad valve guides.
Barry Robotnic is held in extremely high regard in the FE big block motor category. He relocated his shop maybe a year or two ago. Sounds like he’s back in the swing of things. He should be a great resource for addressing your motor issues. I’ve only had a few interactions (Hoping for more) but all were positive.
Hey Doug I have another source for you to consider via referral from Ray Bischoff here on the site. Automotive Parts Machine Shop & Service came highly regarded by Ray (XR7427 here) as they’ve done rebuilds on his 427’s. You can reach them at (734) 663-9381 and ask for Darrell. They are in Ann Arbor.
Might want to consider buying a set of completed aluminum cylinder heads new. Might be a wash by the time it’s over and they’ll certainly flow better than stock. You can paint them blue to make them look stock…
I understand your reasoning, but maybe not the best recommendation. True, everyone on the planet will agree with you, and yes I am always outside the envelope.
What I am saying is with the typical 60/70s engine it is only approximately 33% efficient. That is a 1969 351 Windsor engine would put out about 300 hp @ 5000 rpm, but it uses enough fuel/air to make 900 hp @ 5000 rpm. That is a 600 hp going to waste. It is also a big waste of fuel economy.
My recommendations tap into that potential missing 600hp, and use it more efficiently.
Aftermarket aluminium heads will get more air/fuel in, and make more power, but I doubt it will be as efficient.
![]()
The dish on them should be about 12.5 CC’s. The replacement pistons in mine are the same but with tiny valve reliefs and are 12.5.
![20220414_195444[1].jpg](https://forum.classiccougarcommunity.com/uploads/db3333/original/3X/2/3/2393ca673eb405840116e4139fc0708bc69810df.jpeg)