No that I have pretty much finished my Transmission refresh I moved on to my Drive Line. I am not aware of any real issue with it but since i am working down here under the car seemed to be the next thing to check out. I was able to remove the two clamps holding the drive line in place at the end to the yoke on the third member. That was easy enough to remove and then pulled the front of the drive line out of the end of the transmission end,
Ounce it was out I had to figure out how to best remove the u joints. Since in don’t have a press or a large vice i opted for the BFH method and found an old socket that would fit as the Pounder side and then needed a receiving end. I didn’t have a large enough socket to use for that so i looked around my garage for something with the right diameter that would work. That ended up being my floor jack handle! So I measured of two inches or so and used my cutting wheel to cut me a part that would work.
With my BFH and socket and cut piece I started to beat the crap out of the tops of my u joint caps until I could remove them and then the trundle. The process worked pretty well and I did not send needle bearings flying around my garage.
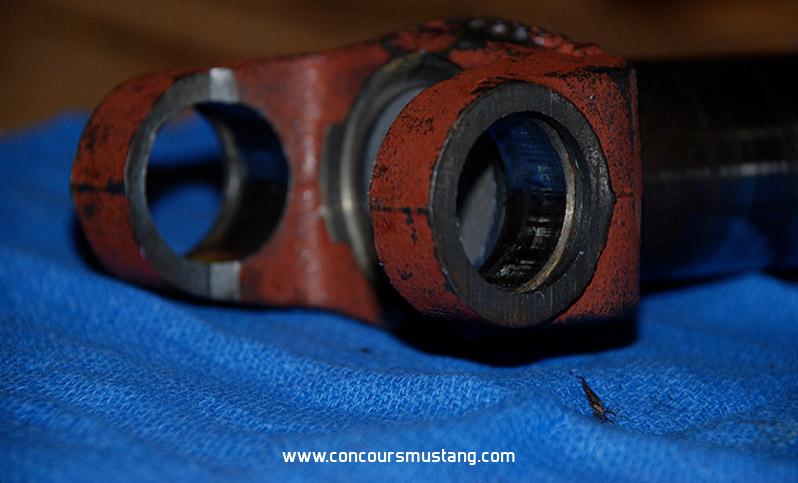
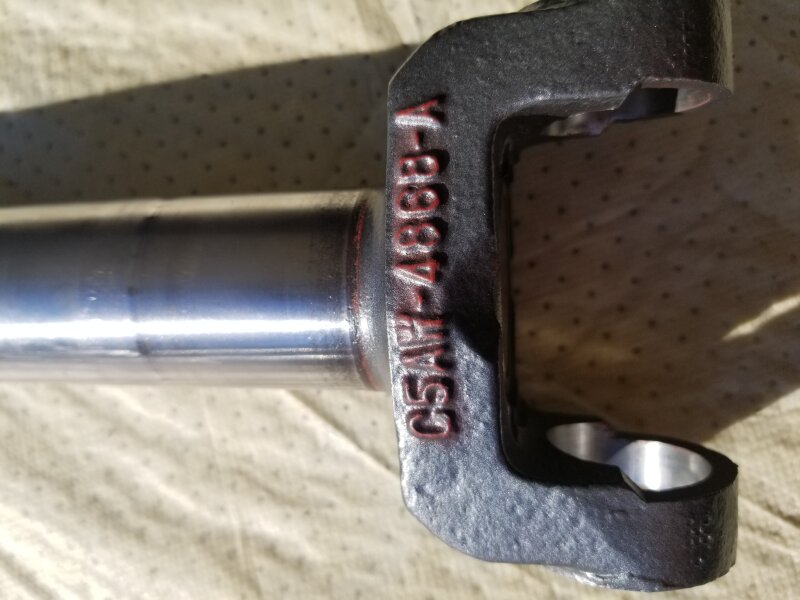
I found the markings interesting on Yoke side, part number on one side and some other markings on the other.
Also the White circle line that was around the drive line towards the end near the third member joint.
Also the part numbers on the very end of the drive line under where the yoke connects up front.
Looks like the Yoke was painted Red originally. Has anyone had the opportunity to see one fully red? I would like to repaint mine original red if could find out the paint code or where to locate that. I am cleaning the rust off my drive line and painting it Factory Grey to look better than just a large rusty looking pipe.
Is there any information to be gleaned from the wear on the yoke? I am installing all new u joints and putting it back together soon.
Any possible pitfalls to avoid?
With the open end of the yoke up, fill the splined end with oil and see if it leaks out the plug in the rear. This is a major source of oil leaks. Use some 320 emery cloth to clean up the rust on the lower part of the yoke. Cleaning that rust up will keep the new dust seal from getting damaged. I would suggest non greaseable Spicer ujoints as they are stronger and less likely to throw grease everywhere. Hopefully you didn’t crush the land area where the snap ring fits. Check for this as not using a ujoint press can lead to this kind of damage. Make sure you center the ujoint after both clips are installed with a firm crack of a hammer to avoid stiff operation of the joint.
Driveline = all the components used to move the car i.e. engine, transmission, drive shaft, rear axle.
Drive shaft = the part you are working on.
I just rebuilt the one for the blue GT-E yesterday. I used a hydraulic press but used to do it like that when I didn’t have a press. If it were me doing that I would take it to a drive shaft shop after rebuilding it to have it balanced.
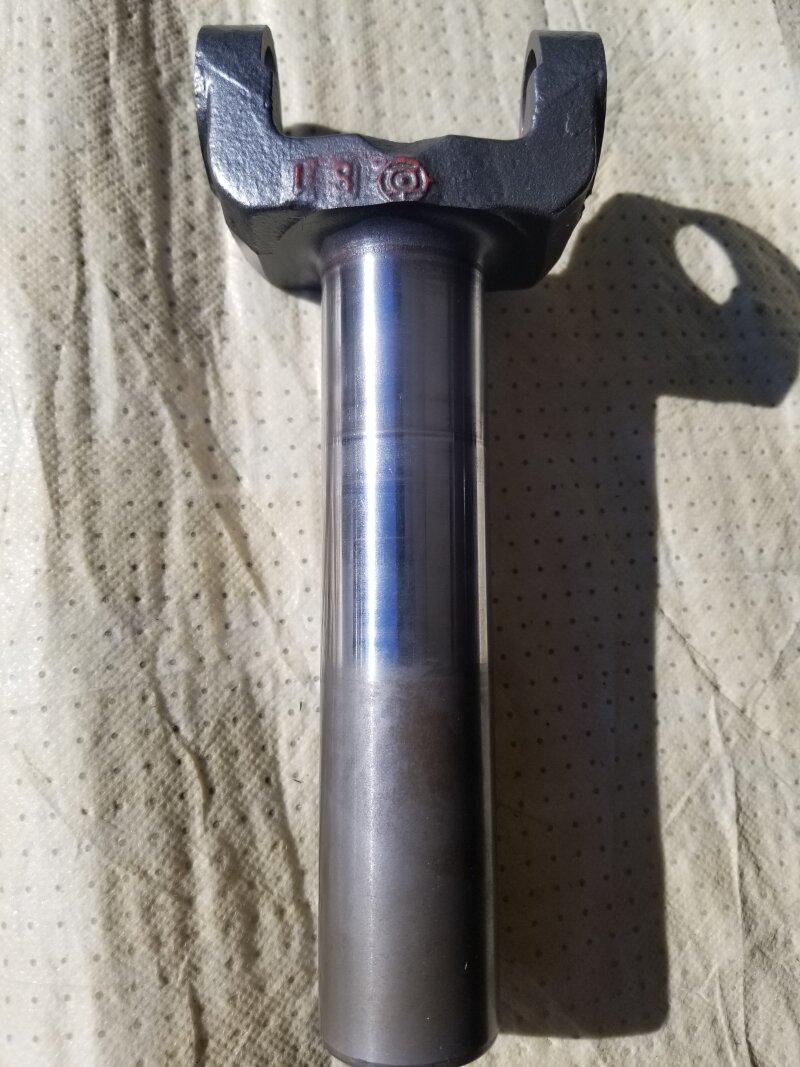
The white line near the rear is to show the driveshaft was balanced most I have seen have this, could depend on which factory put the shaft together.
This is different than the paint stripes as it is narrow and neat and not applied with a brush.
Looks like the driveline is pretty pitted so guess your going for a refreshed look (as the title says) rather than a restored driveline. How the transmission yoke was marked/painted and how much varied depending on year and supplier looking at other examples. The yokes were marked before they were machine like the yokes at the end of the driveline before they were machined and welded for the two added to the driveline tube.
Also for the original look most driveline shops will use balance weights that look differently than the originals
Thank you for your reply. I did not know about filling up the yoke end and will plan to do that. I made sure that any dings I might have made were gently filed out so that there were no issues to interfere with adding new caps into the holes. I had already purchased some u joints that came with a grease fitting. I decided to get a ball joint press from the local auto store as a lender. I pressed in the u joints for the ends, not the yoke yet. I didn’t want to screw it up beating it in. It went pretty well. My snap rings seated and I did have to hit the ends to loosen them up as you suggested. Great tips.
Royce, you are so right. That was a late night slip with calling it drive line! I need to not do this at midnight anymore.
I like the idea of having the balance checked and will plan to do that. Do I include it with the yoke on or before I add the yoke?
J , thanks for the comments and yes, I am fixing up a driver, not a show car but as I go along I am trying to keep the originality as much as I can. Not so much for a judge or anyone else, but for me.
That said, I am trying to determine if the yoke that connects to the transmission side, was originally painted red? It appears to have a lot of red paint on it after I got done cleaning it. It is in more than one area and that was the reason for asking and showing the pic.
Just curious if others had also seen red paint here too. The shaft has some pitting. I am cleaning it , treating the rust , and painting it factory grey. I think it will help it look better than rust color.
Most of the yokes i see have been a darker red. Pretty sure I’ve seen orange too, but my old age helps me forget. I would wait to balance the driveshaft. Install it and drive it first. Most of the imbalance comes from the rear yoke which doesn’t get sent to the balancer. If you have a vibration, rotate the yoke 180 and retry it. You will not have a substantial vibration add by changing u joints….imo
Can confirm I have other pictures of the C4AW-A yoke installed originally on other 68 Ford products with the reddish color and applied over the whole yoke before the part was machined or the plug installed
J, Wow, i have to say I am much impressed. My gut told me that but I had just never seen it! Thank you so much for the kind gesture of finding the photo to show it!
I really like the other site link you shared with me. It takes things to a whole different level.
i will post pics when it is completed.
I did take your advice and filled the yoke up with some cleaning solvent as when I looked in there with a flash light there was some old dark grease in the bottom. I used a clean rag stuffed down inside and with a long screw driver tried to clean it out. Good news the cap didn’t leak a drop!
I then used my small sanding block that has 2" x 3/4" strip sand paper at 440 grit to remove as much rust as i could. looks much better. My question is should i apply fresh grease to the splines inside before I reinstall it on the trans ?
I know nothing about any of this stuff. i am a first timer rebuilding a car but have learned much over this going on five year over haul/ refresh job on my 68 XR7. Thanks to guys like.
Thanks, I’m partial to her too! I would add some grease to the splines. There is a rubber seal that supposed to be on you output shaft of the trans that keeps trans fluid and the grease from mixing. Don’t go too crazy, just enough to cover the bottom of the splines. I noticed you mentioned the use of a sanding block…I would touch it up with Emory cloth wrapped around the tube one full turn just to make sure things are fully round…
Thanks for the message. I will add some grease in there. Does it matter what kind? or what would you suggest?
Also the sanding block I spoke of is a very small foam block, 3 inches long by 3/4 inch wide velcro strips of paper from 440 up to 1400 grit.
It is made for small tight jobs and easy to hold with your thumb and index finger and use.
I decided to paint my yoke factory grey to match what I am painting the drive shaft. I did leave a little red paint on the letters to show that it was once red and think that looks cool to have some of the original color there.
The slip yoke looks great and now that you described use of the soft conforming material, I’m on board. Just use wheel bearing grease. You could spend a ridiculous amount of money on the blue Teflon grease, but not necessary. The gray looks good