Edelbrock Performer RPM for FE...worth while improvement?

I’m looking to purchase the Performer RPM intake on my 390 for a power bump. Although I’m thinking initially on putting on a new 4 barrel, I’m also thinking about jumping to the Holley Sniper FI system as I’m in Colorado with our altitude differences. I’ll spend most of the time around 5200-5800 ft in the Denver area, but may head to the mountains a few times in the summer with passes between 10,000 to 11,500 feet. The car will mainly be for cruising, but may take it to Bandimere once a year for fun at the strip.

Although I want more power due to the loss we see due to altitude, I didn’t know if I would see an appreciable difference or if I should just keep the cast iron 2 barrel manifold and use the 2 barrel Sniper system for now. I did give some consideration into a full Edelbrock upgrade (intake, heads, and cam), but didn’t know whether I wanted to dig into the engine that deep for now…there always seem to be a gotcha somewhere.

It’s been a while since I’ve played with an FE. I had a 64 Galaxy with a 62 406 tri-power in high school years ago, but that was just an engine swap…never tore it apart.

It put my 390 on kill mode along with some headers, solid lift cam, Holley 750 mechanical, roller rockers, and head shaving and porting work done.

My 69 390 IP (Improved Performance) is now living up to its name for real.

If you want to compare get Jay Browns book. The Great Fe Intake Comparo. It rates stock intakes and some after market. The PI stock intake would be better choice if you want stock pc. The edelbrock performer is good flowing after market. Book is great reference with flow charts. Have both.

I actually took my stock heads, performer RPM intake, and a header gasket for Hooker super comp 428 headers to a head porting shop after I clay gapped piston clearance on heads. This elderly gentleman who had reworked FE heads when they were new did a remarkable job. He not only shaved both the intake and heads to mate but also port matched and polished them. On the exhaust side he not only ported and polished, but filled and re-drilled holes to mate the bigger 428 ports and different bolt pattern. He then topped it off with a multi angle valve job and the beast was awoken. I did have the intake and headers silver ceramic coated later by a coating company. The project turned out to be a total success with gobs more power.

1 Like

The Performer RPM is a very good improvement over an S-code intake, you’ll feel it right off the bat, with a 2 barrel intake it would be night and day

As an example, we did a 352 on the dyno last year, 220 HP with stock 2 barrel, 240 with a 500 2 barrel, and 270 with a Blue Thunder and a small 4 barrel. That was on a tired junkyard 352 for a baseline

However, if you plan to go Sniper, there is only one coolant port on FE manifolds, and if you want both heat and the stock gauge to work, you need to have a bung welded in for the coolant temp sensor The time to do it is when it is new. I would not waste my money on a 2 barrel system, if you ever want to improve, you basically toss it

You can switch the gauge sender to the thermostat housing if you don’t have the thermal switch, I don’t like doing that but it can work. You need to either drill a small hole in the thermostat to allow some water to flow over when cold to have the gauge work at all times, or live with the gauge only being accurate when hot. You cannot put the Sniper coolant temp sensor in the thermostat housing though.

I will say as others though
1 - Headers and good duals
2 - Recurve the distributor
3 - Intake and cylinder heads

If you do not have 1 and 2, but may go with a head change later, bite the bullet and do all at once (#2 of course can be electronic with the EFI system)

I will tell you, after many EFI FEs, including my own two (489 inch FE and a 461 inch FE) it’d be hard for me to go back.

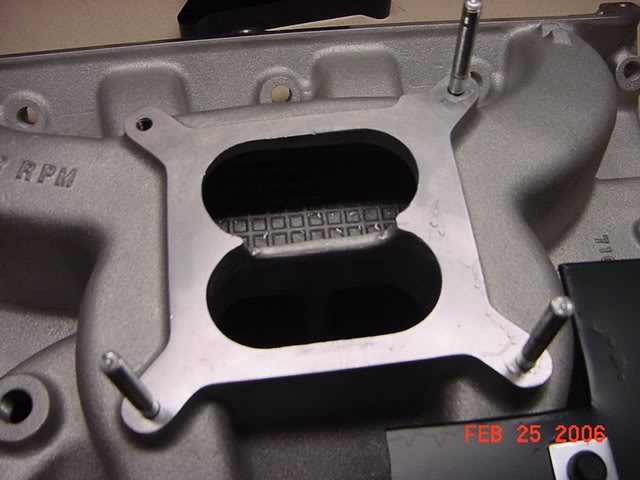
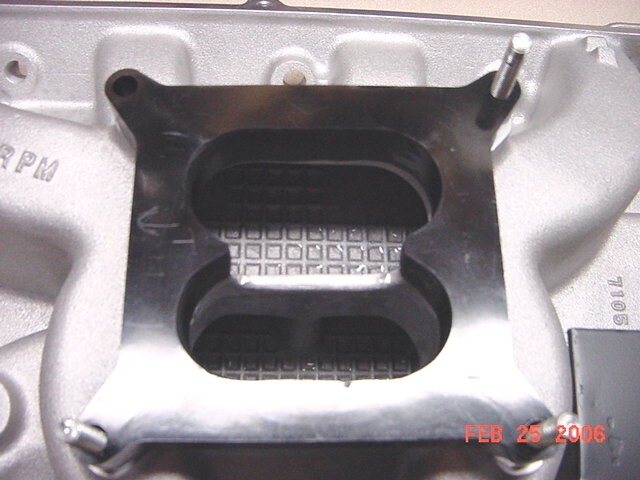
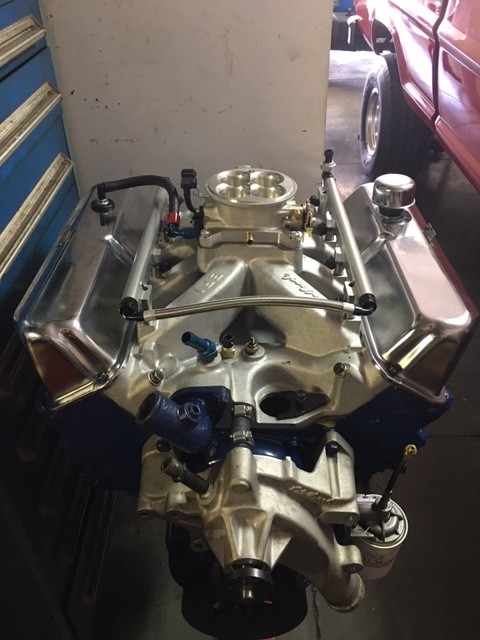
Some pics of my manifold and how we did the bungs on Victor intakes. You can also see in the last picture, the RPM needs a little more thinking, there isn’t as much room for the temp sensor, but can certainly be done

Edelbrock Pro-flo 4 on an iron head 461 inch 428 based engine, 490 HP at 5000 for the red truck in the background

Custom setup, based off Mass-flo FE kit, laptop controlled real time, on 489 inch FE in my Mustang

Victor vs RPM

The last thing I will say is don’t let this scare you. If you buy an RPM intake, buy a pre-threaded bung from Summit, etc, and then go see a welder, it’s easy and you never have to think about it again.

If you also don’t want to go inside the engine or put headers on, and won’t in the future, I think you’d still benefit in drivability. WOT will get better,m but part throttle is the amazing part, especially with ignition control

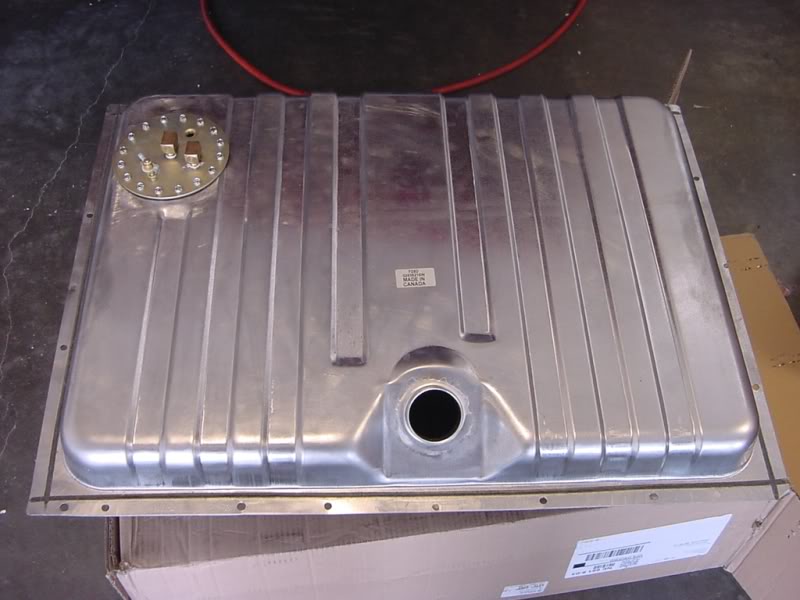
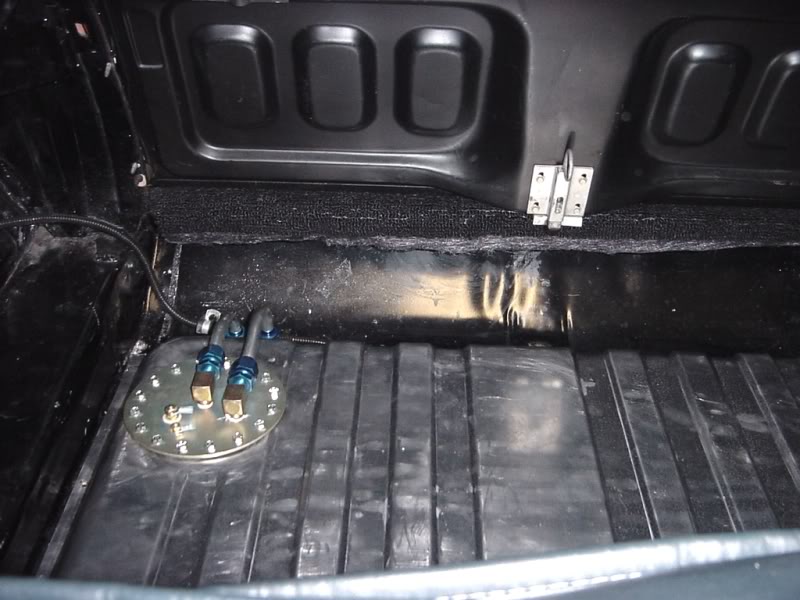
Final point, be sure to think about fuel system, you need a return fuel system, or an expensive voltage controller, or a sump system underhood (which I hate, adds complication and failure points). I modified my Mustang to in tank pump with feed and return, that’s the way to go on a Cougar

Hello My427Stang. Did you cut down the Edelbrock Performer RPM manifolds plenum divider. I have heard some discussion on the benefits of doing this when using a throttle body EFI. I have debated about doing the plenum mod or just using an open spacer to hopefully accomplish the same result as cutting down the plenum. Another reason for the spacer is to use it as the PCV vacuum source as the Sniper EFI does not have a PCV port. Thanks for any information you can provide on this, and sorry to the OP for the hijack. I hope to assemble my engine over the winter and would like to get the build details sorted out. Thank you, Jim R

That intake in the picture has had a lot of work to it. When I built my 489 it was a 1000 HP series vac sec, I had a 1 inch 4 hole spacer that I cut the center out of it to match the cut plenum. Then worked the roof of the plenum and lots of port work. I did it after a lot of talk with a couple of Edelbrock dyno room guys based on lessons learned on big inch BBCs. It worked very well

I have heard the challenges of a TB on a split plenum, but I have never encountered it on quite a few TB installs. That being said, I generally like to cut a plenum divider a little for top end charge on a carbed engine, I also think a spacer would be fine, but I would round off the plenum divider top to avoid a shear point that would potentially pull fuel out of the air charge

Also do not be afraid to drill into the side or back of an alum intake and add a port. It’s easily done. You can see on the truck motor I added a PCV on the pass side, and on the Mustang, same location, I mounted the intake air temp sensor into the manifold instead of the air filter housing

Seems there are lots of options out there now for fuel systems to build one to fit your needs. Holley has a drop in pump/sender now that fits the stock tank and is regulated and returns inside the tank itself. I believe its a 255L flow pump so its good for stock or mild motors. If that pump fits your needs I think that would be the way to go on a cougar. Obviously if you need more flow you would have to go a different route but lots of options for that too from replacement tanks or retrofits for drop in pumps.

Agree on the sump system. Bad idea all the way around.

Im glad the EFI has become much more cost effective and easier to do then ever. I really do hate carbs :laughing:

I’m going to go ahead and purchase the RPM intake for a spring install…good idea in welding in a bung ahead of time for a 2nd coolant sensor in case I go ahead with the Sniper system down the road. I already have a 600 cfm barrel carb (list #80457)for the interim…will see how well that works. I would like to put off FI until 2022 as I want to concentrate on a wheel/tire upgrade and minor repairs, weatherstripping, rear springs, loose steering, etc for 2021…have a spousal budget :slight_smile:

It appears the intake install will be a bit of work (weight, pushrods, etc), but not too difficult. My biggest concern is hoping it fits well for a proper seal…no leaks. Pushrod/rocker arm reinstall appears simple as well…just tighten/torque in correct sequence.

In the end, still want to keep things stock appearing as much as possible, but provide more power and improve driveability.

Thanks for your response. I will probably cut and smooth the plenum divider as you described, but still go with the spacer just for the PCV vacuum source. The vacuum nipple would then be centered over the plenum to equally distribute the oily mist to all cylinders to burn. On a dual plane manifold putting the vacuum nipple on the side of the carb pad would just distribute oil to just 1 bank of cylinders. Maybe I’m over thinking this but I would really like to do things the right way and only once. Thanks again for your input and sorry for the highjack but you really need to consider how to hook up your PCV valve on a Sniper. You do not want to share the power brake and PCV vacuum port. Jim R.

Ignoring the Sniper and i may just stick a 4barrel carb for now, it seems I also need need to consider the other vacuum needs from the RPM manifold.

The attachment shows the vacuum block (to left of carb in this pic) that feeds the brake booster and other vacuum needs. Edelbrock indicates there is a “provision for adding the PCV or breather flange at rear.” Could I simply drill and have a bung added to that flat pad at the rear of the RPM manifold to incorporate the factory vacuum block? That would seem to keep things clean looking. That would also solve the brake booster issue in the future if I did go Sniper.

Cheeser, the port they are talking about is what used to be for the old road draft tube. The internal motor vapors were directed through a tube there down the back side of the engine and out toward the ground. There are now companies that offer a PCV mount for that location. The kit they offer allows you to mount the PCV valve in that location with some baffling where it will suck fumes from the lifter valley below. You still need to locate a proper vacuum source for the PCV valve. I am not an expert in the field but I would not share the PCV vacuum port with any other device due to the oily mist that will pass through the PCV valve. On now on my 4 barrel 390 Cougar the PCV valve that was installed in the passenger side valve cover went to a tube that was piped to two separate intake manifold runners so that the oily mist would be fed to both cylinder banks of the engine.
How is the PCV valve plumbed on your 2 barrel 390?

I understand about the downdraft now…had that on my old 64 galaxy with a 62 406 tripower.

My PCV valve is currently connected to the back of the 2 barrel carb via the 3/8” hose shown in my pic. If I go 4 barrel for the interim, it also has a 3/8” PCV connection. The newer sniper appears to have a PCV port after looking at the pics.

It appears I need to figure out how to make the vacuum tree / block work on a RPM manifold that would connect my power brakes and 4 other vacuum needs.

In taking another look at the RPM manifold pics…there appears to be a threaded vacuum source on the #5 intake runner that I could use for PCV, and then use the 3/8” port off carb to feed the vacuum tree/block that supports the power brakes and 4 other vacuum needs.

First, you shouldn’t have oil coming in your PCV and if it is that misty, it will make a mess. You don’t want that even with the current 2 barrel. Recommend tightening up the engine or putting a catch can in series of the PCV and draining regularly.

Second, just be sure to blunt the edge of the divider, think bullet not wedge. You don’t want to introduce an edge that separates fuel like rain/wind on a roof peak

Here is how I did mine, I cut a 4 hole spacer to make a clean transition and feed a deep breathing 489, you could easily just put an open spacer and blend the divider if you sole reason for the spacer is for a PCV.

Third, on the PCV comment, note I said “back or side” for a place to drill, you pick where…mine are single plane intakes so I went for the most convenient place. However, you can drill a manifold just like Ford did in the center and hit the plenum divider and make an evenly matched source. Realize though, there are plenty of Fords that pull PCV vacuum off of one single port,and even original CJs only pulled off two individual ports with a common steel line. Are you overthinking?..probably, but much better fault that than not thinking enough :slight_smile:

Remember of course, an RPM has only retail value, no resto value, so as long as it’s done nicely, you can poke holes to have as many vacuum sources as you want. Do realize that the plenum walls are pretty thick but the ports are pretty thin when making your choices

Here is how Ford did vacuum access on the PI, it is not a PCV line, but you could do the same for a PCV. Whatever you do, be sure to have the PCV separate from the “non-leaking” vacuum feeds.

Last, my Mustang currently has a 489 inch engine, naturally aspirated, but I am working toward a 520 inch FE, supercharged and intercooled with EFI. Pump gas, street use…I used a Tanks Inc sump bracket and added dual in tank pumps with 1/2 inch lines. It was cheap and easy. You can do similar as well as buy purpose built EFI tanks as well…

Hope this helps, I think you will find an RPM and a 600, when properly tuned, will make a heck of a difference. As the car is down, I also recommend you have the distributor recurved. Although it doesn’t change WOT performance, it is dramatic in drivability, and pretty cheap. Additionally, the intake IS pretty simple if it fits, but many times you have to have an intake machined, so when you do it, set it on the engine without gaskets first and take some pictures. We can quickly see if you need to spend a little machining money.

Also, DO NOT ASSUME you can use the same bolts. Almost every aftermarket FE intake takes different bolts. A customer of mine didn’t check bolt length and ruined a set of 427 medium riser heads by blowing out a bunch of bolt holes, all I could do is tell him the heads were junk

@My427stang

Thanks for the inputs…it’s better to think through this before I start pulling/swapping parts in the spring.

At this time, it appears I will connect the PCV side to the base of the new 4 barrel…just like it’s done now. I took a look few weeks ago, and the existing port appears pretty clean. Will keep the catch can in mind…had one on my supercharged coyote…surprised how much oil it caught. I do have a 1” carb spacer with the 3/8” port that could also be used…don’t know if it would raise carb too much for hood clearance.

As for the brake booster, looks like I may hard line to the existing threaded hole in the #5 runner. Once I obtain the RPM manifold, will take a look at the back for a good spot to drill and have a bung welded in…similar to how it’s done now on the factory 2 barrel manifold.

I do plan on dry fitting it first to verify fit…hoping it doesn’t have to be machined at all. I will take pics and use a feeler gauge on sides and bottom. I am going to buy the bolt kit from Edelbrock for the dry fit as well to check. I assume they are the correct length, but can check during dry fit.

Will have to keep the plenum mod in mind in case I want FI down the road. Easier to mod while it’s off the car.

Be sure to check the bolts, the Edelbrock bolt kit should be right, but what I do is stick every bolt in and look for 1/2 inch showing on the bench. That proves “enough”

Then I take the deepest one, and measure it with a screwdriver and a thumb, to prove it isn’t “too much” by making sure it doesn’t bottom out in any of the threaded holes in the head. The small end of calipers is more precise, but by thumb is quick and well-trained

As far as a 1 inch spacer, I did run one on my 70 Mustang with a 14x4 element and a drop base. However, it captured so much heat that I ended up going Boss 9 scoop and a flat base to let heat out. Also realize if trying to run a stock air cleaner, the RPM kicks the carb back about .450

What I did with the RPM on my truck, pre-EFI, was to put a NPT to AN staright fitting, then put a 90 -6AN push fitting. It allowed me to turn the fitting and keep the hose away from the throttle linkage and tight to the valve cover when tightened. nice and neat

You make get lucky and have the intake fit, but if it doesn’t, there are different thickness gaskets and with/without end seals, so it depends. I am at about 50% over 20 or so

It may be overkill, but changed plans and purchased a Blue Thunder 427MR aluminum intake. Just received it…seems to be a quality piece, nice machining, 3/8” vacuum port on back, and just looks more factory vs the Edelbrock.

Still planning on a Holley four carb for now…will see how well it works here in CO when I install this spring. Have a Holley 4160 (#80457) I ran on a modified 302 I had in my other Cougar in the 90s…will need to refresh it.

Not overkill, and a very nice intake. The RPM is a med riser dual plane too, just a different design. That intake will work well

All the same advice - check bolt length, fit, gasket thickness, and match to the ports, etc. The 80457 should work great, be SURE to make sure you are getting full throttle, and set the carb up as delivered by Holley to start. Set primaries properly and do gross throttle adjustment with secondaries.

Thanks…those things are on my list to check after the spring install. Others have indicated stock bolts can be used on this particular intake, but still good to double check.

I have a friend that has a wide band sensor tool I can use…just need to add a bung on the exhaust. Can have an exhaust shop weld one on at the same time I have the tail pipes replaced with factory style turn down.