Factory rear was 3.0 according to the Marti report. I was told by a guy who looked at it that mine is a 9" rear end but from the look of the pics it seems more like an 8". Access to the two lowest bolts means it’s an 8" right? That’s what the Internet told me. So I guess maybe I do still have the stock rear end after all?
Sorry, I don’t own a shop manual… NEVER have. So I can’t comment on what the “instructions” say in there.
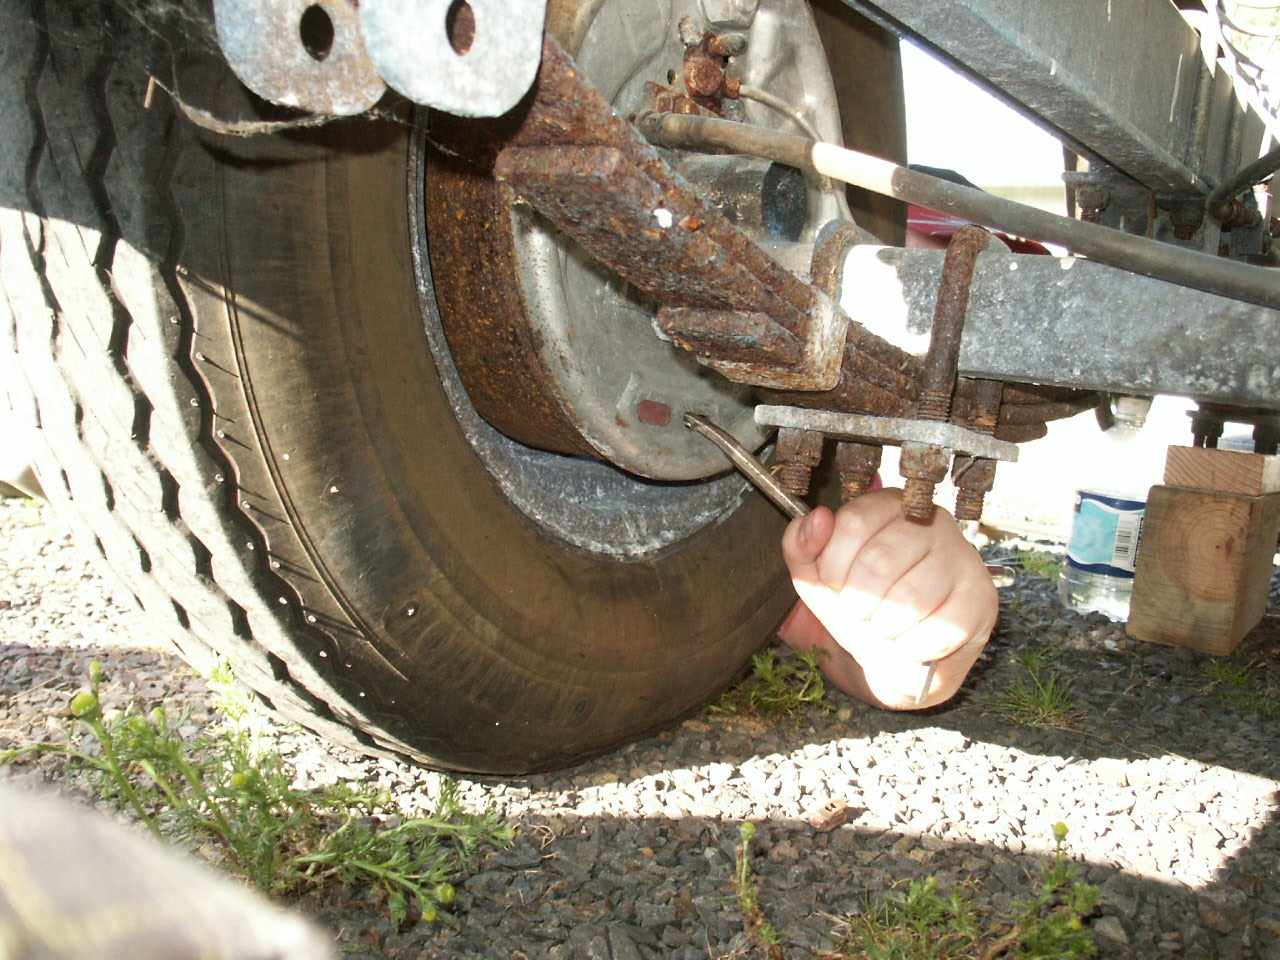
I CAN tell you: You won’t have “rotors” on the rear brakes. They are “drums.” Once the wheel is off, they’ll likely slide right off unless the brake shoes are adjusted extremely close to the drums. Still a little wiggling back and forth is usually all they need to come off.
Inside the brake drums where all the brake hardware is should be dry. Yes, you’ll have a lot of brake dust stuck on everything. But, unfortunately, I’m pretty confident, you won’t find the inside of yours to be dry.
You could also pop the cap off the master cylinder to see if the compartment for the rear brakes (the smaller of the two compartments) appears to be lower on fluid.
Your rear is an 8" which was stock unless someone has been inside of it. I wouldn’t worry too much about what’s inside until you get all of the other systems that need attention, sorted out. For now, don’t mess with what ain’t broke is what I’m getting at.
Cool thanks Mark. And yeah, I meant drums. I know that stock was drums all around and mine came with the front disc upgrade, and rotors are the disc element of disc brakes. I just wasn’t using my brain so good when I said rotors instead of drums.
And that dust, it’s asbestos right? I remember years ago hearing that’s why tool booth operators get paid really well, cause they spend all day breathing asbestos dust from everybody’s brakes, what with everyone braking as they pull up to the booth.
So I shouldn’t eat the dust or rub it in my eyes or anything? Although it sounds like I should expect paste moreso than dust? Ok!!
Yeah, I wouldn’t try snorting the stuff.
I always start with a shop vac when I do a brake job. Brake dust is a mess regardless of what it is made of. I use one of those attachments with the soft bristle brushes on it, and then really clean it up pretty good. Inside the rear drums is the worst, and I keep the shop vac handy so I can do more as I go along if needed.
Well in an awesome turn of events… I was planning on heading to my folks’ place tomorrow to wash and wax before winter naptime. Just got a call from my dad’s buddy (and neighbor) asking if I wanna take the Cougar to his friend’s place tomorrow to put her up on a lift and have the two of them give me some input and guidance. The buddy has a '70 Chevelle that he takes to shows, and his friend with a lift is obviously some kinda car nut too, since he has a lift in his garage at home! Not sure if this is one of the Mustang guys, but if it is that’s even better, what with the similarities. Totally psyched. I just have to wake up a few hours earlier and get out there in the morning.
I also placed my first order from WCCC today, got PS hoses and bracket, new vac check valve, and a new rag joint on the way. Well, not a new rag joint, apparently there aren’t any new ones left nor any on the horizon. Just the used ones. And who knows how long those will last. So I’m glad to have gotten one ordered.
Good times.
Awesome, take advantage of those buddies with lifts!
Also, on removing those rear brake drums…
On the brake backing plate, just under the axle tube, there should be an oval-shaped rubber plug. (Sorry, none of your pictures show this plug, it’s “hiding” behind where the rear springs are u-bolted to the axle)
If you have trouble pulling the drums off, you’ll want to pull those plugs loose. This is because behind those plugs is the “adjuster star” for the drum brakes “self adjuster”; which is designed to tighten up the brake shoes (to move their position closer to the drums as they wear down) every time you step on the brakes while rolling in reverse. Long sentence, break it apart and read each seaprate idea.
You can purchase a Brake Adjusting Spoon from O’relly, AutoZoned, Pep Bpys, etc. It looks like this:

And is designed to go into the hole under the rubber plug and catch on the adjuster ‘star’ to back it off and therefore move the brake shooes AWAY fromn the drum and closer to the axle. When that happens, the shoes will be pulled in enough that the ridge on the rear edge of the drums will clear the brake shoes when you’re trying to pull them off. I’d love to show you pictures of the whole brake assembly and point out WHAT you need to do and WHERE you need to be doing it, but I don’t have any pic’s in any of my cameras or in my photobucket account; and the only drum-brake equipped vehicle I have is my Cougar, which is sitting in my carport, under its car cover, with a flat rear tire on the only easily accessible side!
And, BTW, one of the plans for my car is to take the rear brake assemblies off the axle (I already have disks on the front, as you do) and replace them with a rear disk brake arrangement off a Crown Victoria or late-model “GT” Mustang. It takes me about 15 minutes of actual work to jack up either my F150 or my wife’s Ram1500 and replace the disc brake pads. It took me about an HOUR to wrestle the drums off a friends '95 Ranger, and maybe 15 minutes after that to break my nose with a pair of needle-nosed “Vice Grips” when the pliers slipped off the spring I was attempting to remove and move -(at a speed approaching Mach 2) upwards until it bashed into my schonzzz. Through my teary eyes and bleeding nose, I mumbled “Crap! Not again!” - this was definitely NOT my first (or 10th) time doing the same thing to my poor nose.
So, yeah, the next time the rear drums come off that axle they’re going away, far, far away. And disk brake assemblies from either of the afore-mentioned vehicles or a later-model Explorer will be taking the original brake assemblies’ place! You DON’T have to do this modification right away; in fact, I believe that EVERYBODY should experience the pain and blood and hear/feel the CRACK as the vice-grips smack into the bridge of your nose ONCE. After that, you’ll want to do the modification, just so it ONLY happens ONCE!
For the experienced apprentice out there, yesyesyes; I know that there is another tool for taking the springs off! But they don’t always work. I have gone through 4 of those tools since 1981; because they either slip off at the least opportune time, or just break when I’m fighting to take the springs off or put them back on. Besides, behind some kind of performance wheels like the Shelby-style wheels Bill B and his son put on the black-over-black cherry 68; a disk brake rotor sporting a big “performance caliper” just looks soooooo coooool!
This is a picture of the “Adjusting Spoon” going into the hole in the backing plate (rubber plug already removed)
And here’s a picture of the adjusting “star” while the guy is spreading out the shoes using the spoon from the ‘front’ of the brake assembly.

You can see he’s using the point of the spoon to spin the star (on threads) to lengthen the adjuster assembly
Hope this helps!
So it turns out the problem with that rear wheel wasn’t the cylinder after all, it’s the bearing. It’s got a really minor leak. Maybe that stuff on the tire has been there for a long time, and the brakes had been fixed since then, I don’t really know. But when we popped the drum off (and it was not hard at all) they were all shocked at how clean it was in there, and I was told the brakes on that wheel easily have another 10k miles on them. So the plan for that wheel now is the same as for all four wheels, get the bearings in top shape. That ones gonna need replaced I guess, and the fronts and the other rear I dunno. Fronts should be repacked just as a matter of maintenance, and if anything looks shady then replaced.
I got a bunch of pics while she was up on the lift. It was very, very awesome. I’ll get those uploaded to photobucket and posted here later tonight.
We also:
Checked the timing - was right at 6* so was left alone.
Adjusted the idle so it was higher, now about 500 in gear rather than 400 like before. Still low, since on the ride home it was closer to 400 with the headlights on.
Swapped the vacuum advance from the port on the far right to the far left iirc. Whichever it was on in the pics in this thread, we swapped it, cause apparently it was on a port that works but isn’t the right one. Also, after doing that, there were no more puffs in the exhaust, so either that problem was fixed or it just decided to take a pause at a very coincidental time.
Noticed that the rubber hose connecting the fuel line to the pump had a crack in it, so we replaced that.
Plugged a vac connection that was open. I forget now exactly where it was, on the carb or in front of the carb, a little tree with three ports on it had a hose on one, a plug on the second, and the third was open.
Tested the manifold vacuum. I forget now what it was at, I wanna say 16, but I expected it to be bad since there headlight check valve is toast and there’s some sort of leak in the brake booster. They recommended replacing the brake check valve which I’ll probably end up doing- gotta test it first.
I think that’s it though maybe I’m forgetting something.
I got to see his awesome Mach I which was just ridiculous. So is his garage. Give me five or ten years and maybe I’ll be there.
Oh, and then I went back to my folks’ place, hit O’Reiley’s to pick up a vented locking gas cap and some touch up paint. Then I gave her her very first bath, which was funny- first time I ever washed a car and had the bucket of water look more or less the same after as it did before, pretty much still clear. And then I dried everywhere, ridiculously well, and went to town with the touch-up paint. And my dad took care of the paint bubble area under the hood, hit it with some rust eater stuff and something to encase it? I think that was the word. Whatever, he told me it’s all good.
Oh, I remember now, we tested the rear end. It’s an open rear end, and we did a test where we held one wheel and spun the other to test the gearing. For every two turns of the driveshaft there were three turns of the wheel, which baffled us all since we expected 3 to 1. But I’m assuming that even though it was 3 turns for every two, that actually means the rear end is still the stock 3.0
Also we confirmed the trans is indeed a C4.
Good times!!! Pics to follow.
Oh!! Duh. The power steering leak. Leaks. One at the pump, on the bottom back part of the reservoir where the tube comes out, dude said it’s a super common leak and he had replaced the pump in his Mach I for the very same reason. The other leak is super irritating. Turns out it was indeed leaking at the control valve right where I though, but on the lift it was easy to see why-- because some dumb$&!@ cross-threaded that line, put it in cocked at an angle and just cranked it in- they also used the wrong wrench, I’m guessing maybe even needle nose or something, cause it’s all chewed up. Wtf guy?!? Probably the same clown who put the fuel pump in and messed that all up.
They also confirmed that I had identified the source of the slop correctly, it IS the ball assembly, the whole thing shifts side to side instead of just pivoting. Dude said he had exactly the same problem with his Mach I but his was worse.
Also, he was really impressed with my Cougar. Said she’s in great shape. Everyone’s said that so far. It makes me really happy. Once that control valve is replaced she’ll truly be in great shape.
Pics from today. That rear wheel is in here somewhere


My favorite is the one of the engine bay, where you can see the trees reflected on both sides. Purty.
wow, here’s another contender.
purdy’s the word. How much pressure do you maintain your Hi-Jackers at? The stance doesn’t any rise.
I see one cheap easy fix that will make a huge difference in the way it drives. The sway bar end links are shot. Go to Auto Zone and get a set of stock replacements. (you need the bolts, as one is bent at the bottom). I always install these with the threaded end of the bolt going upwards so that it can’t get bent.
When you go around a corner, the slop in the rubber sections has to be taken up by body lean before the swat bar can begin to take effect. New rubber parts will tighten this up a lot and you will get much better handling.
Bill, thanks! How did I miss that? I’ll look up a part number and post it here and see if I got the right thing.
About the highjackers, I have no idea what psi they’re set at. They’re set however the previous owner had set it. I’ve just read a little bit about them and almost every thing I’ve read is bad and about how they tend to break the rear shock mounts off. So I’m thinking that I might need to hear from people who have good experiences with them, or just take them off and replace them with conventional shocks.
I should check the pressure just to make sure it’s not too low. I really like the height the way it is. And I guess part of the way she sits right now is because there are spacers on the front shocks, too. That’s what they told me yesterday anyway.
Bill, this guy??
If you have slop in the ball stud, the control valve assy. won’t fix that. You need a ball stud repair kit also.
EDIT=A couple of those hose nuts on the control valve are difficult to tighten because they are so close to the casting. I ground a cheepie HF line wrench just to tighten them. Also, the two lines going to the pump should be secured to the drag link with a hose clamp. If they are not secured, the constant moving of the drag link will loosen the tube nuts.
If your control valve leaks, you will probably need new hose seats. This control valve rebuild kit from Randy at StangersSite.com is the only one I could find that comes with hose seats. http://www.stangerssite.com/CVparts.html
The rebuilt control valve from WCCC includes the new ball joint in it, at least it looks like it in the pics:
http://www.cougarpartscatalog.com/controlvlv.html
Same for the one at RockAuto
http://www.rockauto.com/catalog/moreinfo.php?pk=1776520
Maybe I’m describing it wrong but when I’m saying ball joint, I mean the part on the control valve itself, the ball joint that accepts input from the pitman arm, if I’m understanding right. The actual ball assembly in the control valve has side-to-side movement, not just pivot at the ball. I’ve seen the diagrams in the shop manual and I wonder if maybe it just needs to be tightened down, the whole apparatus that holds the ball in place… But it doesn’t matter. With the stripped/cross-threaded connection for that one hose, I’m replacing the whole control valve, there’s nothing to mess with there, it just needs replaced.
I already ordered all the PS hoses a couple days ago, they’re already on their way- the premium hose kit plus the two other hoses, all from WCCC.
It’s still up in the air as to whether I’m gonna try to do all this PS work myself, or take the parts to a guy who’s done it many times before and can do it all solid-like, and if possible I’ll just watch him do it and learn something. Decisions decisions!
Woah, wait, new valve seats?? The valve seat is exactly the part that’s stripped on mine, right? So that kit covers both the sloppy ball joint AND the stripped pressure hose connection?? That seems perfect. No?