Isabel's West Coast Sister

Ever since I saw 1969XR7Vert’s Isabel I have been wanting a similar car. As luck would have it, one appeared locally and I jumped on it. I posted a few pictures of it in another thread a week or so ago. In anticipation of the car’s arrival, I ordered a set of Foose 105 rims and tires the same size as Robert has on Isabel. I also opened up my wallet and ordered miscellaneous parts that I knew were missing, like the air cleaner, Cougar badges, window winders, and the list goes on and on.

I took delivery of the car last Friday as the mechanic who went through it brought it out on his car hauler. I spoke with the mechanic and he told me that the 625cfm Barry Grant Demon carburetor was badly gummed up and he wasn’t able to get the inner passageways clear enough for the car to run, so the seller decided to put a brand new 625BG carb on the engine. The mechanic said he started the car, but that the gas was really bad. I decided that rather than start the car I would do a complete gas cleanout.

So I towed the car into my yard and proceeded to wash it, as it had been sitting outside and the paint was dirty. I was careful with the water as the windows were down and pretty much unattached. I noticed when washing the car that the bumpers were loose and barely on, the rear backup lights were just set in place, and other parts had just been stuck on without fasteners to make the car look more or less complete. The front hood scoop had been removed for the transport to my house, and it only had two holes in the hood to mount it. In other words, this wouldn’t be a quick turnaround to get the car finished.

The next day I towed the car into my big shop and gave the paint a good wax job. I have always been partial to Turtle’s One Step Color Back, so that is what I applied. I took note of where several paint chips were located. The seller had given me the paint cans from the paint job and I am hoping that the paint might still be OK to fill in the chipped areas. We shall see.

I then jacked the rear tires up and drained the gas, which smelled like turpentine. I shook my head thinking that the mechanic had started the car with this junk gas. I flushed a quart of fresh gas in the tank and let it drain out with the old. I blew out the lines running from the tank to the fuel pump, the lines from the pump to the carb, and also drained the float chambers. I sprayed some carb cleaner in the lines and blew them out again until the fluid looked clear coming out of the carb drains for the floats. I checked the radiator and found it to be a half gallon low, so I topped it up. I also checked the oil and saw it was overfilled, but the oil was clean as a whistle.

After buttoning everything up, I poured three gallons of ethenol-free gas into the tank. Then I took the float needle out and carefully poured fresh gas into the float bowl. Since the engine was basically brand new I didn’t want to grind away on the starter while the engine pulled gas from the tank to the carb. I sprayed a little ether into the carb and the engine fired right up. The engine really sounded beefy and it was a pleasure to hear that 408 run! It died after 30 seconds, so I again filled the float chambers with fresh gas. It started right up and this time I ran the engine for 10-15 minutes. I let the engine cool down and tried starting it again. It would start with some ether but would quickly die, so I have to troubleshoot to see why the engine isn’t getting gas.

While I wait for a set of manuals to arrive, I am trying to figure out where some of the parts I still have to install go. The seller gave me three boxes of parts and cautioned me that some of the parts could very well have come off another vintage muscle car. So let’s have a pop quiz and see who can identify these parts!

A. What is this and where does it go?

B. What are these brackets and where do they go?

C. What is this used for and where does it go?

D. Is this the vacuum cannister for the headlights? Does it mount in the engine bay on the passenger side by the hood hinge?

E. Are these front disc brake guards?

Here are some parts that were in the trunk.

Here are a few pictures of the car after I did some cleaning.

The front bumper turned out nice after polishing it with Turtle Chrome Polish and Rust Remover.

I was disappointed that the PO didn’t put some rubber stripping between the hood scoop and the hood. You can see the scratches that resulted.

[URL=http://s921.photobucket.com/user/sternk13/media/1969CougarParts022_zps16a7f831.jpg.html]

[/URL

[quote=“relentless”]

D. Is this the vacuum cannister for the headlights? Does it mount in the engine bay on the passenger side by the hood hinge?

Congrats and have fun!
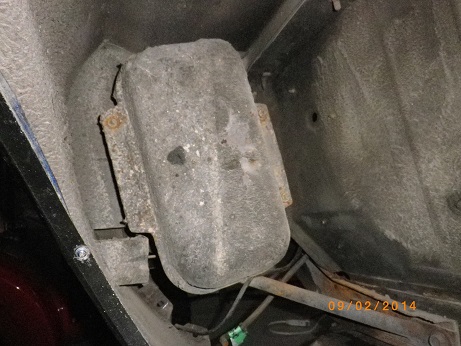
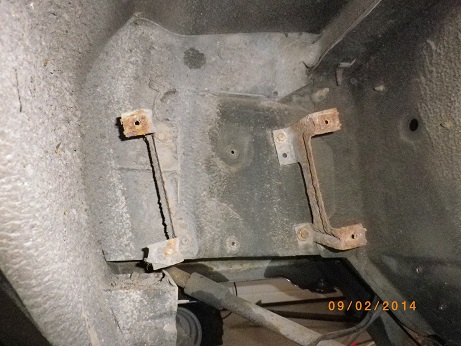
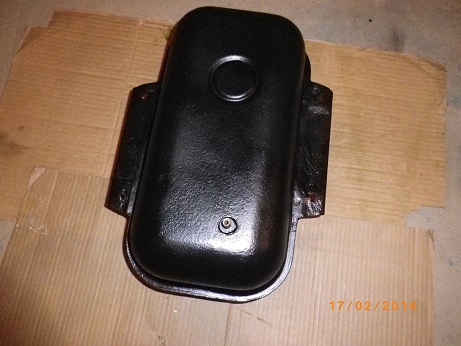
That sure is the vac cannister. On 1970, it mounts under the driver side fender, behing headlights.
See pics that were taken before I removed it to repaint.
VacCan.jpg
VacCanBrackets.jpg
VacResRest.jpg

Dan got some of the easy ones, C. Are lower fender brackets at the rear of the wheel well openings and the long one is a lower fender brace at the bumper bracket at the front of the fender.

Thanks guys for your input. I have much to learn about this car, but it’s going to be fun (and a bit expensive)!

BTW Ken, no weatherstripping between the scoop and hood, that is the way they were. Once the scoop is on, it’ll be no problem!

A) Looks like a side marker light bezel on the far left. The other parts do not look like Cougar parts.

B)Vacumn tank mounting brackets. Shown in CougaDan70’s post #2.

C)What Bob said.

D)Attaches to the brackets in photo B. Shown in CougaDan70’s post #2

E)No.

Trunk) I see a glovebox door and hinge, a front fender extension and the reflector that goes inside the taillight lens. Otherwise I do not see anything Cougar but there could be.

Randy Goodling
CCOA #95

Adding to what Randy said, no they aren’t Cougar front disc brake guards, but they could be (and probably are IMO) disc brake guards for some other kind of car (could be front or rear). Maybe part of some (rear) four wheel disc conversion parts?

OK some of the goodies I have ordered have started to trickle in. While waiting for them I have been busy cleaning, cleaning and cleaning and waxing. I have also taken some parts off and will be taking more off in order to bring this car back to what it once was. The PO didn’t mount many of the parts I have been taking off, and there are a lot of nuts and bolts that are incorrect. I will be rectifying that situation.

After removing parts from the front of the car.

Lots of hidden dirt under the trim moulding.

Found this hiding under the trim.

New air cleaner that sits up too high. It will fit my '67 GT however.

New stainless steel door moulding. Need to figure out what to do with seat hinge bracket, paint or cover?

New Cougar badges, light lens and bezel.

Wondering what seats you have, are they hibacks? Seat back releases are halfway up on 69 seats.

Oh, and there are covers that go on the pivots.

Yeah these seats are out of a 1970 Cougar.

Robert, where can I find a front Cougar emblem to fit the driver’s side above the headlights?

I believe that the front COUGAR emblem is reproduced. You might also be able to find NOS or a good used one. Just in case you (or anyone else reading this) does not know the front emblem is unique for that position and is different than the one on the quarter panel.

Randy Goodling
CCOA #95

I may have a good used one but am away on vacation until next Saturday.

Have fun on your vacation! I will speak to you about the emblem when you return.

In the meantime I installed the Grant 1170 steering wheel yesterday, another match to Isabel! It is 14.5" in diameter and doesn’t rub my thighs like the stock rim blow horn.

Glad you are happy with it and that I could help with the recommendation.

I ordered more car goodies over the weekend. I received more car goodies today. I discovered more car goodies I still have to order. :buck:

My wife came out to help me today. She is a great cleaner, so she attacked the trunk/gas tank where the PO had put some weird rubber-backed rug in that managed to stick itself to the interior. She came into the house and did some research since the hardened rubber wasn’t coming off easily. Tomorrow she will try soaking the area with WD-40 and using a plastic scraper.

Meanwhile I inspected the lock set I picked up today.

I installed the door locks, but ran into trouble with the rear trunk lock. I have been using a long flat blade screwdriver to open the trunk while I waited for the new lock to arrive. The lock set I bought didn’t have the extending lever that the was on the truck lock I found in one of the parts boxes I was given, so I took the extension lever off that lock and put it on the new one. The new lock appeared to be the same length as the other one, yet the extending lever to work the inner trunk latch mechanism doesn’t reach far enough. Length of the lock and lever is right at 4" and is too short.

So I still have to figure out what’s going on here.

I cleaned the inner door panels and put on the repro inner door handles… After I removed the “made in China stickers.” I also cleaned up the passenger door panel and put it on to see how it would look. I sprayed a lot of WD-40 in the doors on the moving parts, and they operated a lot smoother and easier.

Here’s the new passenger door lock.

My wife vacuumed the interior out. I will still be taking the carpet out and cleaning the floor underneath and then cleaning the carpet once more. Here’s a shot of the new Grant steering wheel.

I put the sun visors on but am missing the center pivot/mount so will order one. It was a pain to get the visors on their pivot rods. I ended up spraying WD-40 in the visor rod opening and had to jack with the passenger side before the visor would slide all the way into the rod.

It looks like the previous owner was doing a bit of let’s use what we have when he built this car. I see standard door panels, XR-7 instrument cluster, XR-7 passenger side panel with the clock, standard light panel above the A/C block off plate. Sorry, I’m not trying to pick it apart, just making an observation. Is the car a standard or an XR-7?

Randy Goodling
CCOA #95

Pic “E” shields are for Versaille rear disc brakes.

Seats- Plastic covers avail from Scott Drake (small curved pieces)

Ken,

Am I missing seeing the sheet metal - hub (wheel adapter) cover on your column? I painted mine the same color as the column.

Randy, yes, the PO took a standard and added some XR-7 bits here and there, mainly the dash. He also added the '70 front seats to a '69. He put a lot of non-OEM rusty nuts and bolts in places… He had the bumpers mounted on their from-the-frame mounts but then just slid the mounts into where they should be bolted to the frame, so the bumpers were basically floating… There are a lot of untightened steering and suspension pieces… The driver’s side window was flopping around, and I could go on and on about parts that were just put in place without fasteners. So I am basically taking the car back apart piece by piece and trying to get it to a state where I can drive it reliably!

Cougar Bill - thanks for ID’ing the brake shields! The PO put a 9" LIncoln Versaille rear end and disc brakes in the car. Again, it is a custom hybrid and I’m good with that. I’ll check Scott Drake for the seat hinge covers, although I did find a rough one in the pile of parts I was given with the car.

And Robert, there was a rubber accordian section that came with the wheel and I put that between the Grant hub and steering wheel. The instructions were a bit confusing and I would have preferred a Youtube video to help but couldn’t find one - or a step by step picture procedure for that matter. I haven’t tested the horn yet and I hope I did the right thing by taking the two wires from the Grant adaptor and attaching the wires to the horn hub in the middle of the Grant steering wheel, without the original contact points for the rim blow horn.

The good news about the car is that the heavy lifting has been done. The motor is brand new and sounds beefy. The body has no rust. Brakes, steering and suspension parts are new and just need a good cleaning up. Interior is in good shape. Paint is still shiny. Still a ton of detail work yet to be done but it is progressing!

Ken,

Here is a picture of the wheel adapter cover I am talking about.

Not sure how well the picture shows it, it is the rounded cover that transitions from the column diameter to the accordian rubber cover (and I like I mentioned, I painted it charcoal black metallic to match the column).

Also, FWIW, I seem to recall needing to cut back the edge of one of the horn contact rings on the adapter because it was causing shorting otherwise.