I decided it was time to get after the brakes, suspension, and steering to get my GT ready for longer drives to local club events. First step was pulling the booster and master, quite a chore with not much room to spare. It seems like the '69 Bendix booster that was in there used up a couple extra inches between the firewall and shock tower, putting the end of the master cylinder just about right against the shock tower. I was happy to find that the booster and master were both original Bendix pieces.
I’ll be sending the master out to get rebuilt and mating it up to a Midland booster that I found on Craigslist and will have rebuilt. Hopefully the install will be a little easier with the extra room at the shock tower.
With the booster out of the way, I had access to a whole area of the engine compartment that was basically inaccessible because of the big block.
The distribution block and proportioning valve looked like spaghetti spread over a train wreck. Made me glad I started this project now. I also found that excessive play in the clutch mechanism due to worn out/missing bushings had caused the clutch rod to wear a valley in the side of the distribution block:
So, now that I’m in here, the list has expanded to include removing and rebuilding the clutch linkage. The Z bar looks good and appears to be original, or at least seems to match the markings I have found on NOS and used examples up for sale. I’m not sure about the finish as I have only seen them listed as bare or zinc plated, not dichromate. Maybe somebody can chime in?
I also pulled the steering gear box, the original SMB-K unit, and will be sending that off for rebuild as soon as I figure out how to get the pitman arm off it. I was pleased to find some original yellow paint marking on the pitman when I cleaned it up.
This will be a big project. I’m planning to completely replace the brake system from the booster to the calipers, discs, and drums, completely rebuild the front and rear suspension, and completely rebuild the steering system. I’m hoping to get it done and back on the road by next summer. I’ll update again as I get further along.
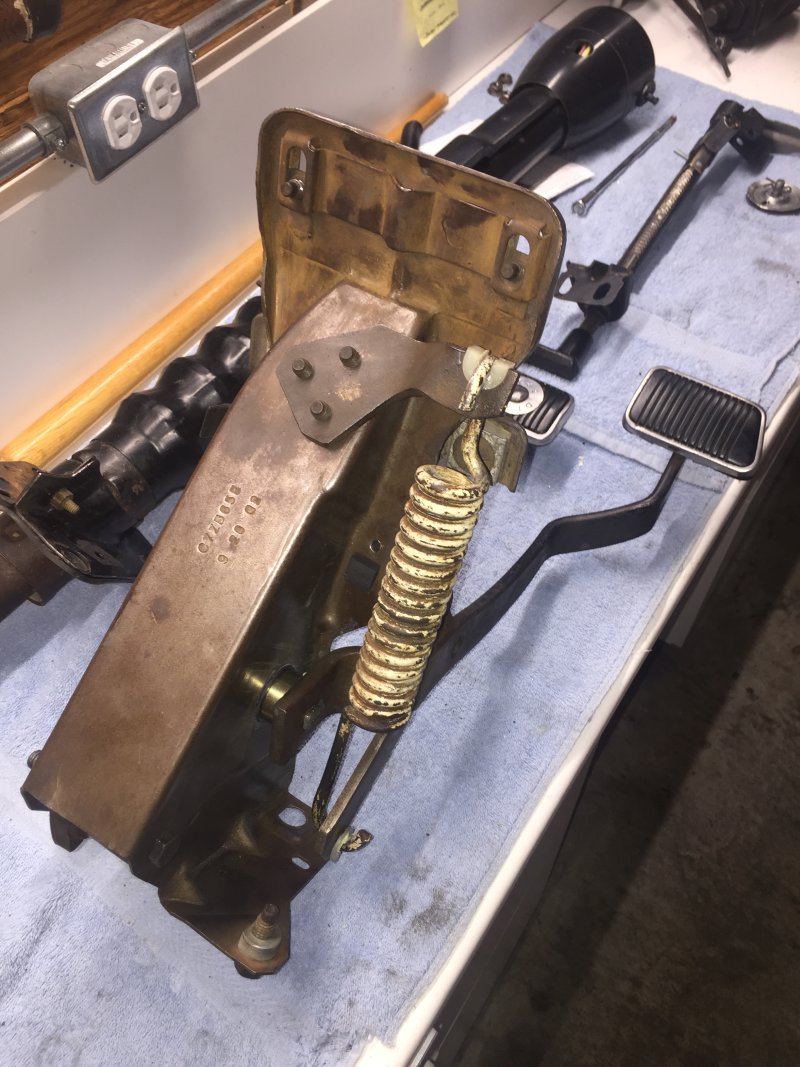
So I pulled the steering column and clutch/brake pedal hanger (Royce - thanks for the advice, it was as simple and easy as you said it would be). I found that the metal clutch pedal bushings were worn out so I ground them out and replaced them.
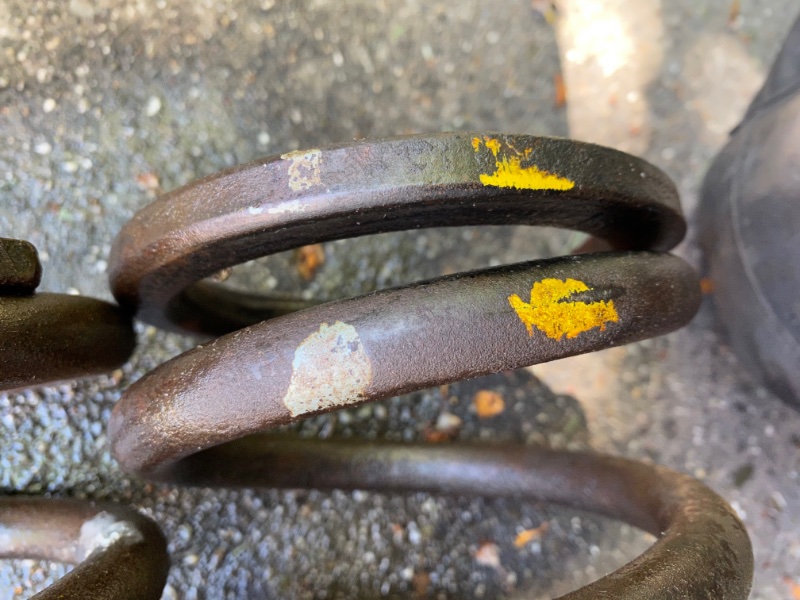
I also replaced all the plastic bushings for the brake and clutch assembly. My clutch assist spring and spring bracket both had the white color codes called out in the assembly manual for S code cars. Here’s a picture of the rebuilt assembly where you can see that the whole spring is painted white and the bracket has a white paint daub. Anybody know what the difference is between the small block and big block parts that required the paint code differentiation?
I believe the small block spring is not as strong as the white 390 application spring also I would plan on replacing your brake distribution block as pressures can exceed 1000 psi.
I think the clutch Z bar is a replacement. The service parts were cad plated like that. It’s common, the hole gets elongated at each end. The rods also wear quickly, yours look to be good so they probably got replaced at least once in the past.
My car is currently, and always has been, missing these brackets, the isolators, and the upper bracket that goes between the leaf spring mounting box and the axle housing. I attached a pic of what is there now. The rear sway bar and it’s mounting bracket are coming off.
EDIT: I eventually found literature that designated #2 leaf spring brackets for Cougars with the 390 in '68.
Very cool! I’ve always wanted an Augusta Green 390/4-speed car. After seeing the production numbers, it’s no wonder I haven’t run across one. Just for reference, there were 581 Mustang fastbacks painted the same color with the 390/4-speed combo (the “Bullitt combo”).
In case you weren’t aware, Kevin Marti is also a Cougar owner. He still owns a 67 that he turned into a convertible back when he was going to college. I had several pictures of it until my memory card got reformatted. It is light brown and has a 289/4V/4-speed. Cool car, but I still prefer yours
I’ve been chipping away at the projects, including running all new OE steel brake lines.
I started on the front suspension yesterday. Having everything out on the passenger side will also allow me to maneuver the hard brake line from the wheel well across the firewall to the distribution block. Since I’m doing one side at a time so I can use the other side for reference, I’m starting with the passenger side. I removed the shock, coil spring, strut rod, and the upper and lower control arms.
I used water and simple green to clean all the road grime out of the wheel well. Everything looks in pretty good shape.
The springs that were on the car are a complete turn shorter than the Moog springs Royce gave me (Thanks again!). There should be a significant difference in stance. Hopefully it will be evened out somewhat since I’m replacing the rear leaf springs.
The control arm, I think, is an original with a replacement ball joint. I don’t see any cracking. Is there any value in keeping this? What are they worth?
Typically $50 - $100 for a pair on eBay. You would need to clean and blast them to get top dollar. You may find cracks after blasting. I did on my most recent restoration, which resulted in me buying the nice (but expensive) made in USA reproductions from NPD.
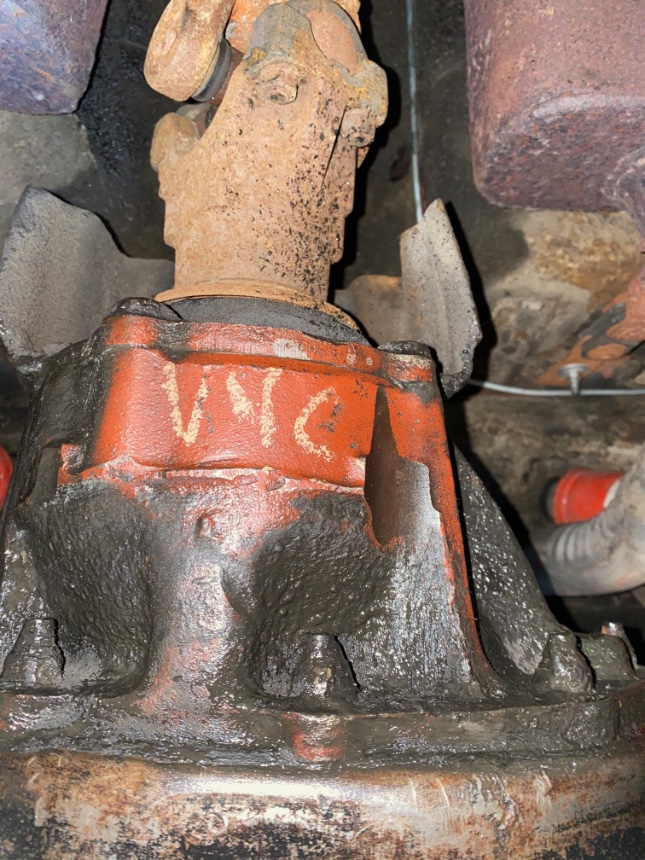
I’ve been procrastinating on some of the more pedestrian aspects of my Cougar and spent a couple hours today cleaning up my rear diff/axle.
After finding some original paint and markings under all the crud, I’m thinking maybe while I’m replacing the leaf springs I should remove the whole axle and clean it up. Is that as simple as just removing the two u-bolts from the drive shaft u-joint and then rolling the axle out from under the car?
Thanks for the responses. I should have said where I’m at with my project. I am currently replacing all the hard brake lines and brake hoses along with the rest of the brake system. The front is complete all the way through the trans tunnel to the rear brake hose, which is not yet hooked up to the rear axle because I was waiting to install the rear hard lines until I replace the leaf springs. My new leaf springs are on their way and I will be removing the axle to spring u-bolts to replace them.
I just want to see if I can support the drive shaft with a jack stand and disconnect the two u-bolts from the differential. The shop manual is rather vague on the subject. Does the driveshaft need to be disconnected from the transmission and removed altogether to accomplish this? It would be fun to clean up the differential but if it’s going to cause headaches I will just do my best to clean it in place.
The drive shaft does not have to be supported to remove the rear u-joint nuts. The u-joint cups rest in the yoke. Remove the four nuts and the u bolts and then you will pull the driveshaft towards the transmission. One or both of the cups may be tight when separating from the yoke. Unless the rear end of the vehicle is elevated you will lose some transmission fluid out of the tailshaft.
When you remove the spring u-bolts make sure that the body is supported so that it does not drop down on you. You will also want to make sure that you do not use the rear leaf springs or rear axle for your body supports.
I am in the middle of installing those same MOOG springs on a 428CJ XR-7 GT-E that has had factory air added to it. So far I have had them in and then took them out and cut 1/4 coil off each spring. Still too high after a test drive around the block.
I am going to cut another 1/2 coil for a total of 3/4 coil off each side.
Meanwhile new Eaton Detroit rear leaf springs were arched too low. I took them to a local spring shop and had 1 1/2" of arch added to each.