Love watching the progress of your car, keeps me motivated to work on mine even though it’s been a month since I’ve had the chance to touch it… Great work!
Great job on the grill, Andrew!
Going through this right now on my 67.
What a job! Did it all work well once you tried it all? I’m wondering if I should replace my vacuum actuators because I tested them with a vacuum pump and they all leak down to 10-12 lbs after abut a minute or so. One leaks all the way don after about three minutes.
I actually haven’t wired everything up yet, but have seen this kit in action before and it works very well. I’m still fiddling a little bit with the alignment of everything, now that I have the front valance and bumper in place. Just this weekend I removed the vacuum hoses and installed the headlight bulb harnesses, and hooked up the linkage arms for the electric motors, so I’m getting closer to actually testing them!
Andrew, your car is looking good. Looks like you are just about to the interior
Car is looking awesome. So much attention to detail and as I am still learning about cougars, I would like to thank you for all the pics and how-to’s. When I get back to working on mine, that information will surely be a great help.
Thanks! It’s been a monumental undertaking, but the end is in sight. Interior is one of the next things on the list, as soon as I get the front and back glass in. I’m looking forward to that stage.
As of now, I finally have all the side windows installed and adjusted. That was a pain but I’m pretty happy with the result. Also have the front bumper and valance on. So the exterior is starting to look pretty complete! Will post pics soon.
Time for another update! I’ve been keeping busy, trying to make as much progress as possible before it gets too cold to have any motivation… would like to be done by the end of the year, but we’ll see about that. I spend almost every evening after work and every Saturday working on it these days.
Firstly, after finishing up the front end with a rechromed bumper, rubber fillers upper and lower, and my valance with new parking lights, correct clear lenses & amber bulbs, modified with Cougar-specific wiring, I pulled the car outside for the first time in a while. Wow! I’m digging it.


Alright, back inside and back to work.

The one major area of the car that I hadn’t touched at all yet was the rear axle, suspension and brakes. This was bugging me, and I really wanted to refurbish it so it would be on the same level as the rest of the car. Some “before” shots:


Out with it! It looks simple but it actually took me a couple / few hours to get the whole assembly out. First time doing this. Also, all this stuff together is heavy!!

The leaf springs had never been replaced, I observed the Ford part numbers on them (no pic, sorry)


Documenting the original paint markings on the top of the axle housing:

Starting disassembly:

Empty hole. This gave me a chance to address some of the white overspray. I just fogged over it with some satin black VHT chassis paint (not done yet in this pic).

To hold up the driveshaft I just stuck a piece of wood over the exhaust for it to rest on. Maybe not ideal, but the welded-on sticks that the exhaust shop did back in the day seemed strong enough. (Exhaust was done roughly 10 years ago when I backed into a steep driveway and ruined the original single exhaust. Those are long glasspacks, they have a nice mellow yet burly sound). The driveshaft is now the only remaining significant piece that hasn’t been refinished in some way. I’ll probably do that at some point.

Brake stuff disassembly begins. Also trying to keep track of all the other bits and pieces. I took a good reference pic of each backing plate with everything installed so I would remember how it all goes together. This is also a first for me, rebuilding drum brakes.

Axles out. I was able to pull one out by hand, but for the other I had to use the backwards drum trick that I was previously unaware of (thanks for that one Scott B.). Put one of the drums on the axle backwards and just start the lug nuts enough to be on the threads. Then you can use the drum like a slide hammer to pop the axle out.

Pumpkin out. Made a mess. It was surprisingly hard to separate it from the housing. I finally realized that I had to pry off all the copper washers before it would budge. New ones are a must for reinstallation.

So at this point, I took the axles and pumpkin to a reputable shop to have them rebuilt / bearings replaced / etc. In the meantime, it was time to clean things up and make them pretty. The axle housing itself was a little challenging, being covered in years of crap. I tried to wipe out most of the old oil from the inside, using rags and Brakleen. For the outside, to start with, I attacked it with wire wheels. That worked to an extent and knocked most of the crap off. But then I started to eyeball the blast cabinet. I wondered if it would fit in there? Or maybe I could leave the side door open and have it sticking out a little?
To prep for this adventure, I made a cardboard cover for the diff opening, and masked off the end holes. I knew I wouldn’t completely avoid getting sand inside, but wanted to at least minimize it.

It took a while, but I got it done. So nice and clean! I then took it outside and washed it out with water to get all the sand out of the inside. I know, water + bare metal = bad, but I dried it off as quickly as possible with compressed air and a heat gun. Then wiped down with wax & grease remover to prep for paint.

And then, paint. Once again I went with the VHT chassis paint. I like that stuff.

Backing plates blasted:

…and painted (still wet)

Then, I got my stuff back from the shop! I had asked them to clean up and paint the pumpkin red oxide, since it would be easier to do while it was apart. It came out great.


New axle bearings. My only disappointment here is that, while they did clean the gunk off the axles, they didn’t really “clean” them. At least not how I would have liked. Still rusty and ugly. I should have asked them up front to also do something about it while the bearings were off, but anyway…

…so I initiated another bold (or stupid?) plan to fix that. Got some thick plastic sleeving from the WCCC shipping department, and zip-tied it below the bearing, and further up the axle. Also followed up with some tape.

Then blasted and clear coated these areas.


The only issue was, my masking method wasn’t 100% effective, and sand did find its way inside and got on the bearings. I was worried it would get inside, which would cause them to grind and wear out prematurely. After carefully wiping it away and blowing the area with compressed air, though, they felt fine and smooth spinning by hand. So I think I dodged a bullet there.

Installed new axle seals:

Here we go! Getting ready to put everything back together.

New gasket with Permatex ultra black goop (both sides):

Pumpkin reinstalled:


Looks good! Some closeups:


Moving on, there were a bunch of bits and pieces that I blasted and clear coated, to keep the “natural” look:


Then, I started to put together the brakes. Here I’ve put in new wheel cylinders and parking brake cables (I used these: LH / RH)

Then fast forward to everything put back together with new springs, hardware, and adjusters. These are a pain in the butt to put together. I actually reused my old shoes because they were good quality and still had plenty of material left on them.


Back together with axles reinstalled! A rubber mallet came in handy to drive the axles all the way home once they were started. Also can’t forget the inner and outer gaskets.

Then, I figured it would be easier to fill up the fluid now, rather than messing around with a pump and hose setup underneath the car. I made sure to set it level and fill until it started to come out of the fill hole. I then closed it off and spun the axles, and tipped it one way, then the other, to make sure the fluid would travel to all the places it needed to be, then topped it off. It took less than 2 quarts.

Here are my new leaf springs. There are a bunch of different variations depending on options, engine, etc. I got the relevant ones for my car, but with the slightly upgraded Competition Handling specs. I think that means an extra leaf?

And then, with help from Darrell and Scott here, everything went back together fairly easily.

As you can see, I also put on a new rubber brake hose as well as new steel brake lines. Fitment required a little tweaking, but I got 'em on there.
I went for the longer U-bolts since I chose the Competition Handling leaf springs, and of course used new rubber pads. The shocks are KYB Excel-G’s, same as what I used on the front. Also needed new shackles.


In all, the process took about a week. Very glad to have this done. It looks so much better, and I can already tell that the rear suspension is a lot stiffer than before.
So that’s one big project done! I have more to update but I’ll close with this for now. My car had a twin for a bit, this is the car that Don recently had for sale. Mine is on top. You can also see that I put on some of our Legendary GT5 wheels to test out / model them for pictures. I’ll have to get some pics on the ground outside soon.


I’ll let that be all for this post. Progress is happening!
So did you ever imagine a few years ago when you started that you’d be where you are today?
That looks fantastic. Makes me want to get after my suspension and diff.
The to-do list is growing…
Very cool! Looks great! …that’s on my “To Do” list for this winter. Have to say I’m not really looking forward to it though >.<
I dunno, if you would have told me back in 2011 that it would take this long, and cost this much, and prevent me from having a social life, I might not have gone for it ![]() But then if you showed me these pictures I’d probably say “wow, that looks good!” In the long run I think it’s something I’ll be proud of.
But then if you showed me these pictures I’d probably say “wow, that looks good!” In the long run I think it’s something I’ll be proud of.
This all started because I wanted to fix the rusty roof. I didn’t really intend on going this far with it, but one thing led to another… hence the “snowball effect.” I’m not a total perfectionist but I do have those tendencies, and want to make things right, or as good as they can be within reason. And really, being employed at WCCC and having access to the shop space and tools there, not to mention all the parts I could possibly need within reach, what better time and place in my life would there be to tackle this?
Thanks Mike! I was kinda dreading it too, and although there was some heavy lifting, and lots of pieces to refurbish or replace, it wasn’t so bad overall. Pretty satisfying to get it done.
Your snowball is out of control. I’ve followed this thread since you started it and have always been impressed with your work and your patience. That rear end project fascinated me. That’s one of the few things on my car that I have purposely ignored, except for brakes, seals, and bearings. I’m going to try to forget that I ever saw your pictures because it sure would be nice to see everything that clean but I don’t think I have the energy for that.
Amazing thread, nice work Andrew.
Looking good Andrew!
Steven
Thanks guys!
So, I skipped over some stuff. I was scrolling back on my phone photos and realized I never posted this stuff. So let me go back in time for a sec.
Front bumper installation! Kinda awkward and it helps to have a second person. In the end, I left the brackets slightly loose on the bumper to allow for some movement / adjustment once on the car. To this day I still need to cinch them all down, but they are hard to get to once on the car! Also, a big piece of foam like this is super handy for things like fenders and bumpers.

The bumper hardware kit gives you everything for the front and rear, I definitely suggest it if you’re replacing the bumpers.
It’s great that the rubber filler pieces are now available. My originals were rock hard, deformed and starting to crack. Word on the street is that new ones are in the works for the rear bumper too. But for now, here is the fender to bumper piece:

And here is the upper filler piece (put these in before installing the bumper!):

Now for a little detail - it seems that there was a slight design flaw on these cars, which causes the hood trim pieces to not quite line up with the fender extension pieces. We had recently taken the trim off of another car for a video, and noticed that the ends had been shimmed. So I did the same. It just took a few little washers. I used two on the outermost screw holes, and one on the next inboard holes.

Much better!

Front view that shows things lining up nicely:

Next, here’s another fun little detail idea I had. I’ve noticed on a lot of cars how the mounting tabs for the front valance kinda stick out like a sore thumb. With my car being white, I knew it would be even more obvious. So I thought it would look good to black out these tabs, so the valance would have a more seamless look. Here’s a before shot:

In process:

Done:

Next, before installing the valance, it’s easier to do the turn signals now. I repainted my original spacer cup things, and kept the old clips (even though they’re no longer usable - the modified wiring for the repro turn signals makes this area too stiff to bend around into the clips).

Front view after installing the valance.

Here’s a closeup of one of the blacked out tabs, and of course I had to paint the bolts to match.

Next, I installed new side marker lights. The only original parts I reused were the wiring and the screws for the lenses (they are unique, don’t lose yours!). The bulb socket is pressed in to the light housing, so you just have to get creative to liberate it from the old one and press it in to the new one without damaging anything. While I was assembling my stuff, I went ahead and made this graphic for WCCC. So if you punch any of these item numbers into the website, they’ll come up.

I also reused my old backing plates and attaching nuts. Of course I cleaned them up and painted them black, but no picture of that. They went on the car fairly easily. Also worth mentioning that I had already installed my front fender splash shields first, after finishing up the grille project.


Another tiny, almost insignificant detail - I knew that I was going to install the windshield soon, so I wanted to clean up these little guys. They are unique to the 1968 Standard, and they retain / finish off the A-pillar edge of the headliner, since there are no full-length pillar pads like you’d see on the Decor or XR-7 trim. Blasted, painted and reinstalled. I know, I need to clean the glue off the A-pillar.


Finally, I never really showed the finished side glass, so here ya go:


The one issue I still have with the door windows is, I can’t seem to get them to roll all the way up at the front, and fit snugly into the corner of the vent window track. They just stop a little shy. And it’s not the actual window stops, as I had them loose and they weren’t bottoming out yet. Has anyone run into that issue? I think they are close enough to be okay, but would like them to actually roll all the way up…
Anyway, that covers the stuff I missed before! More to come soon, I’m still making some progress almost every day. Here’s a finishing shot, but ignore the amber lenses on the turn signals. I put those in as placeholders because they came in the kit and we were out of the clear lenses for a little bit.

It’s always refreshing seeing a project come together. I’m way in the beginning stages of my restoration but seeing progress of others keeps me motivated to push on with mine. It shows me the light at the end of the tunnel, even if that tunnel continuously keeps getting longer lol. Car looks awesome!
Andrew,
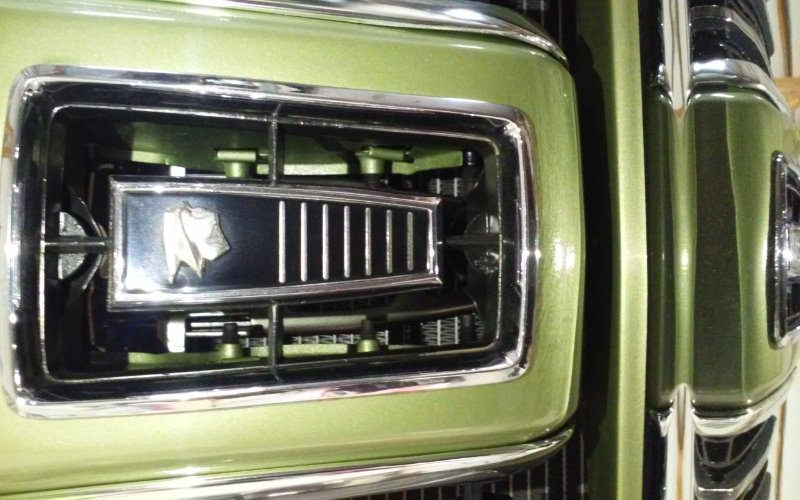
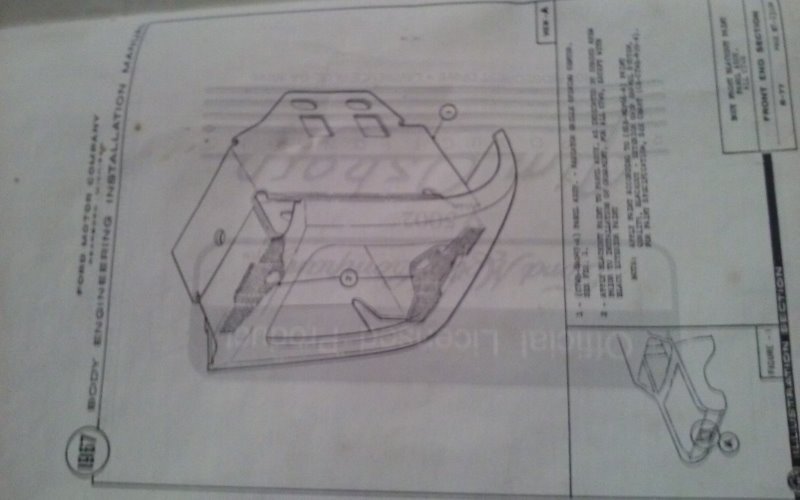
Looking good. Thought I would comment on a couple of things for you. The black out thing on the tabs for the valance is actually shown in the body assembly manual (67 at least). It also shows blacking out the mounting tabs in the center nose piece where the Merc Man bezel goes (which it don’t look like you did)
When using the repro front marker lights it is possible to get the wire in that clip after you do the rewire. If you warm your heat shrink tube and hold it in the direction it needs to “sweep” until it cools it helps. I got mine anyway.
On the window thing not going all the way up in front…I had the same problem and I made a post on it which you commented on. You directed me to the door diagram you guys have.
First, I assume you put new glass runs in the front channel? I noticed when I did mine that the top wedge seemed to have a little extra rubber molded into it vrs my old ones. I did some carful widdling with an exacto knife to get it out and it helped. The other thing, are you using the premium window regulators, or your original? I had a heck of a time with my drivers door window doing just what your describing. The back always touched first over the front no matter what I did with the stops. I needed to replace my regulator because the crank mechanism was real loose, and the teeth for the crank were chewed up, but the rest of it was fine. But no matter which regulator I used (my old one, or the premium repro from WCCC) the window did the same thing. So I got looking at that arm that goes from the short equalizer track to the long window track. On my old regulator it was a little saggy by the center pin, but not horrid, for the most part straight. The new premium one was even more off than my old one. This was using a framing square as a straight edge to check how true they were through that center pivot.
So what I did that you may not want to do…was I noticed in my passengers door that the two holes that hold that short equalizer track on, were actually slotted towards the ground. And I could see when I put the passengers side back together where the flange nuts had left their mark in the steel. So I put them back in the same place, closer to the ground in the bottom of the slots. My drivers door did not have those holes slotted downward. So I slotted them so I could adjust the equalizer track downward which allows the arm to pick the front of the window up a little more, and then when it reached the top of travel then it fit right in that top front corner. Otherwise the window just wasn’t going up parallel to the top door opening nor would it seat parallel until I did that no matter how I adjusted the stops.
Lastly those little clips on your headliner. I have clips like that on my 67. They help hold the headliner I guess in that area. Then the pillar pad, and the padded wind lace around the door opening cover them up so they are not seen.
Keep up the great work! Your going to feel so good once it’s done. Probably a little free’er as well ![]() I know I did!
I know I did!
Thanks for your detailed comments David! It’s cool to know that I had the right intuition on those valance tabs. And funny that you mention the center grille piece, as I was eyeing that as well, thinking the side tabs might look better blacked out. But I don’t think I’ve ever seen that before. Do you have an example picture by chance?
I appreciate your insight on the window conundrum! I got as far as realizing that those short equalizer tracks affect the front-to-rear angle of the glass, but never figured out which way to adjust them. I think the holes in the door shell are slotted on both of mine, so I’ll try moving them down. And yes I put in the new glass run inserts, and new regulators. I’ll take a closer look at those top corners and see if they need to be carved out. I also was unable to reinstall the tiny screws in those top corners, they wouldn’t bite. So I left them out and put a dab of weatherstrip adhesive on the inside of those top corners.
Andrew,
Here are some pics of my nose and the page from the body assembly manual. Note that the diagram is for a 67. Don’t know if 68 is the same, but I can’t imagine why it wouldn’t be, just like the tabs on the valance and the small area on each of the front fender extensions.
As far as your screws not grabbing on the glass runs, I had the same problem on one of mine initially. I realized it wasn’t seated all the way up in there. You really have to work them in there with a small blunt something. Even the length of the rail I had to really work a while to get both the rubber “tanges” into the grooves of the track. Until I got them in there just right my windows went up and down quite hard because the weather strip was pinching on the glass. Think I even ended up spraying a small amount of silicone garage door lube on the strips cuz one just gave me so much grief. As to the screw though, I have a big container of misc screws here from taking various things apart over the years. I found a sheet metal screw of some kind in my assortment the was the right size and looked close to the original one. Filed the point off the amount needed and used it. But again it’s really important to make sure they are seated good, and maybe carved out a little of the extra rubber. Ace, or True value hardware stores where they have all the fasteners that you can buy for way too much money ![]() would probably have a screw you could make work.
would probably have a screw you could make work.
Try the window adjustment thing for sure. I’m not impressed with the repro regulators that way at least. The rest of their construction is decent.
Interesting that you think yours are slotted already. My passengers door was already slotted, and my drivers door wasn’t. My passengers door also has screw holes on the bottom where they put that extra piece of weather strip to help with the road noise I believe, and my drivers door doesn’t. Wonder if my passengers door came off a 68 at some point?