Hey there, appreciate you checking in. Interestingly enough, a month back ran across a google result from years back on your vacuum-timing setting and was planning to do this, and especially if i couldnt read any proper balancer marks.
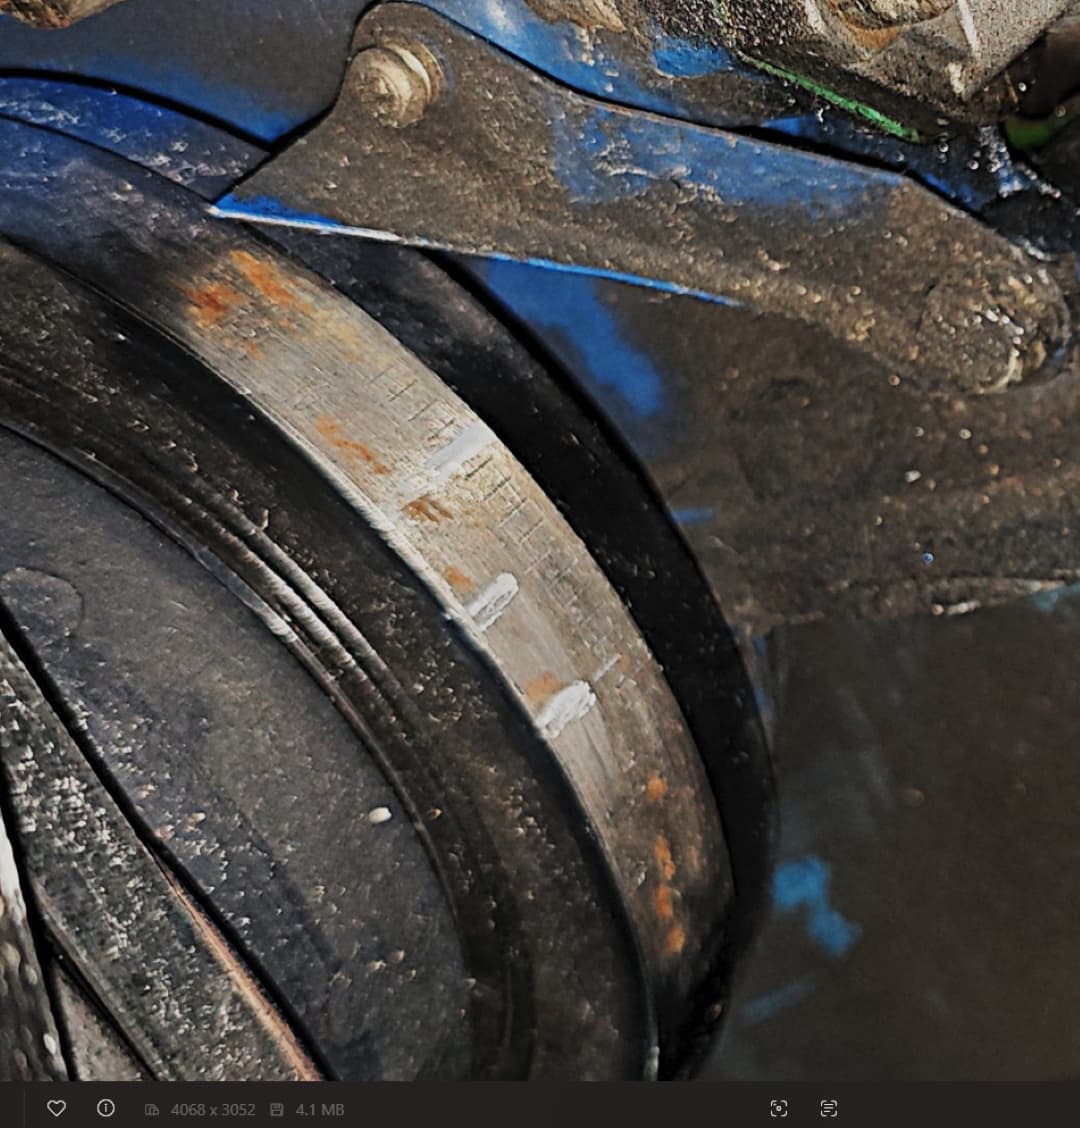
I’m attaching a photo (best one i could get on it tonite) and once i get the rest of the motor cleaned up, refreshed and painted i will also glue on a new timing tape. but for now just to get this cat running right again i’m planning to fit in my day tomorrow to head out there and run the car to check & adjust this timing while observing the vacuum gauge read.
So from the photo it appears these guys who worked on the car about 18mo back, have this marked for TDC and then 10° & 20°. i will shoot for the 1st half-line to right of TDC mark✅ and we shall see how the vacuum gauge reads and acts and take it from there. Thanks again for your help👊
Just keep in mind if you advance the timing beyond 10 deg, you’ll most likely have to retard it a degree at a time until it stops pinging under acceleration.
Also, a god trick is to drill a 1/8th hole in the flat spot on the thermostat- be sure and have the hole pointing ‘up’ when you put it back together. It just really helps get any air out of the system-
I clean the timing hash marks on the balancer with a toothpick then rub white chalk into the slots and wipe the rest away. Most accurate way i have found and lasts a long time actually.
Also a good time to inspect the rubber insulator on the balancer for condition and slippage.
yep, will do. planning to stick around 8-10
EDIT: to add here, i think i’ve got the grasp of the new timing light, whole life only had the basic strobe-light and that was it. but this one should be nice with all the features + RPMs. will test run it today but it looks like you 1st physically turn dist. to set base @ 10, then zero out TL display, then aim light and press + button until the mark (not physically but visually) the light moves it to TDC and once there, the reading is current timing. then assume same will apply if i rev to about 2K and check for total timing as well. at least i can see the marks for TDC & 10 BTDC plus will use the vacuum gauge reading too (hopefully back into that green zone🤞
Interesting, thanks for the chalk idea. I know it’s a mess down there as i havent had a chance yet to get to cleaning up & painting everything in that area yet. As far as the balancer goes, it is in the receipts pile and he told me the guys replaced it about 1.5yrs & 1,000 miles back when they did all the work on the car. other than where they sanded it down to make their marks, i can still see the black glossy paint the replacements come with so all should be good there.
I keep a bottle of white out in the tool box for that purpose. I also put a dab on the pointer also
Yep agree on this, in fact i just installed a new thermostat last week and did this exact procedure, 1/8" hole drilled and installed @ 12 o’clock.
Believe it or not… his mechanics told him he doesn’t need a thermostat anymore because they installed electric fans, so they removed it! That was a new one on me.
And on the fans, i’ll be re-wiring soon as they spliced both fan’s wires together coming off a single relay and power wire. I will set it up proper with 1 relay per fan, 2 dedicated battery feed wires with inline fuse and common ground & trigger wires. I also installed a manual override toggle switch on the dash panel.
Dont do this now(work on geting your other issues resolved first) but before you redo all your fan relays check into a pulse width modulator for fan controls. Its a much better way to control electric fans
Yes it is
16 plus years
.
Did any other of you electric fan users remove the thermostat? I can see where the fan controllers would regulate coolant temp. But on a cold day, I would still want the faster warm up with a closed thermostat.
Yessir, priorities, I do agree with you. but, those fans are also a critical aspect in avoiding any more overheating episodes, i need them running w/o any issues. so what i did for reliability is wired in the new override switch (fused) direct. this way they’re forced on any time i like. and also indispensable here… now have a real temp gauge front & center in the gauge cluster. badly needed vs the 57yo C ----- H needle✅
I ues a thermostat…195 on a 390fe…prodramed the first fan to be on at 200…second on at 210 or with ac o when cold no fan , ir ramps up around 175…
Full on at 200 or so , temp drops below 195 and fan slows down. No overide switch needed
You are not inventing the car. All of this stuff worked well when it was new and it will work well again if you just get back to basics and stop adding bandaids. Removing the electric fan and returning to the mechanical fan and fan clutch with a correctly fitted shroud will go a long way to correctly diagnosing the heating issue. Setting the timing correctly will eliminate a host of other problems. You have too many variables at play at the same time right now.
Let me give you a real world example. I bought a '68 GTE that the owner could never get to run right. He told me it would go about 8 miles before “vapor locking”. They had done everything including an electric fuel pump and a new carb, flex fan, even a new distributor. He was right. It would barely run long enough to get it on a trailer.
It all started when it was running rough. So they removed the Holley carb and put an Edelbrock on it because they were supposed to run right out of the box. And it did run for a little while until it too started to run rough. They just happened to notice that the fuel filter had some orange looking gas in it. So they tried to blow out the fuel line by putting compressed air through it from the front. It blew out alright, it created a hole in the line. So they ran a new rubber hose along side the original steel line. Used zip ties every foot or so. Ran a little better but started “vapor locking”. So they removed the stock fan clutch and shroud and replaced it with a direct drive flex fan. No improvement. So they decided the timing must be off and replaced the distributor with a Mallory unilite. Still “vapor locking”. They just happened to notice the fuel filter was full of orange gas again so they replaced the tank. No more orange gas but it was still “vapor locking”. In every case they were lead to believe that were making upgrades to stock systems. But it barely ran. They gave up.
When I got the car I removed the edlelbrock carb which had a layer of rust in the bowl. It still stalled out with no gas in the carb. I disconnected the fuel line and discovered the electric pump had virtually no output when hot. It still buzzed away but it wasn’t moving fuel. I discovered that they had wired it with old school phone wire: tiny solid copper conductors that was way too long and dropped the voltage to the pump. Simply using a clip lead to provide the full 12 volts made the pump work better but it still wasn’t moving much gas. Working backwards I noticed that the rubber hose had been zip tied very effectively, as in effectively limiting the flow of fuel. I replaced the entire fuel line with factory steel, installed a new mechanical pump and a new steel line up to the carb. It was now running, never stalling but getting hot around town. The Mallory distributor lacked vacuum advance making it tend to get hot on the highway as well. It got replaced by a stock distributor. I replaced the flex fan with the factory fan, clutch and shroud and then it would run at normal temps even in 105 degree Phoenix.
SO basically I returned the car to a know workable condition, and it worked.
The lesson here is to diagnose the problem, do not throw parts at it.
I should add: the original problem was a rusty tank and fuel line that was plugging up the fuel filter and letting crud in the needle and seat assembly in the original carb. A new tank fuel line filter and carb rebuild was all it needed.
well the override is because these guys did hack wiring and the relay & system has been sketchy, so until i have everything in order i had to.
Now on that subject, just went out there to adjust base timing and check vacuum, but… even with the override one fan is dead now and the other cut in/out so i turned car off for now. its possible that one fan’s motor got drenched in the over-spill of the coolant flood the other day as there is still wet coolant all over on everything. when i can, i’ll pull the wires out of the looms i routed and jump it direct to battery to see if it comes alive.
Anyhow there is some progress on what we’ve all been discussing here. even though ran for just few minutes, i got the timing to about 7 BTDC, but the Edelbrock idle screw wouldnt adjust any further back, and i was still around 1200 RPMs post kick-down idle speed so 10 timing would have been way higher idle. Likely need to now adjust the idle mixture screws with the vac gauge to go lower, but i couldn’t let the car run any longer w/o the fans stable.
So far then on positive progress, at approx 7 base timing, 1200 idle, the vac gauge was way back up from 5-7, now into lower quadrant of green around 18, and will likely improve as everything gets dialed in proper. as well, it was not jumpy nor fluctuating, pretty steady for now.
To move forward with further tuning & adjusting of timing & carb, I must 1st address the fans enough for now to get the car where it should be and then i can redo that whole mess they made after i know the car is OK with no damage or issues from 3 overheating-boil overs.
Now for anyone interested or following all this, I had been thinking back over past couple months and to when the car 1st got here. I think I know how this all happened and is definitely a 1st time of this situation for me, the whole thing with boiling over & seriously retarded timing effects on the motor. Based on certain things, it seems that the distributor bolt was never fully tightened when i got the car. so at first, it was baseline and running fine, no issues. but then i remember that my dash brake light would come on/off, but the brakes seemed fine. so there, i’m thinking as the dist bit by bit was retarding & vacuum dropping, it 1st caused that warning light?? maybe, maybe not. But bigger than that and definitive, next the car soon started idling very low at lights where i had to brake torque or shift into neutral to avoid dying out. This was not the case prior. again, looking back it makes sense now. Then next, the big issue of further distributor retard w/o me knowing it and the high temps and boil overs began with each drive 3 diff times.
This is verified by the fact that when i went to replace the giant dual advance canister with the new single port small unit that Bill suggested to me, I needed to move the dist around to remove the old unit, but the bolt was already broken loose. not sloppy loose, but it was not tightened down as should be when you’re done. so all of this slowly took place on it’s own over the course of 3 different drives and ultimately drastically lowered the timing (again as Bill suspected), which caused the issues and explains all the symptoms that weren’t there prior as well as the boil over/overheating due to the messed up combustion situation.
At this time so far, it appears these issues should all resolve once everything is dialed in, but i’m now concerned about any damage as it was extreme heat and pressure 3x times forced onto the motor, gaskets etc. so all i can do is hope that those things will be OK. any experience or thoughts on this potential now or future damage i’d love to hear it.
Also soon as i know she’s running normal temps stable, I have fresh oil & filter ready to change out and nearly all the coolant will be brand new too.
I’ll update again the next time the fans stay on so i can run her for like 20-25 min, finish with the timing and tune the carb’s idle mixture screws so i can get that down to about 750-ish. Any other thoughts, input im all ears, but that’s the next step plan for now. appreciate you all here👍
OK guys, went out to the garage after work on the dead fan. there was a short on some of their wiring from the coolant eruption (no waterproof connectors, found twisted wires under loose tape. grr🙃) dry off, quick temporary connector & replaced blown fuse for now until complete rewire. Both fans running again so tomorrow will adjust the throttle linkage to help bring down that ↑ idle speed, reset idle mixture screws and set base and total timing. with the new small single port vacuum canister, as i now have clearance to use an alan wrench for real-time adjustment. will follow up with results✅
Engine vacuum has nothing to do with the brake warning light activating.
Well thank you for confirming this. and thats why i said maybe, maybe not. as in this case i was not sure because i have power brakes and booster. and it coincidentally happened at the same time as all of this. thanks again.
Switch for the brake warning light is in the distribution box and indicated loss of fluid pressure somewhere in the system. If there is a loss of vacuum to the brake booster, you will have a very firm pedal.