This is an original set of engine compartment headlamp vacuum hoses. The tubing was still good but the stripes were nearly gone after I cleaned it with wax and grease remover. So I masked off the stripes and re - sprayed them.

The smaller hoses were no good as a result of being oversprayed too many times. So I bought new tubing from the auto part store. I put several pieces of .035" TIG rod inside to keep it straight. Otherwise it tries to coil up, which makes it hard to mask.

There are actually three colors used originally. The original white striped hose was still perfect so I did not have to repaint it.

First the tubing is cleaned thoroughly with MEK to remove any lettering and mold release agents. I put a 3/16" piece of tape where the stripe will be. Then mask each side using 3/4" masking tape. Then peel the center and spray.


Reassembling the vent windows today. I will show one of them since the process is the same left - right. I highly recommend having yours re - plated. I have had the reproductions and while they can be made to work it takes a lot of effort and the results are not ideal.
First step was to snap the vent window seal in place. Then the freshly polished stainless rear channel can be mated to the freshly re - chromed main piece. The frst step is to install the single #8-32 screw at the top.
Next we have to install the two steel 1/8" pop rivets at the bottom. The channel is too narrow for my pop rivet gun so I had to grind down the sides so it would fit. That was 35 years ago.


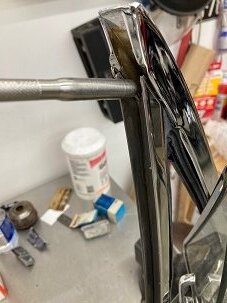
Once the channel is secured the seal has tabs that need to be bent over to secure it. All the tabs are bent upwards. You need to hold the seal firmly in place while bending each tab by pressing against it with something like a screwdriver tip.

The vent window frame is clamped in the vise held by it’s bottom “leg” which is not seen when the frame is installed. The vent window is forced into place, it must crush the rubber enough that the upper pivot can be forced into its socket. As that part takes two hands I don’t have a photo. It’s not hard.
The bottom pivot has a metal plate that goes on first. The long part faces forward.

The lower vent window retainer is installed with the two #10 - 24 screws. Note: None of this hardware is included in the AMK kits so you better save it and restore it.

The spring has a teflon washer on each end so it can move easily.

Here is the spring installed with a steel washer and nut holding everything in place.

Next the channel that holds the window felt track is simply snapped in place. The contour at the top matches the vent window rear channel. The slots match the slots cut in the vent window rear channel.

The “window run” felt channel is next to be installed. At the top for now temporarily install something to align the hole for the screw. I used a hook scribe.

With the window run held in place the rest can be pressed in. I used two thumbs pressing down perhaps every couple inches. It’s hard to get it in place.
Looking at the bottom will tell you if it is seated all the way or not.

Once you are satisfied that the channel cannot be inserted any further it’s time to install a screw at the top. Surprise, the original screw won’t fit the reproduction window run. You have to make a new one from a #6 self tapping sheet metal screw. Cut it to 3/8". You can’t use an off the shelf 3/8" screw because the taper won’t catch the metal in the window run. I cut mine with an abrasive disc in a high speed motor.
The two on the left are the now useless originals. The one on the right has one more turn - just enough to catch without hitting the glass.
The scribe is sticking through the hole where the screw goes.


The “Very front of vent window” seals are installed next. The screws are unlike anything at the hardware store so save them. There are two rubber tips that fit into holes in the door. The seal captures the end of the door perimeter seal.


There is an outer seal that seals between the vent window frame and the door. It needs to be installed with contact cement. So I used a page out of my 9" X 5" notebook to keep the glue off the wrk bench. The seals are overly long so you can tape them to the work bench with the wide sides up.
The vent window frame has a lower recess for these seals. Again masking tape is used - the factory would have simply brushed the glue on.
Once they are installed they can be trimmed to length with a razor blade.


Installing the vent windows in the car is easy. The window is out. The window regulator is cranked to it’s lowest position. The door wiring harnesses are already installed.
The bottom of the window run has an adjustable bolt. I reach into the door and screw it in until there is about 1/2" clearance from the round flat part and the receptacle in the lower window run. There is also an adjuster on the front lower leg of the vent window frame. That one is screwed in to about the same level in a hole adjacent to the hole it ends up in. Someone at Ford apparently realized there needed to be an easy way to do this.

1 Like
With the two adjuster bolts in place the vent window frame can be secured to the door temporarily. It will have to be loose to install the door window later, so no need to fine tune anything yet.
Here I am installing the shortest bolt in the forward upper hole. The longest bolt can be seen in the rear upper hole.

Here I am tightening the longest bolt:

This is tightening the nut at the bottom of the vent window frame on the adjustable bolt:

This is tighteng the nut at the bottom of the window run on the adjustable bolt:

Today the overhead console was at bat. I cleaned it several times with wax and grease remover. It still looked kind of dingy. Apparently who ever owned the car was a heavy smoker. The vinyl was heavily stained with nicotine.

