I finally got the last (backordered) part I needed to complete my EFI install a couple of weeks ago. (The in tank pump /sending unit made for our original tanks)
BLUf, the system is awesome and runs great! Made my cat feel lighter and much more responsive just on the base tune.
Negatives: injectors are a little loud and sound like tapping rocker arms. I can hear the fuel pump whine at idle. With other mods, the original alternator just can’t keep up with amperage/volts required at idle. It drops to 12.2 or 11.9 quite frequently at idle and it needs above 12v constantly to really work correctly.
Positives: no need for a fuel return line with the Holley in tank pump setup. It makes a “self learn table” during driving and idle if the coolant temp is over 160. You can manually import that correction table to the base tune and it will run better for your particular engine/driving demands. It will then learn some more and you can repeat the process to further fine tune the EFI multiple times. No more choke issues. Greatly reduced exhaust smell for my girls. Freaking awesome throttle response! Can perform timing control too if you change the distributor to either a hall effects or magnetic pickup type distributor. (Start with straight fuel management first and later add the timing control so you will have less issues with knowing what thing you changed is potentially giving you problems or needs some adjustments.
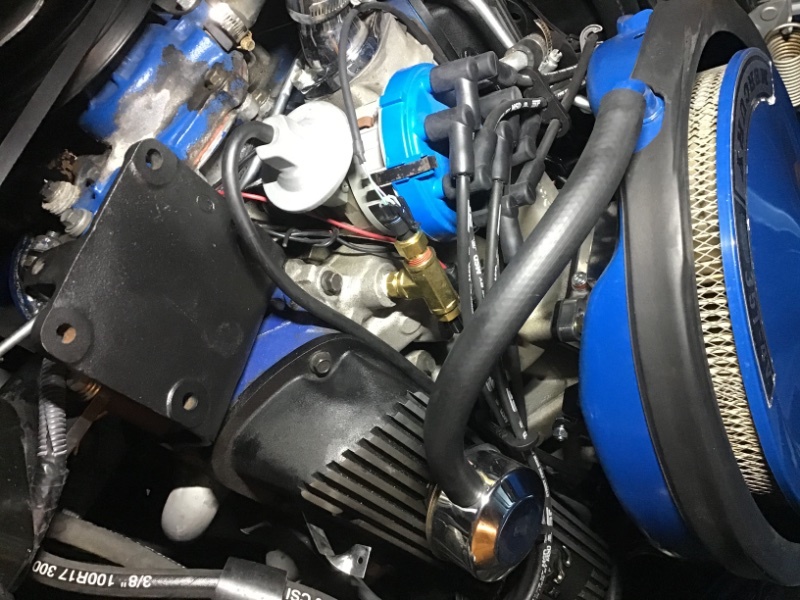
I have a modified duraspark magnetic pickup distributor on mine and it’s curve has been dialed in for my engine from the start (8 years now). I bought the Holley Hyperspark hall effect distributor and their Hyperspark capacitive Discharge type ignition box to use with the EFI for timing control in the very near future. ( will let you know how that goes too)
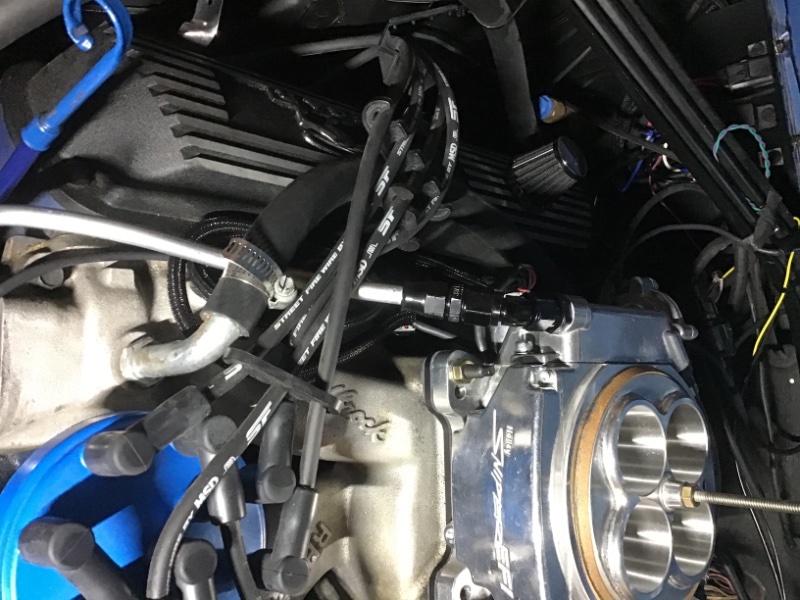
Install quirks/issues/things to know: must avoid electrical and radio interference with the sensors and ECU. Use a clean +12v source in run and crank key position. Use a relay triggered by the original harness wire for the coil+ And powered from a wire attached directly to the + terminal of the battery. Must also attach the ECU power and negative wires directly to the battery. Must also wire the c/d ignition box wires directly to the battery. (The battery terminals are looking pretty ugly and crowded about now)—the fix is to get a battery with both top and side posts to accommodate the extra wires Using the side posts. No fuel return line is required if you have the holley in tank pump/sending unit as it does the return internally…otherwise you have to run a return line. Need to drill a hole and weld an oxygen sensor bung into your exhaust pipe just past the collector. Must bend up a 3/8 hard line to run from the fender apron hard line/fuel filter rubber line up to the Sniper unit. (I won’t use a rubber line going up on the motor as it’s a fuel leak/fire just waiting to happen) Must route all your wires away from plug wires and alternator area to avoid EMI or dirty electric interference. I went ahead and used a 1/4” spacer under the sniper unit because I am running a dual plane intake and a lot of times you will get an annoying whistle and run issues without a spacer on that type intake from everything I have read.
As far as the electrical load goes, i am upgrading to a 3g 95 amp alternator from https://www.paperformance.com/ with internal regulator and using an external adapter harness to do that. Why? Because of the low voltage at idle issue. I upgraded to halogen headlights, I have a self contained subwoofer/amp box in the trunk, convertible top pump, electric fuel pump, new c/d ignition box…you get the point. And, by the way, only the fuel pump was running with the ECU at the time of the low idle voltage. Idle is set at 680 because that is where I like it. If I bumped it up to 725 it would fix the low voltage issue until everything else was running and then my original alternator would die a much quicker overtaxed death in the near future.
Whew, I think that is enough for now. I will keep y’all informed on the timing control upgrade and how it runs with that in the near future. Hope this helps someone thinking about converting to EFI. So far, it’s worth doing in my opinion.
Thanks feedback and tips, I literally just ordered most of what I need to install on my dads mustang so this will be helpful. I also have this on my shortlist for my car as well and have already been making upgrades to support the efi install such as the alternator, battery terminals and external relay/fuse box.
Great feedback, get ready for the next jump in drivability with the ignition control. Although it will be less dramatic with a recurved distributor, it will be noticeable
I’m excited to install a couple of these. I choose to go with the full setup as well, distributor and cdi box to make timing control easy. I was hoping to keep all the msd stuff on my car since it all works but from what I’ve researched it’s just not worth trying to make it work. The cost of the hyper spark stuff is not all that bad.
I am interested in what you did for the line from the frame to engine. I do not want to run rubber line there either and planned on having to bend up a line or run a flexible stainless braided line. Just unsure how to connect to the current hardline but thinking there has to be a fitting for that.
I got a 5 ft 3/8 steel line from the parts store, taped up one end and packed it full of sand and then taped up the other end. This allowed me to custom bend the line without kinking or flattening it. I started with one of the flared ends near where the old manual pump attached to the block and worked my way up to the front fuel inlet area for the Sniper. Use an old metal coat hanger or other stiff wire to bend up as a template first. Cut off the excess near the Sniper inlet so you can use the flare end at the old fuel pump area to act as a nipple for the fuel injection rated rubber line coming from the fender apron steel line from the tank. Put a fuel filter in between both steel lines. Napa 3482 filter is what you need.
I used a 3/8 compression fitting to 6 AN female. Screwed that into a 45 degree male 6AN fitting that screws into the Sniper fuel inlet. Had to use the 45 degree fitting in order for the line not to interfere with the original air cleaner base.
It goes without saying that you have to thouroughly clean the sand residue out of the new bent up line before installing it.
I’m thinking about this setup next year…depending on how well my intake/carb intake swap goes this spring. Looks like an easy install while keeping a relatively stock appearance.
My Blue Thunder dual plane intake already has the the plenum divider milled down a bit, so I may not need a spacer.
I wish the Sniper system had O2 sensors for both sides though…would be more accurate in adjustments.
Distributor notes: got the hyperspark distributor for the 351w and it comes with a cast drive gear which works for a stock style flat tappet cam. I have a roller cam that requires a steel gear. Ordered one from comp cams (my cam manufacturer)
I used my 20 ton shop press to press off the cast gear and press on the oven heated new steel gear. Tried to use the roll pinned collar on the shaft to press against and naturally severed the roll pin on it. Had to press both the new gear and collar off to get the severed roll pin out. Pulled the cap and rotor off and pressed against the top of the shaft to press the collar back on with no issues. Tried pressing on the new steel gear which was now cold and contracted back to a smaller size and ended up bending the top shaft tip where the rotor is supposed to slide on.
Pressed the steel gear back off to see if I could order a new shaft or maybe I will try to re-heat the gear and press it back on and then chuck the whole thing in my drill press to shave a little off the top sides of the shaft where it bent a little to see if it will accept the rotor again. Very expensive mistake if I cant fix it or get a new shaft.
I’m kinda suprise they won’t give you an option on the gears. I was not able to find anything but a cast gear but upon looking at the paperwork it mentions a part number that comes with a steel gear? I have not looked up that number yet and I don’t have it in front of me. Does yours show the same?
I’ve read alot of guys end up sending them in to get the gears swapped out as they can be a pita to do yourself
Lol, yes I thought about residual sand too. I just let it gravity feed out the majority then blew it out with compressed air and then flushed it with brake cleaner and more compressed air.
If anything was left, it hasn’t noticeably affected the EFI.
These are very handy to have around too when working with bending lines, sand definitely works and is an old school trick when you dont have a tool for it.
Yep, I have one from Eastwood that I used to make the hardline for the old carb set up and it pulled the main pulley shaft out of it…that’s why I went old school on this one.
Glad you’re having good luck with it, I absolutely love the Sniper on my car. After I tweaked the tune a bit the drivability and responsiveness got really good.
Daryl,
I installed the Hyperspark distributor on my 1969 351W. The distributor Holley has for a 351W is NOT for a Cougar, it’s for a truck and it is two or so inches too tall and will interfere with the stock air cleaner. I had to use a 14" round air cleaner, which was not part of the original plan.
Not sure if this is an issue with any other size engine, just a friendly heads up.
Good Luck.
Jay
Few questions. 1: when wiring the sending unit returnless fuel pump 4 wires did you run the 2 black wires to ground or one all the way to the battery like the diagram shows? 2: did you use the original 2 wires going to the sender for the power “blue” wire and gage “purple” wire or did you run the blue wire from sniper harness to tank? 3: where did you put your temp sensor? I’m thinking that i will be putting mine in the intake where current one is and just monitoring temp on the handheld. Don’t see any other spots to put another one. 4: i have the stealth 4150 style sniper and it says to feed both ends or injector rails like a dual feed carb… true? Thanks in advance!
I’m not sure why Holley wants that one ground wire ran all the way back to the battery. I’m using a different EFI tank+pump combo, but I terminated both ground cables to a chassis ground near the tank. This has worked fine on my car.
Blue wire from Sniper goes to Grey wire on pump. I think I only had one wire going to the sender for the fuel gauge (which I connected to purple wire on pump). If you have an XR-7 I think you’ve got an extra wire for the warning light.
Temp sensor in place of the gauge sender in the intake manifold. Accuracy is far more important for the EFI temp sensor, you can move the gauge sender into the port on the thermostat housing.
Grounded to wheel well flange near where the main rear harness comes from the front.
Run the sniper fuel relay blue wire thru the interior with the car main rear harness. Had to extend the blue wire a couple of feet in the trunk. Unplugged the original fuel sender harness in the trunk and used a bullet connector on the new purple sender wire to plug into the original trunk harness yellow wire connection.
Used a brass “t” fitting from ace hardware along with a 1/2” nipple to screw into original temp sender hole. Then screwed original sender into one end and new sender into the other. I don’t like the look of it at the moment, but will paint black to see if it looks better or come up with another solution in the future.
No need to dual feed mine, but if the instructions say to dual feed, you should. I am feeding the passenger side front of mine and the other three including rear regulator /return feed are capped off.
I still want to clean up some wire routing and I am still running my Duraspark distributor.
I messed up pressing on a new steel gear on the hyperspark distributor and slightly bent the top tip of the distributor shaft. I have a new shaft coming for me to try it again.
(Comp cams steel gear inside diameter is about 2 thousands too small and my 20 ton press made it go on anyway which bent the shaft a little) next attempt will be after sanding out at least 1 thousands of ID material, heating up the gear and then pressing it on the new shaft.
I got it warm enough to actually do some self learning on a couple of drives, let it import the new learning info to the base table and she is really running good! I still want a few more learn sessions to really dial it in prior to switching over to timing control.