Your progress looks great!! Your work shows that you have patience, which makes a world of difference. How long did you wait to use the reducer trick? Was the black paint completely dry or was it still wet when you did this step?
Thanks! Good question. I waited until the paint was completely dry. That way, I could put masking tape on the outer edges (as seen in the pics above) to keep the end point of each chrome bar consistent. Also this way I could hold on to the bezel with my opposite hand while rubbing away the paint with the other.
Hey, it’s not a cheap thing. I love the soft glow of the old school incandescents, LED’s are too harsh and bright for my tastes.
That white plug on your SEQ relay is unique, don’t see many of those on the units I refurb. Maybe a '68 thing.
Lookin’ good! Hey, don’t lose heart! Just do one thing at a time and eventually you get it all done ![]()
Just think about driving it next spring, and keep pluggin’ away.
[quoteOnce I got the bezels as clean as possible, I painted over them with no masking, again with SEM Trim Black.][/quote]
Andrew, are the original (factory) bezels all chrome or were they painted as you have done? Thanks (great progress on your car, too.)
Thanks Les, the originals were done like mine, with maybe a teeny bit more chrome showing around the edges of the bars. They probably had a masking jig of some sort to do them quickly at the factory.
Not much new to report, but I am gearing up to get back to work on this thing. Got my original AC evaporator core pressure tested, and it passed the 120 psi test with no leaks, so I’ll re-use it. Also started assembling a heater box. Then once I get a condenser, I can start putting the front end / grille together. Also need to finish cutting out the kick panels and installing speaker cups, which is just about the last thing I need to do before mounting the fenders. I also plan on blacking out the flat inner “ears” on the fenders that go behind the grille / attach them to the core support. I think this will be a nice subtle touch to help the grille stand out. Also on the horizon is interior stuff, trim stuff, rear end (brakes & suspension) stuff, and so on.
Anyway, the main reason for this post is that I finally finished my disc brake conversion video. 'Bout time! Watch on YouTube or below.
Okay, it’s time for an update. I’ve been sporadically doing random things to the car and now have enough stuff for a decent “progress post.”
First of all, I bought a high performance AC condenser, which comes in raw shiny aluminum, with black brackets and drier.

I wanted it all to be satin black, to blend in rather than stick out like a sore thumb behind the grille. So removed the brackets and masked off the drier. Just as I was getting ready to paint, someone decided to set up shop right in the way. Typical.

Painted and reassembled:

And here it is mounted on the car. Really glad I painted it. Also, once the condenser was on, I could install the hood latch / center grille support piece, which I had cleaned up and painted previously. Of course I had to get new bolts / bolts / bolts since that’s such a visible area when you open the hood.

Also got new hood bumpers. Can you guess what’s coming next?

The hood! I’m not super happy with the paint work on it. Once the rest of the major panels are on, it’s gonna need some professional help.

Cleaned up and painted the hood latch and dowel thing so I could actually close it… knowing full well that the paint would get chipped immediately. I suppose plating would be the way to go on these? Zinc perhaps?

Now, here’s another foray into the tiny detail parts. This little clip rides against the hood release handle, to keep it from rattling / scraping on the support piece. Mine was missing, and I scoured the junkyard for a good one. Also it took me a minute to figure out how it works. You have to drive the round pin down with a slightly smaller punch, then the four clips release it. Re-installation is the opposite of course.

Installed, yay!

Ok, here’s another nerdy little thing. This must be why it’s taking me so long to finish the car, haha…
I wanted to slap a Battery OK decal on the apron, but first I had to figure out the date my car was actually built, so it would have that cool tidbit of history on it. So first, I got a Marti Report, which I’ve been meaning to do for a while anyway.

Pretty basic car! It’s cool to see that it was a “retail” order, confirming the story I heard that my grandparents ordered it the way they wanted, rather than just picking one up off the lot. Also interesting that it’s only 1 of 87 with this paint and trim combo. Anyway, this gave me the nugget of info I needed for this little project: my car was built on 6/17/68.
So I wrote that on the sticker, along with a “charge reading” that’s supposedly the proper format, and improvised something for the inspection stamp. I know the stamp probably isn’t quite like what they used at the factory, but to me it looks more official than something handwritten. I used an ink pad from a stamp, a socket, and a couple number punches. I chose 18 because I was 18 when I started driving the car.

And here we go, in its rightful place.

Ok, now another random project. I had my center grille piece sitting on my desk for the longest time, looking dingy. So I finally spruced it up. First was to remove the Mercury man and the background decal. Then I tried to strip the old black paint off with oven cleaner, but it didn’t really work. Also I think the oven cleaner may have accelerated the pitting of the chrome a little, so be careful out there. I ended up carefully masking off the chrome with electrical tape, and lightly sandblasting the paint off. Then did some hand sanding to knock down some of the rough spots.

Removed electrical tape…

Then applied painter’s tape. Not sure why I did the back side like this, other than to avoid painting the back of the center section. In hindsight I wouldn’t do it this way again, since the paint pools up and has nowhere to escape. But anyway, it worked.

SEM Trim Black, of course. Excellent stuff.

Had to do some fine-tuning by hand to scrape away excess paint on some edges after removing the tape. New background decal applied and Mercury man epoxied back in place. This could have been a little cleaner, but it works.

Note on the decal: make sure you test-fit it before peeling off the backing. I’m glad Don mentioned this to me while I was doing this. The decal is a little too big, so I had to sand down the edges a bit before it fit properly.
Here’s a fancy “finished” shot.

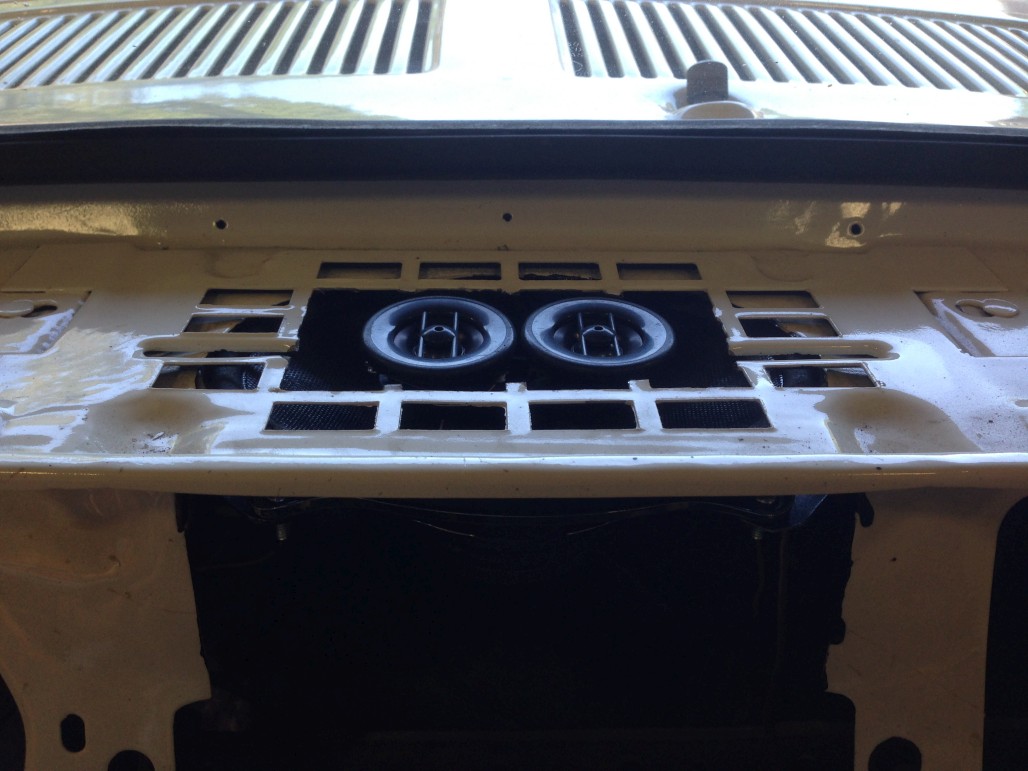
In other news, I’ve been trying to finish up the things that are keeping me from putting the fenders on. One of those things was to cut the kick panels out for speakers. Both sides are now done. Some fine-tuning is needed, and I’ll want to install the “pods” before the fenders go on, but it’s progress.

On a similar note, I chopped an opening in my dash structure for the center speaker. Is that blasphemy? Usually I don’t like cutting or modifying my car for aftermarket stuff, but somehow this one didn’t really bug me. I went with one of these dual voice coil speakers, which wouldn’t have fit without modification.
Finally, here are a couple cool before-and-after shots of the front fender splash shields. Same concept as the rear ones - removed staples and rubber, blasted and painted brackets, reinstalled rubber through same holes with wire.


The problem is, the old rubber is so brittle, it could crack and break pretty easily. Since doing the one on the right, I removed the rubber from the other one and it broke in half. So, I’m going to make new seals out of 1/16" Buna-N rubber and replace both sides for good measure. Pics coming soon, whenever I actually do that.
Note: the rubber seals are reproduced, but they’re for Mustang, meaning the shape is different and they wont fit correctly in Cougar fenders.
Coming up next, heater box stuff!
Alright. This next undertaking is something relatively major that I’m glad to have (mostly) behind me now. We’ll call it the HVAC system.
I basically rebuilt all the under-dash stuff, starting with the heater box. Unfortunately, my original heater box was cracked and broken in several places, so I had to piece together two decent used halves from different cars. I cleaned up and painted both halves so they would match and look decent, then proceeded to replace seals, install a new heater core with new end caps, install my original evaporator core (which I had pressure tested at a radiator shop), and put in a the little brackets and flappers which I had also cleaned up and painted.


Then I could start putting on the vacuum actuators and other external pieces.

I still had to make a few repairs to the fiberglass. Since I’m clueless about fiberglass work, I opted for JB Weld. This corner was cracked:

Smoothed out and painted. Not super purty, but better than being cracked and weak.

Several of the clip recesses were also broken from improper clip removal technique. Here’s one sample repair with JB, and a straight section of paper clip for reinforcement (which you can’t see since it’s covered in epoxy…). My goal was basically just to rebuild the “lip” that would allow the clip to grab on to it.

…and here’s a terrible “after” shot, after smoothing down the excess epoxy and squirting some paint on it.

It was right around this time that I realized that there’s no such thing as a good used evaporator seal (the rubber grommet that fits into the heater box and encloses the two evaporator lines). As a result, I also realized that WCCC didn’t carry this reproduced product. One squeaky wheel later, we now have the 67 - early 69 version as well as the late 69 - 73 version.

And yes, that’s my heater box I used for the product photos. Here’s another glamour shot of the box, just for fun. It’s basically done here.

Lastly, since the two halves from different cars didn’t fit together so great, I used some rope seal stuff to make up for the gaps. Again, not the prettiest thing in the world, but it should be functional.

Finally, the heater box was done.
Next I had to tackle the blower assembly and center vent duct thing. Again, I had one half of my fiberglass shell, but the other half vanished after I handed it to the body guy for fiberglass repair. So, I scrounged another half and mated the two together. But first, I took apart the original blower motor, blasted and repainted the “squirrel cage” aka fan, and cleaned & lubricated the motor internals. I put it back together, tested it, and it works like an absolute champ. It used to be a little noisy, but now it seems quiet and powerful. I was so proud of myself, I had to take a video clip.
https://www.youtube.com/watch?v=zdQcO-FafK4
Naturally I had to clean up the flappers too.


Of course the donor fiberglass shell half I found wasn’t perfect, so I embarked on another epoxy repair. I ran out of normal JB Weld, so I used some leftover “clear weld” stuff that basically serves the same purpose. A little masking tape provided support:

Expoxy after hardening, tape removed. Eeew.

Smoothed out and hole re-drilled:

…and painted over to blend in. Again, not perfect, but this gets covered by the lower vent piece anyway.

All assembled! I re-used my original resistor and vacuum actuator, still good as far as I can tell. When reinstalling these actuators and flappers, it does take some fiddling around to make sure they’re going to move back and forth freely.


These two halves didn’t fit together so well either. It was a struggle to get the “lip” lined up all the way around and clip it together. I ended up not using rope caulk this time. I tested the blower and felt for any air leakage around the seam, and felt none. So it should be good 'nuff.

Okay! On to the center vent duct piece. This guy also has a flapper, which is what decides whether you’re going to use defrost or the dash face vent. There’s a foam seal on this flapper, like most of the others, but mine was toast, and the heater box seal kit didn’t include one (even though it did include the seal for the defrost duct). So I made my own, using sticky-backed foam from the craft store (suitable for ages 3+). This stuff is surprisingly similar to the material you get in the heater box seal kit.

And now here’s the assembly put together.

Put that onto the blower assembly, and behold:


Looks pretty cool, I think. Now, FINALLY, it was time to put all this crap up under the dash. This is what prompted me to install that dash speaker, by the way. Definitely wanted to do that first. Anyway, here’s an overall shot where you can’t see much, but it’s all in there:

I put the blower assembly in first. Don’t know if it’s just me, but the upper bracket for this is a real pain to get to.

Then I realized (through much trial and error and cussing while contorting myself in painful positions under the dash) that I’d have to loosen the blower assembly in order to shove the heater box in place. Eventually, I got it all in without breaking anything, and even hooked up all the little vacuum lines and wires. My under-dash harness was never removed, nor were the AC controls and vacuum lines. With a little help from a manual, it was easier than I thought to figure out where all the lines go. The colored stripes were still slightly visible on the hoses, and some of them were obvious due to length and shape.

Engine bay view. I still need to put on the rubber seal and cover plate, but that should be a snap. I also need to put the drain hose on the heater box.

Phew! Now you can see why I’m glad to have that saga (mostly) behind me. It was more of a marathon than I expected. But now I can hook up heater hoses and start figuring out the rest of the AC system. Also I can now do the rest of the under-dash ducting, and install new AC vents. After that I should be able to start refurbishing the dash stuff that you can actually see. That’ll be fun.
That’s all for now folks! The Cougar shall ride again…
Looking good Andrew.
Note on the decal: make sure you test-fit it before peeling off the backing. I’m glad Don mentioned this to me while I was doing this. The decal is a little too big, so I had to sand down the edges a bit before it fit properly.
Here’s a fancy “finished” shot.
Andrew, Is black the correct color for the insert on a polar white car?
Black is the correct color for the insert on every 67 & 68 Cougar.
So why do I keep finding white ones? Reproductions??
Nope. They are faded. I’ve seen some fade to gray, some to white and some to pink but they were all black to begin with.
Awesome update, Andrew!
To replicate the black oxide? look on suspension and other parts without painting, many professional restorers are using gun blue as used on firearms.
Jeff Speegle describes the process on a drive shaft here: http://www.concoursmustang.com/forum/index.php?topic=13.msg41#msg41
Eastwood sells phosphating solution (a kit of a jar and a bottle of green phosphoric (and what else?) acid). Works great, I used it on a TON of Isabel’s fasteners. I follow up the phosphating with matte clear to simulate the oil and keep them nicer longer.
The gun blue sounds right for weld heat bluing (like on driveshaft), not sure it would look right on bolts and such.
Andrew,
I just finished reading through the entire project thread. Wow, inspiring. Awesome work and attention to detail. I’ve owned my '68 for 28 years and have yet to begin the type of resto that you’ve undertaken. In fact, I’m just working on getting mine back to basic operational status all after 19 years in storage. Sometime soon, I hope.
A couple of questions:
The August '14 open house photos (pg 16 of the thread) exhibit some stellar looking wheel covers. Did you recondition them? If so, I’d love to see a post (or video) on your process and the materials used, especially those Walking Cat center medallions.
Also, are you planning to pin stripe after all the body panels are reinstalled and aligned?
I’ll be in the Bay area for a conference later this month and may have an opportunity to spectate a little at this year’s Western National Show. Maybe Snowball’s ready to attend, too?
Cheers,
Thanks Nate! It’s been a long, daunting process and sometimes I feel in over my head, but it’s getting there! It’s been almost 4 years now since I was last driving it around, and the memory of being behind the wheel is part of the motivation to finish. That said, I’m slow and methodical, and don’t always dedicate enough time to work on it. So it takes forever.
Answers: The wheel covers are just really nice originals I got at WCCC. I’ve also tried in vain to find someone who can reproduce the red center medallions. If I got my hands on some, I’d find a set of non-scratched wheel covers with good chrome, redo all the black paint and stick new emblems on. I think that would look great, to me the hubcaps and whitewalls look classy. Plus most people go with styled steel wheels or Magnums or whatever, it’s actually pretty uncommon to see a car with nice hubcaps anymore, which makes it kinda cool IMO. Depends on the personality of the car of course.
Yes I will definitely pinstripe the car when it’s ready for that. I may either use one of those tape-on templates and paint them on myself, or have a pro do them by hand.
I’ll be at the show, but the Snowball will not. ![]() Still got a ways to go.
Still got a ways to go.
Well I think I’m past due for a random update… most of these things happened months ago, I was just too lazy to post! Let’s get up to speed now.
Picking up where I left off, I was getting ready to put the fenders on, which meant I had to finish with the kick panel speakers first. I finished off the holes in the sheet metal, threw a little paint on the bare edges, and installed the aftermarket buckets and speakers.


Generous amount of sealant for good measure…

I have the wires run to the trunk area because the current plan is to use an amplifier. I’m going to see if I can make some kind of mounting plate to attach the amp the the underside of the package tray without creating any new holes in the car. Will cross that bridge later.

I also had to fix up my LH front splash shield. The rubber was much more brittle than the other side for some reason, and broke into a few pieces when I took it off the metal bracket. So I ordered some sheet rubber online and made a replacement.


The new rubber was the right thickness, but not as rigid as the original stuff. I did some research and picked the one that sounded the best for this application… there are a lot of different types of rubber! I don’t remember now what type it is, but feel free to chime in if you know what the proper type of rubber would be for this. I didn’t use the reproduction kit because not only is it for Mustang, thus shaped incorrectly for the Cougar, but the rubber is even thinner and floppier. It sounds like a Cougar version may be in the works, which would be great, but for the time being I think my solution will work fine.
Anyway, test fitting onto the [sandblasted] bracket so I could poke through the staple holes to reuse them:

And fastened in place with wire after painting the bracket:


Next, it was time to get the fenders themselves ready. I wanted to undercoat the inside of the fenders for good measure / original-ness, so I embarked on a journey of masking the entire outer portions so I could do just that. This took a while. The giant piece of foam was a lifesaver, I highly recommend having one around.

Then carefully set it down outside to do the undercoating:

Next I revealed this front flange and refined the masking on the leading edge, so I could paint this area semi-gloss black. I know it would have been body color originally, but my thinking is that it will look cleaner behind the grille if everything is blacked out.

Ta-da:

Unmasked and pretty:


… and then did the same thing to the other fender, of course. Guess I don’t need to show you those pics. You get it.
Now it was time to put them on the car! Kind of exciting to put such big pieces on.

But first, don’t forget these clips (I used this kit)


…and also a line of goo, kinda like factory, to seal the fenders to the aprons. Same 3M “strip caulk” I’ve been using all over the place.

Fast forward after some fiddling around, trying to get it lined up to the door and hood, going from one end to the other snugging bolts down, and:


Gaps looking decent, for a noob:

Repeat process on the other side:

Another look at gaps:


Yay! It looks more like a car now. Pretty cool to see it with most of the major panels on, finally. Speaking of major panels, next up was the trunk lid. Given the issues I’d had with my painter, whose current whereabouts is unknown, I decided to just paint the hinges and rods myself. The Duplicolor “perfect match” Wimbledon White is a pretty good match for Polar White (same color code) so I picked up some rattle cans and primed, painted, and cleared these parts. They came out pretty good.
Sandblasted:

Done:

Installed:


Definitely scratched my paint up trying to install the rods… will have to touch these areas up. The rattle can paint is probably not as durable as real automotive paint.

Meanwhile, here’s the bottom side of the tunk lid, before and after installing the latch and weatherstrip.


By the way, notice how I got a little overzealous with the weathersrtip adhesive? Anyone have any tips on how I can clean that up without messing up the paint? A solvent perhaps?
Finally, here it is on the car. I ended up laying in the trunk with a socket and flashlight to adjust the hinges while a helper made adjustments to make sure it was on straight / even gaps.

So… remember how I had the rear window channel patched with 2 different used pieces? (This was before the new patch panel was available) Well, I just found out that the contour wasn’t quite done right, so the forward edge of the trunk lid actually sticks up a little. Bummer.

Anyway, how about a little educational segway about trunk lid installation? This is a short video I made on how to install the torsion bars, using this tool. Also I show which side is which (the bars are side-specific) and mention the anti-rattle strip.
https://www.youtube.com/watch?v=ZcWw41MlPcA
So… that was back in June, and that’s basically the last major thing I’ve done. Wow… I’ve been slacking!
I hope to have more updates soon, but we’ll see if that actually happens. One of the current things I’m working on is polishing the stainless window frames for the side windows. Still need to do some sanding, buffing, and reassembly… then figure out how all the mechanisms and stuff go in the car. Luckily there are plenty of other Cougars nearby to look at. Until next time!