It looks like my 1970 has 1969 Radiator mounts, then.
Well, as it turned out the build sheet on the drivers floor pan was a blank - had no printed data anywhere. The real one was taped to the drivers door under the door panel. Most of it was missing, but the small piece that remained cleaned up great in mineral spirits. Very cool that your build sheet was still there and cleaned up so well - especially knowing your history with that car.
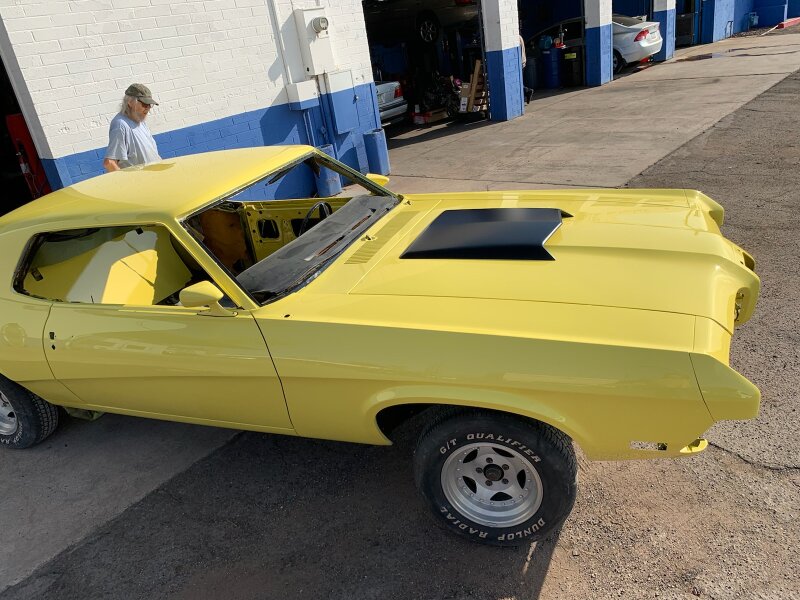
Here are some photos of Project “Freddy” in it’s nearly complete painting stage. Jorge wanted to take it out into the sunlight to get a better feel for the paint color under natural conditions.
In these photos, the hood scoop has not yet been bolted on and the stripes will come before affixing the hood scoop.


She’s looking sharp. You must be getting excited about getting her done.
This is one of the most memorable and exciting steps in putting a car back together.
Small world, this is around the corner from my shop which is also in the same neighborhood my car got painted in! I recognized the Costco and ranch market sign!
Just behind the Costco Business center on Indian School and 35th Ave (shop on Grand Avenue); Arizona Collision Services, Jorge (pr: George) Sommerer, proprietor. He is a master color blender and he has relatives working in the paint business.
Lookin good!
From now on everything is going to make it one step closer to being driven again. Looks very nice!
Good to know for future reference.
My shop is on 35th just south of Indian school on Clarendon.
Awesome! Looks great Chuck!
Here is a question about the door trim that holds the rubber seal onto the body. The seal that is between the window glass and the body inserts into a channel of stainless steel trim. I have both channels removed and am ready to reinstall but there is a gooky backing on the body side of the trim piece. It appears to be a cork/asphalt material on top of a one-sided sticky strip which holds it onto the trim piece. On second look, there are places where it appears that the material is just old, tired foam rubber. It is very difficult to remove and any hints, tips or tricks would be welcome.
From a previous job on another nameless Ford product, I obtained a roll of some cork/asphalt on one-sided tape and have more than enough to do the trim, if this is what was used originally. This is the channel that attaches to the upper body door frame and holds the window rubber seal in place that the windows contact when the doors are closed and windows rolled up.
Thanks in advance,
Chuck
So I forgot to ask the real question after typing all of that descriptive BS above.
How do I remove this mess from the stainless fitting?
What do I replace it with prior to reinstalling into the body door frames?
Thanks in advance,
Chuck
Tuesday, I got my Cougar back from the body and paint guy (who is also doing almost everything else, too). Anyway, it is now living at the shop where my business is located. Now to put it back together! The car started out as Project Freddy and is now just Freddy (Cougar, not Kruger).
Here it is just before touching down!

And here it is nestled in “the clean room” within my shop. All of that “stuff” on the rack to the left is everything to go back on. The engine and trans are sitting in front of the car and will be installed shortly. Following all of the major weight going back onto the chassis, the final body alignment and striping will be completed.

More progress to follow…
Congratulations on getting her back, she looks very nice. ![]()
Most of it will peel right off. I use scotch brite and Wax & Grease remover to get the rest. Wearing rubber gloves of course.
WCCC offers the same product peel & stick to install.
I had a devil of a time getting that old stuff off of there. I ended up blasting it off with a pressure washer which leaves dozens of sticky little balls all over the driveway. Most of the original backing is still stuck to the aluminum so there it will stay. I did get the new foam backed tape from WCCC and I’ll use that instead of the cork/asphalt stuff that I have.
Thanks all,
Chuck
Chuck, that’s awesome! Glad you have it home again already!
Hope to see some pics of you cruising around in it soon!
Acetone will dissolve almost anything when other solvents fail. Top cat is looking really good!
Here’s another little question: I am reinstalling the trunk/luggage compartment lock cylinder and I need some help in getting the TRUNK LOCK CYLINDER RETAINER CLIP under the cylinder. I have tried wooden block and mallet (gently, of course) but will not slide into place on the lock cylinder on the inside of trunk lid. Maybe I’m trying it upside down?
The TRUNK LOCK CYLINDER RETAINER CLIP has a tang at the closed end of it, presumably to push against. What is the orientation of the tang when properly installed? The tang extends toward the front of the car, to the rear (like against the inside of the trunk lid metal)???
Thanks in advance,
Chuck
Today the back bumper was reinstalled…

Looking pretty good so far?